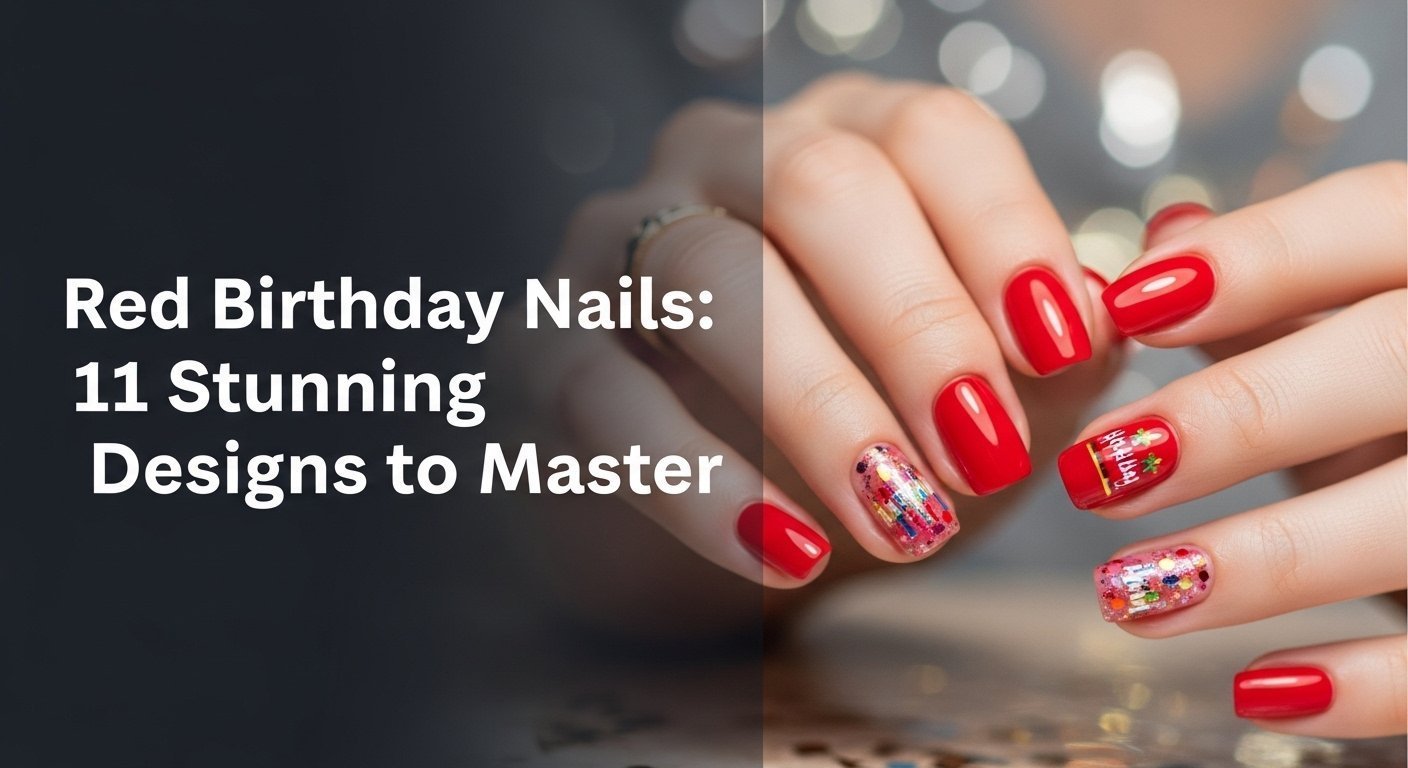
Struggling to choose the perfect nail look for your big day? You want something that feels special, powerful, and unapologetically you, but scrolling through endless options is overwhelming. It’s time to stop searching and start celebrating with red birthday nails.
Choosing red nails for a birthday is a declaration of confidence and main character energy. This bold, vibrant color is psychologically associated with power, passion, and celebration, making it the perfect shade to signal that you are the center of attention on your special day. It’s a timeless, festive choice that complements a wide range of outfits.
Drawing from proven techniques and current style trends, this guide will walk you through the most stunning red nail designs for 2026. You’ll discover everything from classy and chic looks to bold and baddie-approved styles. Get ready to find the perfect manicure that makes you feel unstoppable.
Why Are Red Birthday Nails the Ultimate Power Move?
Choosing your birthday manicure is more than just picking a color; it’s about setting the tone for your entire celebration. When you opt for red birthday nails, you’re making a statement. This isn’t just a manicure; it’s a power move. The color red has long been a symbol of confidence, energy, and passion. It’s the color of stop signs and red carpets for a reason—it commands attention. By choosing a bold red birthday nails look, you’re embracing that spotlight and channeling your inner main character energy. It’s an aesthetic choice that requires no explanation, as it inherently symbolizes celebration and self-assurance, perfectly complementing any birthday outfit or party theme you have planned.
Red Birthday Nails: 11 Stunning Designs to Master in 2026
Ready to find your perfect match? We’ve curated 11 of the most stunning red birthday nail designs to inspire your look. Whether you’re a fan of long acrylic nails, love the durability of gel polish, or prefer the convenience of press-on nails, there’s a design here for you. Each style uses different tools and techniques, from dazzling rhinestones and metallic chrome powder to artistic blending, ensuring you can find an option that fits your personal style—be it classy, baddie, or simply chic. Let’s dive into the ultimate birthday nail inspo for 2026.
1. Style Classic Red French Tips

Pin this timeless look to your ‘Birthday Glam’ board!
This look takes the timeless sophistication of a French Tips manicure and gives it a celebratory twist. Instead of classic white, a vibrant cherry red tip offers a pop of color that is both elegant and festive. It’s the perfect choice for a classy red nails look that feels polished and intentional, working beautifully on almond nails or softer square shapes.
Products & Tools Used
- Sheer Nude or Pink Base Gel Polish
- A highly pigmented, cherry red gel polish (non-runny formula)
- Fine-liner nail art brush (3mm or 5mm)
- Glossy, no-chip top coat
- UV/LED nail lamp
Application/Styling Steps
- Prepare nails by filing to your desired shape (almond or soft square works beautifully), pushing back cuticles, and buffing the nail surface.
- Apply one to two thin coats of your sheer nude base color, curing for 60 seconds in your UV lamp after each coat.
- Paint the tips: Pour a small amount of the red polish onto a palette. Dip your fine-liner brush and carefully paint the French tip, creating a clean “smile line.” Cure for 60 seconds.
- Finish with a layer of glossy top coat, making sure to cap the free edge to prevent chipping. Cure for a final 60-90 seconds.
- Moisturize with cuticle oil for a salon-perfect finish.
Pro-Tip: For a perfect smile line, I find it’s easier to paint the two sides first, meeting in the middle, rather than trying to draw one continuous curve. This expert nail tech trick ensures symmetry.

2. Create Baddie-Approved Red Chrome Nails

Save this baddie aesthetic for your 21st birthday look!
For a high-impact look that screams confidence, nothing beats red chrome nails. This futuristic, mirror-like finish is achieved using a special chrome powder burnished over a gel base. The result is a liquid metal effect that’s undeniably bold and perfect for a “baddie” aesthetic. It’s an especially popular choice for long red stiletto nails or coffin-shaped red acrylic nails.
Products & Tools Used
- Black or dark red gel polish (as a base color)
- High-quality metallic red chrome powder
- A “no-wipe” glossy gel top coat
- A separate gel top coat for sealing
- A silicone applicator or eyeshadow sponge
- A soft, fluffy brush for dusting excess powder
Application/Styling Steps
- Apply two coats of your base color (black makes the red chrome pop most intensely), curing after each.
- Apply a thin layer of the “no-wipe” top coat and cure for only 30 seconds (or as directed by the manufacturer). The surface should be cured but still slightly tacky for the powder.
- Design the chrome effect: Using your silicone tool, pick up a small amount of red chrome powder and burnish it firmly onto the nail surface until it becomes a mirror.
- Style the finish: Gently dust off all excess powder with your soft brush. Pay close attention to the cuticle area.
- Finish and seal by applying your second, separate top coat over the chrome layer. Cap the free edge and do a full 60-second cure. This prevents the chrome from chipping.
Pro-Tip: The key to a perfect chrome finish is the curing cycle of the no-wipe top coat. If you over-cure, the powder won’t stick. If you under-cure, it will look glittery instead of metallic. In my salon, we test our lamp with a 30-second cure time first.

3. Embody Elegance with July Birthstone Ruby Red Velvet Nails

A perfect July birthstone tribute! Pin this for your birthday.
If your birthday is in July, this one’s for you. July birthstone nails are a meaningful way to celebrate, and the ruby red velvet trend is pure luxury. This effect, created with a special magnetic polish often called “cat-eye” polish, gives a deep, plush texture that shifts in the light. This deep red manicure is moody, sophisticated, and a unique alternative to a simple gloss or matte finish.
Products & Tools Used
- A ruby red “cat-eye” or “velvet” magnetic gel polish
- A strong nail art magnet wand (bar or dual-head)
- Black gel polish (optional, for a deeper effect)
- Glossy or Matte top coat
- UV/LED lamp
Application/Styling Steps
- Apply one coat of black polish for depth (optional), and cure.
- Apply a thick coat of the ruby red magnetic polish, but DO NOT CURE yet.
- Create the velvet effect: Hold the magnet wand close to the wet polish for 10-15 seconds. Hold it steady over the center of the nail to draw all the shimmer there, creating the plush velvet look.
- Once you are happy with the effect, cure immediately for 60 seconds to lock the magnetic particles in place.
- Finish with a glossy top coat to enhance the shimmer or a matte top coat for a true fabric-like texture. Cure for a final 60 seconds.
Pro-Tip: For a more diffused, all-over velvet look, hold the magnet at the tip of the nail and then along each side wall for a few seconds each. This pulls the magnetic shimmer away from the center, creating a unique, light-catching depth. This is an advanced salon grade technique.

4. Apply Elegant Red and Gold Foil Flakes

This red and gold combo is pure luxury. Pin it now!
The combination of red and gold is a classic for a reason—it’s the epitome of celebration and luxury. Creating red and gold birthday nails with foil flakes is an easy way to achieve a high-end look. A rich, deep red polish serves as the perfect canvas for delicate gold foil flakes, which are decorated with the base color and sealed in for a touch of glamour. This design looks particularly stunning on red coffin nails.
Products & Tools Used
- A deep red or crimson gel polish
- Edible gold leaf foil or nail art foil flakes
- A pair of fine-tipped tweezers
- A silicone tool or toothpick
- Base coat and Top coat
Application/Styling Steps
- Apply two coats of your deep red polish to all nails, curing after each layer.
- On the nails you want to decorate, apply a thin layer of base coat or the uncured top coat to act as an adhesive. DO NOT CURE.
- Design with foil: Using tweezers, gently tear off small, irregular pieces of gold foil. Carefully place them onto the wet polish.
- Style the placement: Use the silicone tool to gently tap the foil flat against the nail, ensuring no edges are sticking up.
- Finish by encapsulating the design with one or two layers of top coat. Make sure the foil is completely covered to prevent it from snagging or fading. Cure for a final 60 seconds.
Pro-Tip: To avoid the foil sticking to everything, work on a silicone mat and use a tiny bit of rubbing alcohol on your tweezers to prevent static cling. This ensures hygienic and precise application.

5. Style Simple & Chic Short Red Nails

Proof that short nails can be the main event. Save this chic look!
You don’t need long nails to make a statement. Short red birthday nails can be incredibly chic and powerful. The key is a flawless application of a vibrant, bright red polish and meticulous cuticle care. This simple red birthday nails look is perfect for a minimalist or professional aesthetic, proving that a clean, classy manicure is always in style.
Products & Tools Used
- A high-quality, opaque bright red polish (vermillion or fire engine red)
- A good base coat to prevent staining
- A quick-dry, high-shine top coat
- Cuticle pusher and nipper
- Nail polish remover and a clean-up brush
Application/Styling Steps
- Prepare the nail meticulously. On short nails, clean cuticles are everything. Push back and carefully trim any hangnails. Shape the nail into a neat square or “squoval.”
- Apply a thin layer of base coat to protect your natural nail from the powerful red pigment. Let it dry completely.
- Paint using the three-stripe method: Start with one stripe down the center of the nail, then one on the left, and one on the right. This prevents streaky polish. Apply two coats for full opacity.
- Style the edges: Dip your clean-up brush in nail polish remover and run it around your cuticle line for a razor-sharp, professional finish.
- Finish with a glossy top coat for that long-lasting, “wet-look” shine.
Pro-Tip: The secret to making short nails look elegant is leaving a tiny, hair-thin gap between the polish and the cuticle/sidewalls. This trick, used by every expert nail tech, creates the illusion of longer, more slender nail beds.

6. Design a Dazzling Red Glitter Ombre

Bring the sparkle to the party! Pin this glitter ombre idea.
For a look that’s pure, unapologetic fun, a red and glitter ombre is the answer. This design blends a nude or red and white ombre birthday nails base into a densely sparkling glitter tip. It’s a festive, eye-catching style that looks incredible on long red coffin nails and is perfect for a night out celebrating. The key is using a sponge to create a seamless gradient.
Products & Tools Used
- A sheer nude or pink polish for the base
- A vibrant red polish
- Loose red cosmetic glitter or a dense glitter polish
- A disposable makeup sponge
- Liquid latex or tape for cleanup
- A smoothing top coat
Application/Styling Steps
- Prepare your nails and apply two coats of your sheer nude base color. Let it dry completely.
- Apply liquid latex around your nail on the skin to make cleanup easy.
- Create the ombre on your sponge: Paint a stripe of the nude polish, then a stripe of the red polish, and finally a stripe of the glitter polish directly onto the sponge.
- Blend by dabbing the sponge a few times on a piece of paper to mix the colors at the seams.
- Apply the design by gently dabbing and rolling the sponge onto your nail. Repeat until you have an opaque, blended look.
- Finish by peeling off the latex and applying one or two thick coats of top coat to smooth out the glitter texture.
Pro-Tip: For an extra-dense glitter tip, after creating the ombre, dip a small brush in top coat and then into the loose glitter. Gently pat the glitter just on the tip of the nail. This professional results technique provides maximum sparkle where you want it most.
7. Paint a Cute Red Hearts Design

Share the love on your birthday! Pin this adorable heart design.
For a sweet and playful vibe, a red heart birthday nails design is a perfect choice. This look is surprisingly easy to create, even for beginners. Tiny red hearts on a milky red and white nails base look both cute and chic. The secret to a perfect heart shape isn’t a steady hand, but a simple Nail Art Dotting Tool.
Products & Tools Used
- A sheer, milky white or pale pink gel polish
- A vibrant cherry red polish
- A nail art dotting tool (or the end of a bobby pin/toothpick)
- Base coat and Top coat
Application/Styling Steps
- Apply two to three coats of your milky white base color until you have a semi-opaque finish. Cure after each coat.
- Design the hearts: Pour a small drop of red polish onto a palette.
- Dip your dotting tool into the red. Create the heart by placing two dots right next to each other on the nail.
- Before curing, use the same tool or a fine brush to drag the bottom of the two dots down to meet at a point, forming a perfect heart shape.
- Cure the hearts for 60 seconds. You can place one on each nail or create a cascade on an accent finger.
- Finish with a glossy top coat to seal in your cute design.
Pro-Tip: The key to crisp nail art is flash curing. After you create a heart you’re happy with, cure it for just 10 seconds before moving to the next one. This prevents the delicate design from bleeding or smudging while you work. This is a standard practice for complex salon grade art.

8. Achieve a Moody Dark Red Wine Manicure

For a sophisticated celebration. Pin this moody manicure.
Perfect for an autumn or winter birthday, or for anyone celebrating a milestone like a 30th, dark red wine birthday nails are the definition of sophisticated glam. Shades like burgundy or oxblood offer a moody and mature alternative to bright cherry red. These deep red nails look exceptionally classy and are best worn with an ultra-glossy finish to give them a luxurious, “wet” look.
Products & Tools Used
- A ridge-filling base coat
- A deep, wine red or burgundy polish (e.g., oxblood)
- An ultra-glossy, “gel-like” top coat
- Nail polish remover and a clean-up brush
Application/Styling Steps
- Prepare a perfect canvas. Dark colors show every flaw, so start with a ridge-filling base coat to create a super smooth surface.
- Apply the first coat of wine red polish. This coat may look streaky; don’t worry. Keep it thin.
- Paint the second coat carefully for a perfectly opaque and even color. Let it dry for at least two minutes.
- Style the edges. Use a clean-up brush dipped in remover to perfect the cuticle line. This step is critical for dark colors.
- Finish with a thick, high-shine top coat to give it that luxurious, “wet” look and protect it from fading.
Pro-Tip: Dark polishes like burgundy can stain the nail plate. Never skip the base coat. For extra protection, you can apply two layers of base coat before starting with the color. This is a key part of maintaining nail plate health.

9. Master Red and Black Ombre Nails

For the bold and daring birthday look. Save this edgy ombre.
For those who lean into the “baddie” aesthetic, red and black birthday nail designs are the ultimate power statement. The dramatic gradient of a red and black ombre is edgy, bold, and unforgettable. This look is especially striking on red long birthday nails stiletto style, where the dark tips accentuate the sharp, fierce shape. An Ombre Sponge is the key tool used to create this seamless blend.
Products & Tools Used
- A vibrant true red polish
- A jet-black polish
- A disposable makeup sponge
- Liquid latex for skin protection
- A glossy top coat
Application/Styling Steps
- Apply liquid latex around your nails to protect your skin. This is essential for dark ombre.
- Paint the top half of your nail with the red polish.
- Paint the bottom half (the tip) of your nail with the black polish.
- Blend quickly while the polish is still wet. Take your makeup sponge and gently dab up and down where the two colors meet until they create a smooth gradient.
- Repeat with a second layer for full opacity, then immediately peel off the liquid latex.
- Finish with a high-shine top coat to meld the colors together seamlessly and add a glossy finish.
Pro-Tip: To get a truly seamless blend, paint the stripes of color directly onto the sponge first, slightly overlapping them. Dab it once on paper to mix, then apply to the nail. This pre-blending on the sponge is a proven technique for avoiding a harsh line.

10. Decorate with Red Nails and Rhinestones

Maximum glam activated. Pin this for a show-stopping birthday set.
When you want a manicure that truly brings the drama, add some bling. Red birthday nails with rhinestones are the definition of extravagant glam, perfect for a milestone birthday or any event where you want all eyes on you. From a single, elegant gem at the cuticle to a fully encrusted accent nail, sparkling Rhinestones adhered with nail glue create a stunning 3D effect on red acrylic nails.
Products & Tools Used
- A matte red gel polish
- A variety pack of clear or red rhinestones
- A wax-tipped gem picker tool
- Strong nail glue or a specialized rhinestone gel adhesive
- A fine-tipped brush for applying adhesive
Application/Styling Steps
- Apply two coats of your red polish and finish with a matte top coat. Cure completely.
- Design your placement. For a full “pixie” nail, apply a layer of rhinestone adhesive gel over the entire accent nail.
- Adhere the gems: Use your wax-tipped tool to pick up rhinestones and place them onto the wet adhesive, packing them tightly together.
- For smaller placements, use the fine-tipped brush to apply a tiny dot of adhesive where you want the gem, then place the gem on top.
- Cure the adhesive gel for 60-90 seconds under your UV lamp.
- Finish by using the fine-tipped brush to apply top coat or adhesive around the base of the larger stones to seal them in without covering the sparkling facets.
Pro-Tip: Never apply top coat over your rhinestones. It will dull their facets and ruin the sparkle. The professional technique is to seal only the base of the gem to the nail, leaving the top exposed. This is critical for professional results.

11. Style Red Nails for Black Girls: The Perfect Shade

Radiant and confident. Pin this perfect red for melanated skin.
The perfect red is out there for everyone, and it’s all about finding the shade that complements your unique Skin Undertone. For red birthday nails for black girls, choosing the right red can create a stunning, radiant effect. A vibrant, richly pigmented red looks absolutely incredible against melanin-rich skin, making the color pop in a powerful and beautiful way.
Products & Tools Used
- For Warm/Golden Undertones: An orange-based or crimson red polish.
- For Cool/Blue Undertones: A blue-based ruby red or burgundy polish.
- For Neutral Undertones: A true, primary red.
- A high-quality glossy top coat.
Application/Styling Steps
- Determine your undertone. Look at the veins in your wrist. If they appear greener, you likely have warm undertones. If they look bluer, you have cool undertones. If it’s a mix, you’re neutral.
- Select your shade:
- Warm Tones: Choose vibrant, orange-based reds like crimson, scarlet, or fire engine red. These shades will make your skin look golden and radiant.
- Cool Tones: Opt for deep, blue-based reds like ruby, wine red, or berry shades. These will provide a beautiful, rich contrast.
- Apply two even coats of your chosen polish for a fully opaque, vibrant finish.
- Finish with an ultra-glossy top coat to make the color pop and give it a luxurious, high-shine finish that lasts.
Pro-Tip: Don’t be afraid of brights! Vibrant, highly pigmented reds create a stunning and powerful contrast on melanin-rich skin. Look for polishes described as “opaque” or “one-coat coverage” for the most impactful color payoff. This is a key takeaway from years of client reviews.

Key Takeaways: Your Quick Guide to Red Birthday Nails
- Red Symbolizes Power: Choosing red birthday nails is the ultimate way to channel main character energy; the color signifies confidence, passion, and celebration.
-
Technique is Everything: A flawless finish depends on the right technique. For red chrome nails, use a no-wipe top coat; for ombre, use a sponge; for hearts, use a dotting tool.
-
Preparation is Non-Negotiable: To prevent staining from potent red pigments and avoid chipping, always use a quality base coat and finish with a top coat that caps the free edge.
-
Match Red to Your Undertone: To find the most flattering shade for your skin, check your wrist veins. Blue-based reds (ruby, wine) suit cool tones, while orange-based reds (crimson, scarlet) illuminate warm tones.
-
Don’t Dull Your Sparkle: When applying rhinestones, use a strong gem glue and apply top coat around the gems, not over them, to maintain their sparkle—a proven technique for a lasting, professional look.
-
Short Nails Can Be Chic: A simple, classy short red nail manicure can be just as impactful as long acrylics when executed with perfect cuticle work and a high-gloss finish.
People Also Ask About Red Birthday Nails
What do red nails symbolize for a birthday?
Red nails are a powerful symbol of confidence, excitement, and passion, making them a perfect choice for a birthday. In color psychology, red is associated with energy, love, and being the center of attention. Wearing bold red birthday nails is a way to non-verbally declare that you are celebrating yourself and ready to be in the spotlight.
Are red nails classy for birthdays?
Yes, red nails are considered a timeless and classy choice for any celebration, including birthdays. A well-executed manicure in a classic shade like cherry red or a deep wine red is the epitome of sophistication. The key to keeping it classy is a flawless application, neat cuticles, and a shape that complements your hands.
How can I make my red birthday nails last longer?
To make your red manicure last, proper preparation and sealing are crucial to prevent chipping. Always start with a quality base coat to help the polish adhere. After applying your color, finish with a long-lasting top coat and be sure to “cap the free edge” by running the brush along the very tip of your nail. This creates a seal that dramatically reduces wear and tear.
What’s the best red nail shade for a 21st birthday?
For a 21st birthday, a bold and trendy design like red chrome nails or red nails with rhinestones is a fantastic choice. These styles reflect the high energy and celebratory nature of this milestone. A vibrant, bright red or a baddie-approved design like red and black ombre also perfectly captures the fun and confidence of turning 21.
How do I prevent red polish from staining my nails?
The best way to prevent staining is to never skip the base coat. Red nail polishes contain strong pigments that can yellow your natural nail plate. Applying one or two layers of a quality base coat creates a protective barrier between the pigment and your nail, ensuring a clean and easy removal process.
What are red velvet nails?
Red velvet nails are a trendy design that uses a magnetic polish to create a textured, light-shifting effect that mimics velvet fabric. The polish contains tiny magnetic particles. After applying the wet polish, you hold a magnet near the nail, which pulls the particles together into a pattern, resulting in a deep, plush-looking finish. Ruby red velvet is a popular choice.
Should I get red or pink nails for my birthday?
Choose red for a bold, confident, and high-energy statement, and pink for a softer, more romantic, or playful vibe. Red nails command attention and are perfect for feeling like the main character. Pink offers a wider range, from sweet and subtle to hot and vibrant, and can be tailored to a more feminine aesthetic. The best choice depends on your birthday outfit and desired mood.
How much do red birthday nails cost at a salon?
The cost for red birthday nails at a salon can range from $30 to $150+. A simple gel manicure in red might be $30-$50. If you opt for red acrylic nails with complex designs like ombre, extensive rhinestones, or chrome powder, the price can increase to $75-$150 or more, depending on the salon’s location and the nail tech’s expertise.
How do I style long red stiletto nails?
Long red stiletto nails are a statement in themselves, so they pair best with confident and glamorous styling. They look incredible with cocktail dresses for an evening party or can add a dramatic edge to a more casual birthday outfit, like leather pants and a stylish top. Complement them with bold gold or silver jewelry to complete the baddie aesthetic.
What are ‘main character energy’ nails?
‘Main character energy’ nails are any bold, intentional, and eye-catching manicure that makes you feel like the star of your own life. Red birthday nails are the quintessential example. This trend is less about a specific color or design and more about choosing a nail look that boosts your confidence and makes a statement for a special occasion.
Final Thoughts on Your Red Birthday Nails
Ultimately, your birthday manicure red is about more than just a color—it’s an attitude. It’s about choosing a style that makes you feel powerful, celebrated, and ready to take on a new year of life with confidence. Whether you opt for a simple and classy crimson or go all out with dramatic festive red nails complete with chrome and rhinestones, you’re embracing the bold energy that red embodies. So go ahead, pick the design that speaks to you, and wear it with pride. Which red nail look will you be rocking for your birthday this year?
Last update on 2026-04-13 / Affiliate links / Images from Amazon Product Advertising API