As the crisp air of March signals the arrival of Halloween, the quest for the perfect festive look begins, and nothing captures the essence of this spooky season quite like a striking set of red Halloween nails. Far from being just a color, red embodies the very spirit of Halloween, from the blood-curdling intensity of a vampire’s gaze to the fiery determination of a mischievous devil. This comprehensive guide dives deep into the world of red Halloween nail designs for 2026, curated from extensive experience in seasonal beauty trends and nail art.
We’ll unveil 10 spooktacular ideas, ranging from classic gory effects to modern, chic interpretations, ensuring you find the perfect aesthetic that screams both ‘spooky’ and ‘stunning’. Whether you’re a DIY enthusiast seeking easy-to-follow steps or looking for professional salon inspiration, we’ve got you covered. Get ready to explore diverse styles, master essential techniques, and uncover expert tips for maintaining your captivating claws throughout the festivities. Prepare to transform your fingertips into a canvas of crimson, establishing unparalleled topical authority in the realm of seasonal nail art.
We’ll traverse themes from the iconic allure of vampire nails and gothic elegance to the edgy mystique of red glass nails and ethereal aura designs. We’ll also explore the powerful contrast of red and black combinations and the convenience of press-on nails for instant festive flair. By focusing on these core entities and their intricate relationships, this guide aims to provide exceptional user value and practical guidance, helping you unleash your inner ghoul with confidence this Halloween.
Unleash Your Inner Vampire: The Ultimate Guide to Stunning Red Halloween Nails for 2026
10 Spooktacular Red Halloween Nail Ideas to Try This March
This March, redefine your festive style with the ultimate collection of red Halloween nail ideas. From timeless frights to avant-garde artistry, our curated list ensures your halloween nails red are nothing short of spectacular. We blend creative inspiration with actionable guidance, addressing all skill levels from diy red halloween nails to salon red halloween nails for those seeking professional red halloween nails. Discover the best red halloween nails that are also trending red halloween nails 2026, perfect for any costume or spooky occasion.
1. Classic Blood Drip Nails

Nothing says spooky red nails quite like the timeless appeal of blood drip nails. This design connects directly to classic horror, making it a quintessential choice for classic red Halloween nails. It’s a bold statement that showcases the powerful relationship between Halloween nail art and gore, transforming red nail polish into a chilling effect.
- Products & Tools Used:
- High-quality deep red nail polish known for its vibrant pigment and smooth application.
- A fine-tipped nail art brush or a medium-sized dotting tool for controlled application.
- A glossy top coat for a wet, freshly dripped appearance.
- Nail polish remover and a clean-up brush for precision.
- Application/Styling Steps:
- Start with clean, prepped nails and apply two coats of your chosen deep red polish. Allow each coat to dry completely.
- Dip your fine-tipped brush or dotting tool into the same red polish, ensuring it’s loaded but not dripping excessively.
- Carefully create small dots along the cuticle line of each nail.
- Using the same tool, gently drag the polish downwards from the dots in varying lengths to simulate dripping blood. Create 2-3 drips per nail for a natural effect.
- Allow the drips to dry fully before applying a generous layer of high-shine top coat to seal the design and add a glossy finish.
- Clean up any excess polish around the cuticles with a clean-up brush dipped in remover for crisp edges.
Pro-Tip: For a more realistic, slightly raised blood drip, use a slightly thicker gel polish or a dedicated 3D nail art gel for the drips, curing each under a UV/LED lamp.

Call to Action (CTA): Pin this classic spooky look for your next Halloween party!
2. Vampire French Tips

For a sophisticated take on red Halloween nails, vampire French tips offer an elegant halloween nails aesthetic that is both chic and unsettling. This design uses red to evoke blood while transforming the classic French tip into sharp fangs, perfect for a gothic french manicure that elevates your vampire nails.
- Products & Tools Used:
- A sheer nude or clear base coat for a natural nail foundation.
- A richly pigmented crimson red nail polish for the “fang” tips.
- Thin striping brushes for precise, sharp lines, or French tip guides if desired.
- A high-gloss top coat to seal and enhance the finish.
- Application/Styling Steps:
- Apply one to two coats of a sheer nude or clear base coat to all nails. Allow to dry completely.
- Using a thin striping brush dipped in crimson red polish, carefully create a sharp, V-shaped tip on the free edge of each nail, extending slightly longer at the sides to mimic fangs. Ensure the lines are crisp and clean.
- For a more pronounced effect, apply a second thin layer of the red polish to the tips, ensuring full opacity.
- Once the red tips are fully dry, apply a generous layer of glossy top coat over the entire nail to protect the design and add shine.
- Clean up any mistakes with a cotton swab or clean-up brush dipped in nail polish remover for a polished finish.
Lesson Learned: Achieving consistently sharp “fang” tips requires a steady hand. Practice drawing the V-shape on a piece of paper first, or use a French tip guide sticker cut into a V-shape for an easier application.

Call to Action (CTA): Sink your teeth into this chic vampire nail idea—save it now!
3. Gothic Matte Red & Black

Embrace your darker, more refined side with gothic matte red & black Halloween nails. This design marries the dramatic intensity of burgundy halloween nails with the sophisticated edge of matte halloween nails and black halloween nails. Often seen on coffin halloween nails, the matte finish provides a luxurious, velvety look, distinguishing these as truly dark elegant nails.
- Products & Tools Used:
- A high-quality matte black nail polish known for its smooth, non-streaky finish.
- A deep burgundy or crimson matte red nail polish.
- A fine detail brush or stamping kit for intricate lace or filigree patterns.
- A matte top coat, essential for achieving the velvety, non-reflective look.
- Application/Styling Steps:
- After thorough nail prep, apply one coat of a clear base coat.
- Alternate applying two thin coats of matte black and matte burgundy red polish on different nails, allowing each coat to dry fully. For example, pinky and index in red, middle and ring in black, thumb in red.
- On one or two accent nails (e.g., the ring fingers), use a fine detail brush and contrasting matte polish (black on red, red on black) to paint delicate gothic lace patterns, or use a nail stamping kit with a gothic design plate.
- Once all designs are dry, apply an even layer of a specialized matte top coat over all nails. This will transform any glossy polishes into a matte finish and unify the look.
- Ensure to clean up any edges for a crisp, professional gothic aesthetic.
Pro-Tip: When working with matte polishes, apply carefully as they tend to show imperfections more readily than glossy finishes. A quick-dry matte top coat can help prevent smudges while maintaining the desired texture.

Call to Action (CTA): Embrace your dark side—save this sophisticated gothic nail look!
4. Modern Red Aura Nails

For those seeking modern halloween nails with an ethereal nail art twist, red aura nails are a captivating choice. This trendy red nails look leverages a diffused red gradient to create a mystical glow, embodying a subtle spooky nails vibe that’s effortlessly chic. The aura effect on a sheer base offers a contemporary take on red Halloween nail designs.
- Products & Tools Used:
- A clear or sheer nude gel polish for the base color.
- A bright, highly pigmented red gel polish that diffuses well.
- A small, soft sponge (makeup sponge or nail art sponge) or an airbrush for the gradient effect.
- A UV/LED curing lamp, essential for setting gel polish.
- A glossy no-wipe top coat for a smooth, shiny finish.
- Application/Styling Steps:
- Prep nails thoroughly and apply one coat of clear or sheer nude gel polish. Cure under a UV/LED lamp according to product instructions.
- Apply a small amount of bright red gel polish onto a soft sponge.
- Gently dab the red polish from the center of each nail outwards, creating a diffused, soft-focus aura effect. Start with very little product and build up the intensity gradually.
- Once satisfied with the gradient, cure the nails under the UV/LED lamp.
- Apply a second, even thinner layer of red using the sponge for a deeper aura, if desired, and cure again.
- Finish with a layer of glossy no-wipe top coat and cure one last time for protection and shine.
Pro-Tip: For a truly seamless aura effect, using an airbrush is ideal, but a makeup sponge can achieve a similar soft blur. Remember to use very little polish on the sponge and dab lightly.

Call to Action (CTA): Capture mystical vibes with this aura nail trend—perfect for 2026 Halloween!
5. Shattered Red Glass Nails

For an edgy red Halloween nails statement, shattered red glass nails provide a unique and impactful aesthetic. This design is a modern take on Halloween nail art, using iridescent foil nails under a translucent red jelly nail polish to mimic a broken glass effect. It’s a visually striking choice for those wanting unique halloween nail art that integrates the “shattered glass” entity into a festive, crimson theme.
- Products & Tools Used:
- A translucent red jelly nail polish or a sheer red builder gel.
- Iridescent nail art foil or Mylar pieces, cut into small, irregular shards.
- A fine-tipped tweezers or an orange wood stick for precise foil placement.
- A UV/LED curing lamp if using gel products.
- A sturdy, clear top coat (gel top coat is recommended for durability) to encapsulate the foil.
- Application/Styling Steps:
- Apply a clear base coat and one layer of your translucent red jelly polish or sheer red builder gel. Do not cure if using gel, or let dry slightly if using regular polish.
- Using tweezers, carefully pick up the small, irregular pieces of iridescent foil and place them strategically on the still-wet/tacky polish, creating a shattered glass pattern. Ensure the pieces lay flat.
- Once satisfied with the placement, if using gel, cure the nails under a UV/LED lamp. If using regular polish, allow to dry completely.
- Apply a second thin layer of the translucent red polish over the foil to help encapsulate it and add depth. Cure/dry.
- Finish with two layers of a durable top coat (gel top coat is highly recommended to smooth over any foil edges) to seal and provide a super glossy finish. Cure/dry after each layer.
Lesson Learned: When working with foil, it’s crucial to use a good quality, thicker top coat to completely encapsulate the pieces. This prevents snagging and ensures a smooth, long-lasting finish, maintaining the illusion of embedded glass.

Call to Action (CTA): Break free from basic with these stunning shattered glass nails!
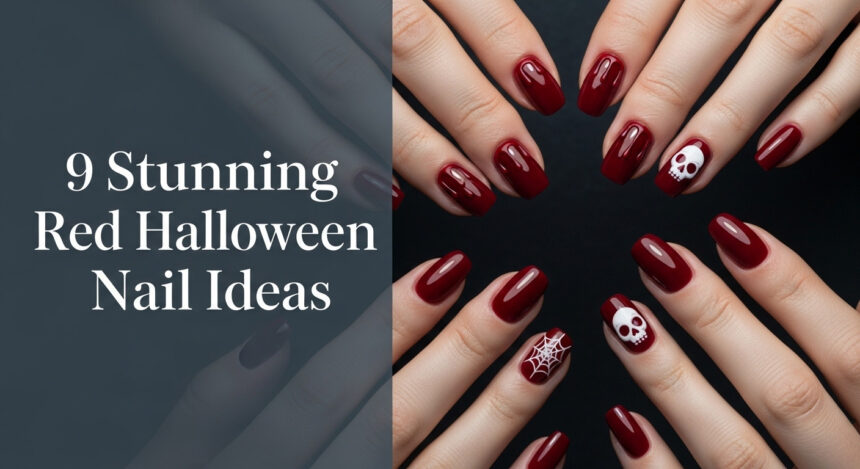
6. Spooky Spiderweb Accent

A spooky spiderweb accent offers a classic and subtle way to infuse your red Halloween nails with a touch of fright. This black and red spider nails design uses a vibrant red base with intricate black detailing, creating a captivating contrast. The accent nail halloween strategy allows for a focus on the spiderweb design, delivering easy spiderweb nails that are both festive and elegant.
- Products & Tools Used:
- A vibrant crimson red nail polish for the base color.
- A highly pigmented black nail art gel polish or fine-tipped black nail art pen.
- A thin striping brush for creating delicate lines.
- A dotting tool for a tiny spider body, if adding a spider.
- A glossy top coat for durability and shine.
- Application/Styling Steps:
- Apply two coats of crimson red nail polish to all nails, allowing them to dry thoroughly between coats.
- On your chosen accent nail (e.g., ring finger), use the black nail art pen or striping brush to draw a small “X” shape near the cuticle.
- From the center of the “X”, draw thin curved lines outwards to the edges of the nail, creating the web spokes.
- Connect these spokes with small, curved lines to form the concentric circles of the spiderweb.
- (Optional) Use a small dotting tool and the black polish to create a tiny spider body near the web, adding small legs with the striping brush.
- Once the design is dry, seal it with a glossy top coat.
Pro-Tip: If freehanding the spiderweb seems daunting, consider using a spiderweb nail stamping plate. This allows for quick, consistent, and intricate designs with minimal effort.

Call to Action (CTA): Catch this web-tastic design for a subtle touch of spooky!
7. Subtle Red Glitter Gradient

For an elegant red nails statement that offers a hint of festive sparkle without being overtly thematic, try a subtle red glitter gradient. This ombre glitter nails technique creates a smooth transition from a deep burgundy glitter nails base to a shimmering tip, making it ideal for subtle halloween nails and establishing a connection between the red color entity and understated seasonal glam.
- Products & Tools Used:
- A deep burgundy or wine red nail polish for the base.
- A fine-grained red or holographic glitter nail polish with good coverage.
- A small cosmetic sponge or a fan brush for applying glitter.
- A clear base coat and a high-shine top coat.
- Application/Styling Steps:
- Apply one coat of clear base coat to prepped nails.
- Apply two thin coats of the deep burgundy red nail polish, allowing each to dry completely.
- Take your fine glitter polish and a small sponge. Apply a small amount of glitter polish onto the tip of the sponge.
- Lightly dab the glitter onto the free edge (tip) of your nail. Gently move the sponge upwards, dabbing less as you go, to create a fading gradient effect. Concentrate the glitter most densely at the tip.
- Repeat step 4 if you desire more glitter intensity, allowing each layer to dry slightly.
- Once the glitter is dry, apply two coats of a glossy top coat to smooth over the glitter texture and provide a brilliant shine and seal the design.
Pro-Tip: For an ultra-smooth glitter gradient, use a peel-off base coat around your cuticles before applying glitter. This makes cleanup incredibly easy and prevents glitter from sticking to unwanted areas.

Call to Action (CTA): Sparkle subtly this Halloween—save this elegant glitter gradient!
8. Devil Horns & Tail Design

Showcase your mischievous side with a playful devil horns & tail design for your red Halloween nails. This halloween character nails concept uses a vibrant fiery red base, contrasting with bold black accents for the devil horns nails and a delicate devil tail on separate fingers. It’s a fun yet edgy take on black and red nail art that is both cute spooky nails and impactful.
- Products & Tools Used:
- A vibrant, fiery red nail polish for the base color.
- A fine-tipped black nail art pen or a thin striping brush with black nail polish.
- A clear base coat and a glossy top coat.
- Application/Styling Steps:
- Apply two thin coats of fiery red nail polish to all nails, allowing each layer to dry completely.
- On the ring finger, use the black nail art pen or striping brush to draw two small, curved devil horns at the tip of the nail, pointing upwards or slightly outwards.
- On the pinky finger, draw a thin, curved line starting from the cuticle area, extending to the tip, and ending with a small, pointed barb to represent a devil’s tail.
- Allow the black details to dry thoroughly.
- Seal the entire design with a glossy top coat for shine and protection.
Lesson Learned: For symmetrical devil horns, try drawing a small dot in the center of the nail tip as a guide, then draw two curved lines extending from it. This helps maintain balance.

Call to Action (CTA): Unleash your playful devilish charm—pin this fiery design!
9. Abstract Red Swirls

For a sophisticated and artistic touch to your red Halloween nails, abstract red swirls offer a modern halloween nail art option that is both minimalist spooky nails and chic. This design uses deep red and subtle black lines to create flowing patterns on a neutral base, connecting to the artistic red nails trend and showing the versatility of Halloween nail designs beyond traditional motifs.
- Products & Tools Used:
- A creamy off-white or nude nail polish for the base.
- A deep red nail polish and a black nail polish, both with good opacity.
- A fine-tipped nail art striping brush or a dotting tool for drawing swirls.
- A clear base coat and a glossy top coat.
- Application/Styling Steps:
- Apply a clear base coat, then two thin coats of the off-white or nude polish to all nails, allowing them to dry thoroughly.
- Dip your fine striping brush into the deep red polish. Create flowing, abstract swirl lines across the nail, varying their thickness and direction.
- Before the red polish completely dries, dip a clean striping brush into the black polish and add a few thinner, complementary swirl lines that either intertwine with the red or stand alone for subtle contrast.
- You can also use a small dotting tool to gently marble the wet red and black polishes together in a few spots for a more blended effect.
- Allow the abstract design to dry completely.
- Finish with a generous layer of glossy top coat to protect the design and enhance shine.
Pro-Tip: Work quickly when doing abstract swirls, especially if you want to marble the colors. If the base colors dry too much, they won’t blend as seamlessly, resulting in sharper, less fluid lines.
Call to Action (CTA): Get artistic with these abstract red swirls—a modern Halloween statement!
10. Eerie Ombre Red

Achieve a mysterious and sophisticated look with eerie ombre red Halloween nails. This red ombre nails technique creates a seamless gradient from a dark, almost black burgundy at the cuticle to a vibrant, bloody red at the tips. This spooky ombre effect delivers a truly gothic red nails aesthetic, perfectly linking the color red to an unsettling Halloween theme.
- Products & Tools Used:
- A dark, almost black burgundy nail polish for the base.
- A vibrant, blood-red nail polish for the lighter shade.
- A cosmetic sponge or makeup wedge for blending the ombre effect.
- A clear base coat and a high-gloss top coat.
- Liquid latex or petroleum jelly for protecting cuticles during sponging.
- Application/Styling Steps:
- Apply a base coat to clean nails.
- Apply two thin coats of the dark burgundy polish as your base color, allowing each to dry.
- Apply liquid latex around your cuticles or carefully apply petroleum jelly to protect your skin from polish.
- On a makeup sponge, paint a strip of the dark burgundy polish, immediately followed by a strip of the vibrant red polish, ensuring the colors slightly overlap in the middle.
- Lightly and quickly dab the sponge onto your nail, moving it slightly up and down to blend the colors. Repeat this dabbing motion several times until you achieve a smooth gradient.
- Repeat steps 4-5 for each nail, and apply a second layer of ombre if more opacity is desired, letting each layer dry slightly.
- Carefully peel off the liquid latex or wipe away petroleum jelly from your cuticles.
- Apply one to two generous coats of high-gloss top coat to smooth out any texture from the sponge and provide shine, sealing the design.
Lesson Learned: The key to a flawless ombre is quick dabbing motions and thin layers. Don’t press too hard, and reapply polish to the sponge after every 1-2 nails to maintain color intensity and blend.

Call to Action (CTA): Master the mysterious with this eerie red ombre—perfect for 2026!
Key Takeaways: Your Quick Guide to Red Halloween Nails
Navigating the vast world of red Halloween nail designs can be overwhelming, but these essential takeaways will equip you with the knowledge to achieve your desired Halloween nails red look.
- Diverse Designs: Explore classic blood drips, elegant vampire French tips, modern aura effects, and edgy shattered glass looks to find your perfect red Halloween style. These designs leverage the red entity with various Halloween themes to offer diverse aesthetic options.
- DIY & Pro Options: Many designs are achievable at home with basic tools, while press-on nails offer intricate styles instantly. For complex looks, consider a salon visit. This addresses different skill levels and convenience for your red Halloween nail art.
- Color Combinations: Red pairs perfectly with black for dramatic contrast, or subtle glitter for elegance. Choose shades like crimson, burgundy, or fiery red to set the mood. The strong relationship between red and black is central to many impactful Halloween nail designs.
- Application Essentials: Always prep your nails with a base coat, apply thin polish layers, and seal your design with a durable top coat for longevity and a professional finish. Proper application ensures your spooky red nails last through all the festivities.
- Nail Health: Prioritize nail care before and after Halloween festivities by using quality products and proper removal techniques to maintain strong, healthy nails. This expert advice ensures your Halloween nails look great without compromising nail health.
People Also Ask About Red Halloween Nails
What are popular red Halloween nail designs?
Popular red Halloween nail designs include classic blood drips, vampire fangs, gothic black-and-red combinations, subtle spooky accents like tiny spiders, and modern interpretations like red aura or glass nails. They often leverage the color’s association with horror and drama to create impactful festive looks that connect the red entity to various spooky designs.
Can I do red Halloween nails at home without special tools?
Yes, many red Halloween nail designs can be achieved at home with just polish and a few household items. Simple designs like solid red with a black accent nail, or using a toothpick or a bobby pin for basic blood drips, require minimal specialized tools. Press-on nails are also an excellent tool-free option, offering easy red Halloween nails for beginners.
What colors go best with red for Halloween nails?
Black is the most classic and impactful complementary color for red Halloween nails, creating a dramatic and spooky contrast for themes like vampires or gothic horror. White, silver, and gold can also be used effectively for accents and details, providing highlights or a ghostly effect without overpowering the red. The strong relationship between red and black makes for stunning halloween nail designs.
How long do red Halloween nail designs last?
The longevity of red Halloween nail designs depends on the polish type and application. Regular polish typically lasts 3-7 days, gel polish can last 2-3 weeks, and press-on nails can range from a few days to over a week depending on the adhesive and care. Proper prep and a good top coat significantly extend wear time, ensuring your halloween nails endure.
How can I make my red Halloween nails look professional?
To achieve a professional look for your red Halloween nails, ensure meticulous nail prep (clean, file, buff), apply thin, even coats of polish, use high-quality base and top coats, and clean up any polish around the cuticles with a small brush dipped in remover. Practice with nail art brushes for precision and patience for intricate nail art designs.
Final Thoughts
As the March moon rises and Halloween approaches, your nails are a canvas waiting to tell a spooky, chic, or dramatic tale. Red, in all its versatile glory, offers endless possibilities to express your festive spirit through Halloween nails. Whether you opt for the timeless terror of blood drips, the sophisticated allure of vampire tips, or the modern mystique of aura nails, remember that the best design is one that truly excites you. Don’t be afraid to experiment, combine elements, and make these ideas your own. Which red Halloween nail design will you conjure up this 2026? Share your masterpiece with us!
Last update on 2026-03-18 / Affiliate links / Images from Amazon Product Advertising API