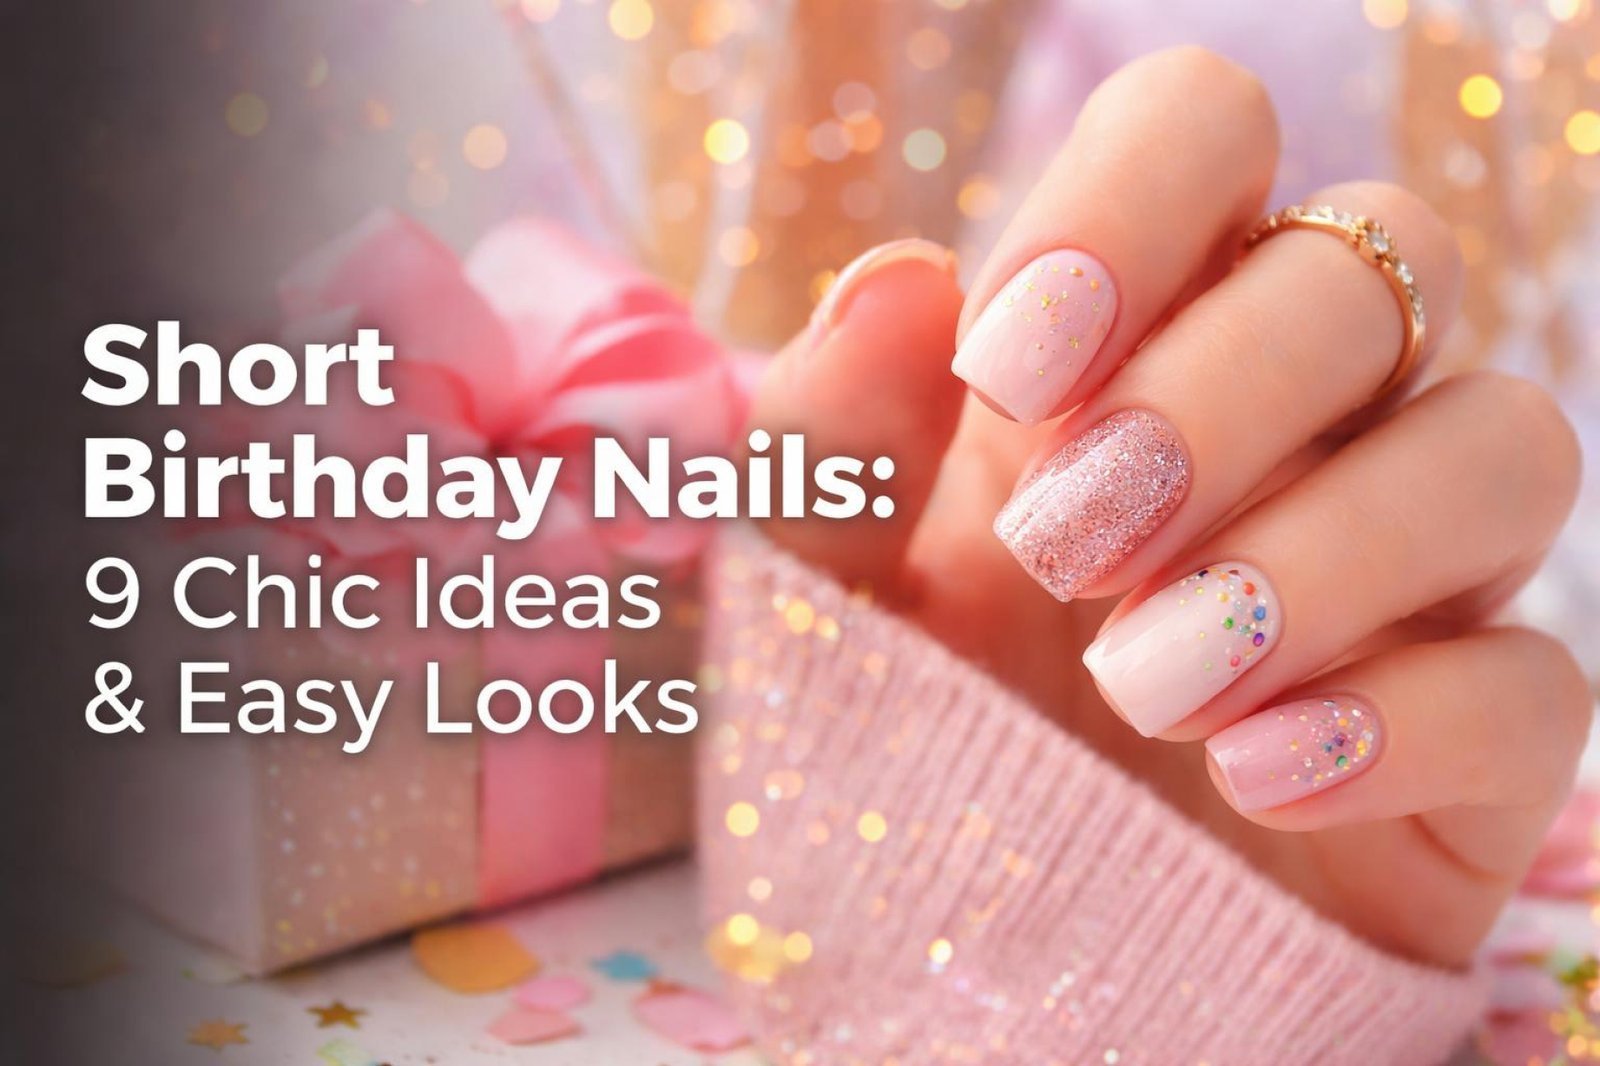
Struggling to find glamorous nail inspo that works for shorter lengths? You want a festive, chic manicure for your big day, but most designs seem made for long talons, leaving you feeling uninspired. Finding the perfect short birthday nails can be a real challenge.
The best short birthday nail ideas for 2026 combine elegance with a festive touch, using minimalist glitter accents, modern Micro-French manicures, subtle chrome finishes, or delicate hand-painted details. These styles make short nails look chic, intentional, and celebratory without overwhelming the smaller canvas.
Drawing from an analysis of current trends and proven nail art methodologies, this guide is your ultimate resource. We’ll unveil 9 stunning yet achievable looks designed specifically to make short nails shine. Get ready to discover your perfect birthday manicure that’s both stylish and practical.
What Are The Best Short Birthday Nail Ideas for a Chic Celebration?
Finding the perfect manicure to celebrate your big day should be fun, not frustrating. For those of us who love or need to keep our nails short, it can often feel like the most glamorous and exciting designs are out of reach. But that couldn’t be further from the truth. In fact, short nails offer a wonderfully chic and practical canvas for a huge variety of celebration nails short styles, from understated elegance to full-on festive sparkle. The key is to choose designs that complement, rather than overwhelm, the nail. This guide is packed with birthday nail inspo short that does exactly that, proving that you don’t need length to make a major style statement for your birthday.
9 Chic Short Birthday Nails & Easy Looks for Your 2026 Celebration
Get ready to find the perfect look for your party. We’ve curated nine distinct and cute short birthday nails ideas that cater to every style, from the minimalist to the glamour queen. Each design is broken down into a simple, two-part guide: the products and tools you’ll need, and the step-by-step application process. Whether you’re a DIY pro or a nail art novice, these instructions will help you achieve a salon-quality short birthday nails look at home, just in time for the celebration.
1. Create a Subtle Glitter Fade for an Elegant Sparkle

Pin this elegant sparkle to your ‘Birthday Beauty’ board!
This look is the definition of sophisticated sparkle. A glitter short birthday nails design with a fade effect is perfect because the vertical gradient helps to make short nails look longer. It’s a beautifully elegant short birthday nails style that adds a festive touch without being overwhelming, making it a go-to for a chic celebration.
Products & Tools Used
- Sheer neutral or pink gel polish (e.g., a ‘your nails but better’ shade)
- Fine-milled cosmetic-grade nail glitter (holographic silver or gold works best)
- A small, flat nail art brush or a fan brush
- Gel base coat and a no-wipe gel top coat
- UV/LED nail lamp
Application Steps
- Prep your nails (file, buff, and cleanse). Apply a thin layer of gel base coat and cure under the lamp.
- Apply one or two thin coats of your sheer pink polish, curing after each layer.
- Place a small amount of glitter onto a palette. Using your flat brush, pick up a tiny bit of glitter and gently tap it onto the tacky layer of the polish, concentrating it near the cuticle area.
- Use a clean, dry fan brush to lightly drag the glitter upwards about a third of the way up the nail, creating a soft fade.
- Apply a layer of gel top coat, making sure to “cap” the free edge of the nail to seal in the glitter. Cure for the final time.
Pro-Tip: For a more “encapsulated” look, apply a thin layer of builder gel over the glitter before the top coat. This proven short birthday nail technique creates a smooth, glass-like finish and adds durability.

2. Style a Modern Micro-French Manicure

Save this chic and timeless look for your birthday mani inspo!
Timeless, clean, and endlessly chic, the french tip short birthday nails look gets a modern update. A micro-French is perfectly compatible with short nails because the whisper-thin line enhances the nail shape without visually shortening it. This is the ultimate classy short birthday nails option for a sophisticated celebration.
Products & Tools Used
- Sheer nude or natural pink gel polish
- A highly pigmented white gel art paint
- An ultra-thin, long-bristled nail art liner brush
- Gel base coat and top coat
- UV/LED nail lamp
Application Steps
- After your standard nail prep and base coat, apply two coats of your sheer nude polish, curing between each coat.
- Pour a small drop of white art gel onto a palette. Dip the very tip of your liner brush into the paint.
- Anchor your pinky finger on your other hand for stability. Starting from one side of the nail tip, gently drag the brush across the free edge in a single, smooth motion to create a razor-thin line.
- Cure the white line immediately to prevent it from bleeding.
- Finish with a layer of top coat and cure.
Pro-Tip: Instead of white, use a pop of color for your micro-tip—like a neon pink, a deep navy, or a metallic gold. This is a trend-setting short birthday nails look for 2026.

3. Add a Touch of Glam with Minimalist Gold Foil

Need a quick upgrade? Pin this minimalist gold foil idea!
For a look that’s both artistic and incredibly easy, gold short birthday nails are a perfect choice. Abstractly placed foil flakes provide a high-end, textured look with minimal effort, making it a fantastic option for at-home birthday nails short. The beauty of this modern short birthday nails design is that it’s impossible to mess up—each nail is a unique piece of art.
Products & Tools Used
- Your favorite birthday nail polish color (deep colors like navy, burgundy, or black create a stunning contrast)
- Nail art foil flakes (gold is classic, but silver or rose gold are also chic)
- A pair of tweezers or a wax-tipped pencil
- Gel top coat (or a strong regular top coat)
- Base coat
Application Steps
- Apply your base coat and two coats of your chosen color polish. Let it dry almost completely if using regular polish, or cure if using gel.
- If using gel, apply top coat and cure, then wipe the tacky layer. If using regular polish, apply a fast-dry top coat and wait a minute.
- Using tweezers, pick up small, individual flakes of gold foil.
- Gently place the flakes onto the nail in an abstract, random pattern. Less is more. Press them down gently with a silicone tool or your fingertip so they lie flat.
- Apply one or two thick layers of top coat to completely encapsulate the foil flakes and create a smooth surface. Cure if using gel.
Pro-Tip: For better adhesion with gel, apply a thin layer of “foil transfer gel,” cure for 30 seconds, then press the foil flakes into the slightly tacky surface before sealing with a top coat. This is an industry standard for long-lasting foil art.

4. Rock a “Birthday Suit” Neutral with a Hidden Sparkle

The perfect subtle glam! Pin this hidden sparkle idea now.
This unique short birthday nails look is all about a delightful surprise. A classic, neutral manicure on top offers a professional and polished look, while a flash of glitter on the underside provides a playful, hidden celebration. It’s the perfect way to make a subtle birthday statement and works beautifully on short almond birthday nails.
Products & Tools Used
- An opaque neutral gel polish (beige, taupe, or soft grey)
- A dense, high-impact glitter gel polish
- A very thin detail brush
- Isopropyl alcohol and lint-free wipes
- Gel base and top coat, and a UV/LED lamp
Application Steps
- Perform your nail prep. Before applying base coat, take your detail brush, dip it in the glitter polish, and carefully paint the underside of your nail’s free edge. Clean up any polish on your skin with a brush dipped in alcohol. Cure for 60 seconds.
- Now proceed with your manicure on top: apply base coat and cure.
- Apply two coats of your neutral polish to the top of the nail, curing between each layer. Be careful not to smudge the glitter underneath.
- Finish with a top coat on the top surface of the nail and cure.
- There’s no need to top coat the glitter underneath; the gel is durable on its own.
Pro-Tip: To make cleanup easier, apply a liquid latex barrier around the skin of your fingertip before painting the underside. Let it dry, paint the glitter, cure, and then peel the latex off for a perfectly clean line. This is a master short birthday nail class trick.

5. Apply Delicate Hand-Painted Birthday Florals

Pin this sweet floral design for a fresh birthday look!
A few hand-painted short birthday nail motifs can create a personalized and delicate look. This design is especially charming because it can work with any birthday theme, and you can even customize it with your birth month flower. Don’t be intimidated by “hand-painted”—this simple dotting technique makes it achievable for everyone.
Products & Tools Used
- A base color of your choice (a sheer pink or even a clear base works beautifully)
- White and yellow (or any other color combo) nail art paints
- A small nail art dotting tool
- A matte or glossy top coat
- Base coat
Application Steps
- After your base coat and two coats of your base color are applied and cured/dry, you’re ready to paint.
- Place a drop of white paint and a drop of yellow paint on a palette.
- Dip the dotting tool into the white paint. Create a flower by placing five dots in a small circle on your nail. Don’t worry about them being perfect.
- Clean the dotting tool and dip the very tip into the yellow paint. Place a single yellow dot in the center of your white dots.
- Repeat to create 1-2 small flowers per nail. Cure if using gel.
- Finish with your favorite top coat (a matte top coat gives this a very modern, chic look) and cure.
Pro-Tip: For more intricate petals, use the tip of a fine liner brush and pull the white dots slightly outward from the center before they set. This advanced short nail art technique creates a more realistic petal shape.

6. Embrace the Trend with Sheer Jelly & Encapsulated Stars

Save this dreamy jelly nail look for your birthday wish list!
Jelly nails are one of the biggest birthday nail trends short nails can rock perfectly. The translucent finish creates a fun, juicy look, and the style is ideal for encapsulated glitter short birthday nails. The see-through layers create a mesmerizing 3D effect that’s perfect for a playful birthday vibe.
Products & Tools Used
- A sheer or “jelly” gel polish in your favorite color
- Small, flat nail glitter or confetti (stars, hearts, or circles work well)
- A wax-tipped pencil or tweezers for placement
- Gel base and top coat, and a UV/LED lamp
Application Steps
- Apply your base coat and cure.
- Apply one thin layer of your jelly polish and cure.
- Using your wax pencil, pick up individual glitter stars and place them onto the tacky layer of the polish.
- Apply a second layer of jelly polish over the top of the stars. This will “encapsulate” them and create the 3D, suspended look. Cure thoroughly.
- If the surface feels bumpy, you can apply a thin layer of builder gel to smooth it out before finishing with your final top coat and curing.
Pro-Tip: Mix a tiny bit of your loose glitter directly into a clear builder gel in a small pot. You can then apply this custom glitter gel in thin layers to build up the encapsulated effect with more control. This is a custom short birthday nail art method used by pros.

7. Go Bold with Chic Black & White Abstract Lines

Pin this bold and modern look for an artistic birthday statement!
For the person who loves a graphic, artistic statement, abstract black short birthday nails with white details are a perfect match. This high-contrast design feels like wearable modern art. It’s ideal for short nails because using negative space (the unpainted parts of the base color) keeps the patterned short birthday nails from feeling too busy or cluttered.
Products & Tools Used
- An opaque white or nude polish for the base
- A high-pigment black nail art paint
- A long, thin striping brush
- A dotting tool
- A matte top coat (recommended for a modern look)
- Base coat and UV/LED lamp if using gel
Application Steps
- Apply your base coat and two coats of white polish. Cure/dry completely.
- Pour a small amount of black art paint onto a palette.
- Dip your long striping brush in the paint. With a light but confident hand, draw one or two thin lines across the nail. They can be curved, straight, or intersecting.
- Use a dotting tool to add one or two small dots for balance.
- Cure immediately to lock in the sharp lines.
- Finish with a matte top coat for a chic, gallery-worthy finish, and cure.
Pro-Tip: The key to a non-shaky line is to load the entire length of your striping brush with paint and move your whole arm, not just your wrist. This proven short birthday nail technique helps create smoother, more confident strokes.
8. Try the Luxurious Velvet Effect Magnetic Polish

Ready for a magical manicure? Pin this velvet nail trend!
If you want a high-impact, mesmerizing look with minimal effort, magnetic short birthday nail polish is your answer. This innovative polish contains magnetic particles that create a stunning, multi-dimensional shimmer that mimics the look of crushed velvet. It enables intricate birthday designs with just one product and a magnet, making it a showstopper for any fun birthday party.
Products & Tools Used
- A black gel polish (as a base to make the color pop)
- A “velvet” or “cat-eye” magnetic gel polish
- A nail art magnet wand (often comes with the polish)
- Gel base and top coat, and a UV/LED lamp
Application Steps
- Apply your base coat and cure. Apply one coat of black polish and cure. This creates a deep canvas.
- Apply a thick, even coat of the magnetic polish, but DO NOT CURE IT YET.
- Hold the magnet wand close to the nail (without touching it) for 10-15 seconds. Hold it flat and parallel over the nail to create the all-over “velvet” shimmer. You will see the magnetic particles shift.
- Once you’re happy with the effect, cure the nail immediately to lock the design in place.
- Finish with a glossy top coat to enhance the dimension, and cure.
Pro-Tip: For the classic “cat-eye” line instead of the all-over velvet look, hold the edge of the magnet wand diagonally across the nail during step 3. The magnetic particles will gather into a sharp, bright line.

9. Keep it Classy with a Single Rhinestone Accent

The easiest way to add bling! Pin this simple rhinestone idea.
Sometimes, the simplest touch makes the biggest impact. Adding a single, tiny rhinestone to a classic manicure is the fastest way to create bling short birthday nails that are still incredibly classy. This simple short birthday nails look works with any color, from a deep red short birthday nails to a soft nude, and is perfect for a sophisticated birthday dinner.
Products & Tools Used
- Your favorite birthday nail polish
- Tiny nail art rhinestones
- A wax-tipped picker pencil
- Strong nail gem glue (for gel) or a dab of wet top coat (for regular polish)
- Base coat and top coat
Application Steps
- Paint your nails as you normally would with a base coat and two coats of color.
- For Gel: Before your final top coat, place a tiny dot of nail gem glue where you want the rhinestone (usually centered at the base of the ring finger nail). Use your wax pencil to pick up a rhinestone and place it on the glue. Cure for 60 seconds. Then, carefully apply top coat around the gem (not over it, which dulls the sparkle) and cure.
- For Regular Polish: While your second coat of color is still slightly tacky, use the wax pencil to place the rhinestone. Gently press it in. Once the polish is dry, apply a thick top coat around and slightly over the base of the gem to seal it.
Pro-Tip: Using a dedicated, professional-grade nail gem glue is the most reliable short birthday nail guide for ensuring your bling lasts through your entire birthday celebration and beyond. A simple top coat is not strong enough for long-term wear.

Key Takeaways: Your Quick Guide to Short Birthday Nails
- Embrace Minimalist Details: For short birthday nails, a little goes a long way. A single rhinestone, a few flakes of gold foil, or a tiny floral detail can look more elegant and intentional than a crowded design.
-
Vertical Lines Create Length: Designs like a glitter fade from the cuticle or subtle vertical lines can create the illusion of a longer nail bed, a key solution for making short nails look longer.
-
The Micro-French is Your Best Friend: A modern micro-french with a razor-thin tip is universally flattering on short nails because it doesn’t visually “cut off” the nail length like a thick, traditional French tip can.
-
Texture Adds a “Wow” Factor: Don’t be afraid to try trends like velvet magnetic polish or encapsulated glitter. These add dimension and a luxurious feel that make short nails pop without needing complex art.
-
Use the Right Tools for a Pro Finish: Achieving salon-quality short birthday nails at home is possible with the right tools, like an ultra-thin liner brush for clean lines and a dedicated nail gem glue for durable bling.
-
Negative Space is a Design Element: A few abstract lines or carefully placed dots on a neutral or clear base look incredibly chic on short nails. The empty space keeps the design feeling airy and sophisticated.
People Also Ask About Short Birthday Nails
What are trending short birthday nail styles for 2026?
The top trending styles focus on minimalist glam and interesting textures. This includes “jelly” nails with encapsulated glitter, velvet-effect magnetic polishes, modern micro-French tips (often with a colorful line), and chrome powder finishes for a “glazed donut” look. Subtle details like a single, tiny rhinestone or a bit of gold foil on a neutral base are also extremely popular.
How can I make my short nails look festive for a birthday?
Focus on high-impact, low-coverage details to add a festive touch. A glitter fade starting from the cuticle, a metallic or holographic top coat over any color, or a single accent nail with a bold design are great options. Using rich, celebratory colors like deep reds, emerald greens, or navy blue with a touch of gold also instantly elevates the look.
Are short square nails or short almond nails better for birthdays?
Both shapes are fantastic, but they offer different vibes. Short square nails provide a sharp, modern canvas perfect for graphic designs like French tips and abstract lines. Short almond nails can help elongate the look of fingers and are ideal for softer, more elegant designs like glitter fades or delicate floral patterns. The best choice depends on your personal style.
Can you get acrylics on short nails for a birthday?
Yes, you can absolutely get acrylics on short nails. A skilled technician can apply a very thin, short overlay to add strength and create a perfect canvas for polish and art, without adding significant length. This is a great option if your natural nails are weak or if you want your birthday manicure to be extra durable.
What are the best nail polish colors for a birthday?
You can never go wrong with a classic red, a fun pink, or a sophisticated nude. However, for a birthday, consider something more special. Deep, jewel-toned colors like sapphire blue, emerald green, or burgundy feel luxurious. Metallics like gold, silver, and rose gold are inherently celebratory. The best color is one that makes you feel amazing and confident.
How do I choose a design that won’t make my short nails look shorter?
Avoid designs that create a horizontal line across the middle or tip of your nail. A thick, traditional French manicure can visually shorten the nail bed. Instead, opt for designs with vertical elements, like subtle stripes or a glitter fade from the cuticle. Designs that concentrate detail near the base of the nail also help preserve the nail’s length.
Are press-on nails a good option for short birthday nails?
Press-on nails are an excellent, damage-free option for a temporary birthday look. Many brands now offer high-quality, reusable sets in trendy short shapes and designs. Look for kits that include adhesive tabs for short-term wear (1-3 days) or nail glue for longer wear (1-2 weeks). It’s a fantastic way to try a bold design without commitment.
What is the easiest birthday nail art for a beginner?
The easiest options are glitter fades, simple dots, and foil flakes. A glitter fade just requires tapping glitter near your cuticle and brushing it out. A dotting tool can create perfect polka dots or simple flowers with no drawing skills required. Abstractly placing gold foil flakes is also “mistake-proof” and looks incredibly chic with minimal effort.
How do I make my short birthday manicure last longer?
Proper prep and a quality top coat are crucial. Always cleanse your nail plate with alcohol to remove oils before polishing. Use a good base coat. After your color, “cap” the free edge of your nail by running the brush along the tip. Finally, reapply your top coat every 2-3 days to maintain shine and prevent chipping.
What’s a good birthday nail idea for someone who bites their nails?
A gel manicure is a fantastic choice as the hard coating can deter biting. For the design, choose something that keeps the focus away from the very tip of the nail. A glitter fade from the cuticle, a design focused on the nail’s base (like a single rhinestone), or an all-over design like a dark color with a matte top coat can be beautiful and confidence-boosting.
Final Thoughts on Your Perfect Short Birthday Manicure
Ultimately, the perfect short birthday nails are the ones that make you feel confident and excited to celebrate. As you’ve seen, having short nails isn’t a limitation—it’s an opportunity to embrace chic, modern, and elegant designs that are both beautiful and practical. From the subtle sparkle of a glitter fade to the bold statement of an abstract pattern, there is a perfect style waiting for you. Hopefully, these ideas have provided trusted and authoritative inspiration to help you create a look you’ll love.
Which of these chic short nail ideas will you be trying for your birthday?
Last update on 2026-04-27 / Affiliate links / Images from Amazon Product Advertising API