Struggling to find autumn nail designs that look chic on shorter lengths? You want that cozy, stylish fall vibe but worry that intricate art or deep colors won’t work on your practical, short fall nails.
Short fall nails are chic, practical, and highly versatile, offering a sophisticated look without the maintenance of longer lengths. These designs embrace autumn’s rich color palette and playful motifs, proving that style doesn’t require length. This makes them perfect for an active lifestyle while staying on-trend.
Drawing from current data and proven nail art methodologies, this guide reveals how to master the art of the short fall manicure. You’ll discover 11 classy and simple designs, complete with expert tips to achieve salon-quality results at home. Get ready to embrace the ultimate in low-maintenance luxury.
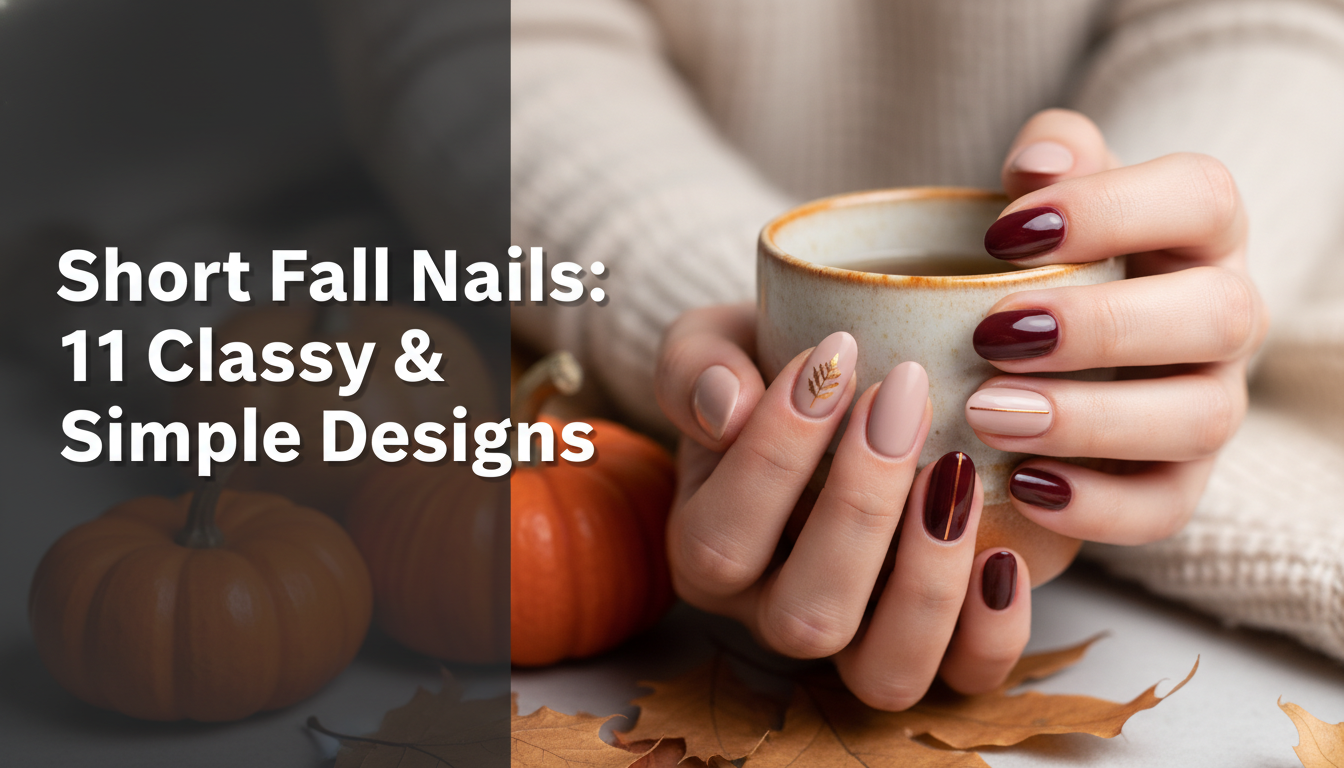
Fall into Style: 11 Classy & Simple Short Fall Nails for 2026
As the crisp autumn air rolls in, so does the desire to switch up our style with cozy sweaters and rich, warm colors. This seasonal shift extends all the way to our fingertips. For those who prefer a practical yet polished look, short autumn nails are the perfect canvas. They offer a sophisticated and clean aesthetic that aligns perfectly with the “low-maintenance luxury” trend of 2026. Forget the idea that you need long talons to make a statement; this season is all about showcasing intricate designs and deep, moody autumn nails on a compact, elegant canvas. This guide is your ultimate inspiration for embracing the beauty of fall nails for short nails, proving that you can have a high-impact manicure that fits seamlessly into your active lifestyle.
Short Fall Nails: 11 Classy & Simple Designs for 2026
Ready to find your perfect autumn look? We’ve curated 11 stunning short fall nail designs that range from minimalist chic to playfully bold. Each design is specifically tailored to enhance small nail beds, making them perfect for anyone with short nails. You’ll find everything from the earthy tones of an olive french tip to the rich depth of a tortoiseshell pattern. We’ll walk you through the steps and pro tips to recreate these gorgeous, Pinterest-friendly looks, ensuring your nails are perfectly on-trend for the entire fall season.
1. Classy Olive French Tips on Short Almond Nails

Pin this elegant design to your ‘Autumn Nail Inspo’ board!
What You Need
- Nude or sheer base coat: A
long-lastinggel or traditional polish in a natural skin-tone shade. - Olive green polish: A deep pigmented, high-quality olive green for the tips.
- Fine-tip nail art brush: For precise application of the French tip line.
- Top coat: Smudge-proof and glossy finish or matte fall nails topcoat.
- Nail file: A
fine grit filefor shaping short almond nails. - Cuticle oil: For
moisturizingandcuticle health.
Steps
- Shape and Prep: File your nails into a short almond shape.
Cleanseandbuffthe nail plate, pushing back cuticles gently. - Base Coat:
Applyone thin layer of your chosen nude or sheer base coat.Cureunder a UV lamp if using gel. - Create the Tip: Dip your fine-tip brush into the olive green polish. Carefully
painta thin, curved line along the free edge of your nail, mimicking the french tip shape. - Refine: Use a clean, angled brush dipped in rubbing alcohol (for gel) or polish remover (for traditional) to
detailand clean up any imperfections in your smile line. - Second Coat (Optional): If needed,
applya second thin layer of olive green for opacity,cureif gel. - Top Coat: Finish with a glossy finish or matte fall nails top coat for durable finish and shine/mattification,
cureif gel. - Hydrate:
Moisturizecuticles with cuticle oil for healthy autumnal fingertips.
Pro-Tip: For perfectly symmetrical short almond french tip nails, try painting a small dot in the center of your nail tip first, then drawing outwards to each side. This ‘micro-painting technique’ provides an anchor and ensures an even curve, even on
compact nails.

2. Cozy Sweater Weather Nails with a Matte Brown Finish

Save this cozy fall nails idea for your next mani!
What You Need
- Brown nail polish: A deep pigmented, warm matte brown or chocolate brown shade.
- Matte top coat: A smudge-proof,
professional gradematte top coat for the characteristic finish. - Base coat: A
strengtheningbase coat for brittle nails and longevity. - Nail file: For shaping short square nails or
short rounded nails. - Cuticle oil: To
moisturizeand maintaincuticle health 101.
Steps
- Prep Nails: File your super short fall nails to your desired shape (square or rounded).
Cleanseandbuffthe nails, ensuring a smooth surface forcolor saturation levels. - Base Coat Application:
Applyone thin layer of base coat. - Brown Polish:
Painttwo thin coats of your chosen matte brown polish, allowing each coat to dry fully. This is crucial for an even, opaque finish. - Matte Transformation:
Applyone generous layer of the matte top coat. Watch as the glossy brown transforms into a beautiful, matte finish. - Dry Thoroughly: Allow ample time for the matte top coat to dry completely to ensure a durable finish and prevent chipped polish.
- Nourish: Finish by
moisturizingyour autumnal fingertips with cuticle oil.
Pro-Tip: To keep your matte brown short nails looking fresh and cozy, avoid excessive contact with oils or lotions immediately after application, as these can temporarily restore a slight sheen. Also, consider a
hema-free polishfor healthiernail plate anatomyandhyponychium care.

3. Subtle Fall Leaf Accent Nails for Short Autumn Manicure

Pin this simple fall nail art for short nails to your board!
What You Need
- Base color polish: A muted colors autumnal shade like terracotta, deep beige, or a warm shade of cream.
- Detail colors: Small bottles of deep pigments in rust, gold, or dark brown for the leaf.
- Fine-tip nail art brush or stencil: For
detailingthe leaf design. - Dotting tool (optional): For creating tiny dots or vein details.
- Top coat: A glossy autumn nails or matte finish top coat.
- Nail buffer: For
smoothingthe nail surface.
Steps
- Prep and Base:
Prepyour short autumn nails by filing and cleaning.Applytwo thin coats of your base color, allowing each to dry. - Choose Accent Nail: Select one or two nails per hand to be your
accent nails. - Leaf Outline: Using a fine-tip brush and one of your detail colors, gently
painta small leaf outline on the chosen accent nail. Keep it minimalist short nails in size. - Fill and Detail: Carefully
fillin the leaf outline. While wet, you can use a different detail color and your fine-tip brush tolayera tiny vein or shadow for depth. - Dotting (Optional): Use a dotting tool to add tiny, delicate dots around the base of the leaf for an extra touch.
- Seal with Top Coat: Once completely dry,
applya smudge-proof top coat over all nails, paying extra attention to smoothlylayerover the leaf art. - Final Touch:
Moisturizehands and cuticles to perfect your autumnal fingertips.
Pro-Tip: When
designingintricate leaf art on short fall nail designs, a magnifying lamp can significantly improve precision. Also, practice the leaf shape on a piece of paper first to master the micro-painting techniques beforeapplyingit to yourcompact nails.

4. Moody Deep Emerald Green for Classy Short Fall Nails

Pin this rich moody autumn nails color to your ‘Fall Colors’ board!
What You Need
- Emerald green polish: A vibrant autumn, deep pigmented dark emerald green polish (gel or regular).
- Base coat: A
strengtheningbase coat to protect againstnail dehydrationand prevent staining. - Top coat: A glossy autumn nails top coat for maximum shine and long-lasting wear.
- Nail file: To maintain tidy manicures in your chosen short nail designs.
- Cuticle pusher: For gentle
cuticle debridementandhyponychium care.
Steps
- Preparation is Key: Start with thoroughly cleaned and shaped short fall nails.
Prepby pushing back cuticles and gentlybuffingthe nail surface. - Base Layer:
Applyone thin, even layer of base coat, ensuring full coverage. - First Color Coat:
Painta thin, even layer of the deep emerald green polish. Allow to dry (orcureif gel). Dark colors require careful application to avoid flooding the cuticles. - Second Color Coat:
Applya second thin coat. This will deepen thecolor saturation levelsand ensure full opacity, giving a truly moody autumn nails effect. - Top Coat Seal: Finish with a high-shine, smudge-proof top coat.
Cureif gel. This will protect the polish and provide a durable finish. - Clean Up: Use a clean brush dipped in polish remover to
detailaround the cuticles for a crisp, salon-quality look. - Hydrate:
Moisturizewith cuticle oil to maintainnail health for beginners.
Pro-Tip: For classy short fall nails with deep colors like dark emerald green,
curing timesfor gel polish should be strictly adhered to, and for regular polish, alwayslayerthin coats. This prevents chipping and ensures a flawless, opaque finish that ‘defines seasonal style’.

5. Luxurious Gold Foil Accents on Short Fall Nails

Glam up your short fall manicure with this gold foil idea!
What You Need
- Base color polish: A rich burgundy, deep brown, or dark nude deep pigments polish.
- Gold nail art foil: Thin, vibrant autumn gold foil flakes.
- Foil adhesive (or tacky polish layer): A specific adhesive for foil, or apply foil when polish is still slightly tacky.
- Orange wood stick or silicone tool: For pressing and
detailingthe foil. - Top coat: A glossy autumn nails top coat for sealing and shine.
- Rubbing alcohol: For cleaning around the
compact nails.
Steps
- Base Color:
Applytwo thin coats of your chosen burgundy or dark base color, ensuring full opacity. Allow to dry completely (orcureif gel). - Adhesive Layer: If using foil adhesive,
applya thin layer to the areas where you want the gold foil. If using polish, ensure your last color coat is almost dry but still slightly tacky. - Foil Placement: Gently press small pieces of gold foil onto the adhesive/tacky layer using an orange wood stick or silicone tool.
Detailand press down firmly to adhere. You canlayerfor more coverage or keep it minimalist short nails for a scattered look. - Remove Excess: Carefully rub away any loose foil with a dry brush.
- Seal It In:
Applya generouslayerof glossy finish top coat to seal the gold foil and prevent chipped polish. This provides durable finish. - Final Polish: Clean up any edges around your autumnal fingertips with rubbing alcohol for a tidy manicure.
Pro-Tip: When
applyinggold foil to short fall nail designs, work with very small pieces. Too much foil can makecompact nailsappear bulky. A viscosity of top coats that is slightly thicker can helpsmoothingthe surface over the foil for a truly salon-quality results.

6. Chic Tortoiseshell Pattern on Short Square Nails

Recreate this trendy tortoiseshell pattern on your short fall nails!
What You Need
- Sheer amber polish: A translucent, warm amber or orange fall gel nail color.
- Dark brown polish: A semi-sheer to opaque dark brown deep pigments polish.
- Black polish: A small amount of opaque black polish for
detailing. - Fine-tip nail art brush: For
blendingand creating the pattern. - Top coat: A glossy autumn nails top coat to seal and add shine.
- Base coat: A
strengtheningbase for your short square nails.
Steps
- Prep & Base:
Prepyour short square nails.Applya base coat. - Amber Foundation:
Applyone thin layer of the sheer amber polish.Cureif gel. - Brown Splotches: Using your fine-tip brush,
paintsmall, irregular splotches of the dark brown polish over the amber layer. Don’t cover completely; leave amber peeking through.Cureif gel. - Black Details: Dip your brush into the black polish and
detailtiny, sparse splotches over the brown. Immediately, beforecuring(if gel), use the clean brush to slightlyblendthe edges of the black into the brown, creating a soft, blurry effect characteristic of tortoiseshell patterns. - Second Amber Layer:
Applyanother thin layer of the sheer amber polish over the entire nail to add depth and create a translucent effect.Cureif gel. - Top Coat: Finish with a smudge-proof, glossy finish top coat for a durable finish.
Cureif gel. - Cleanse:
Cleansearound the cuticles for a perfect tidy manicure.
Pro-Tip: The key to a realistic tortoiseshell pattern on short square nails is the translucency and imperfect
layering. Don’t let each layercurecompletely beforeblendingthe next; this allows for a softer, more organic transition, crucial forenabling intricate detailoncompact nails.

7. Playful Autumn Ombre Skittle Mani for Short Fall Nails

Glam up your short fall nails with this ombre skittle!
What You Need
- Five fall nail polishes: A range of warm shades from light to dark (e.g., cream, terracotta, burnt orange, burgundy, deep plum).
- Makeup sponge: Small, disposable makeup sponges for the ombre
blending. - Liquid latex or cuticle protector: To
protectingskin around the nails. - Top coat: A glossy autumn nails or matte finish top coat.
- Base coat: A
strengtheningbase for optimalnail health for beginners. - Nail polish remover and a clean-up brush: For
cleansinganddetailing.
Steps
- Prep & Base:
Prepyour short fall nails.Applya base coat to all nails. - Individual Base Colors:
Painteach nail with one of your chosen fall nail colors from lightest to darkest (e.g., thumb lightest, pinky darkest). Let these base coats dry. - Ombre Effect: On a flat surface (or directly on a makeup sponge),
painttwo or three lines of your chosen warm shades side-by-side, creating a mini gradient. - Sponge Application: Gently dab the sponge onto one nail, moving it slightly back and forth to
blendthe colors onto your nail. - Repeat & Refine: Repeat the sponging technique 2-3 times per nail until you achieve the desired
color saturation levelsand seamless ombre effect.Applyliquid latex beforehand to makecleansingeasier. - Seal & Clean: Once dry,
applya smudge-proof top coat.Cleansearound the cuticles with polish remover and a brush. - Hydrate: Finish with cuticle oil to
moisturizeyour autumnal fingertips.
Pro-Tip: When
applyingan autumn ombre skittle mani to short fall nails,layeringthin coats of polish on the sponge and dabbing gently creates the smoothestblending. Consider ahema-free polishandUV protection for handsif using gel to prioritizenail health.

8. Vibrant Burnt Orange & Mustard Yellow Block for Trendy Short Fall Nails

Recreate this bold fall nail art for your petite fall nails!
What You Need
- Burnt orange polish: An opaque, vibrant autumn burnt orange deep pigments polish.
- Mustard yellow polish: An opaque, vibrant mustard yellow deep pigments polish.
- Nail striping tape (optional but recommended): For crisp lines.
- Fine-tip nail art brush: For
detailingand cleanup. - Top coat: A glossy finish top coat for protection and shine.
- Base coat: A
strengtheningbase to preventnail dehydration.
Steps
- Prep & Base:
Prepyour short fall nails, shaping them to a short square nails orshort rounded nails.Applya base coat. - First Color Block:
Applytwo thin coats of the burnt orange polish to one half of the nail (e.g., the top half). Allow to dry completely. - Tape Placement (Optional): Once the orange is bone dry,
applya piece of striping tape to create a clean line separating the two colors. - Second Color Block:
Applytwo thin coats of the mustard yellow polish to the remaining half of the nail, painting right up to (or slightly over) the striping tape. - Remove Tape: Carefully
removethe striping tape immediately after applying the second color coat (before it dries completely) for a super crisp line.Cleanseany smudges with a fine brush. - Seal It: Once both colors are completely dry,
applya long-lasting top coat for a durable finish. - Nourish: Finish by
moisturizingyour autumnal fingertips with cuticle oil.
Pro-Tip: When creating color block designs on trendy short fall nails, always ensure the first color is completely dry before
applyingthe second, especially when using tape. This prevents smudge-proof lines and ensures highcolor saturation levels. Using agrit levels for filingup to 240 can ensure a perfectly smooth edge for tape adhesion.

9. Minimalist Negative Space Designs for Clean Girl Fall Nails

Pin this genius hack to your ‘Minimalist Mani’ board!
What You Need
- Clear base coat: A
strengtheningclear polish that also acts as your base. - Fall accent polish: A single deep pigments polish in a dark fall color (e.g., burgundy, deep green, or black).
- Fine-tip nail art brush or dotting tool: For precise, minimalist short nails lines or dots.
- Top coat: A glossy finish or matte finish top coat (optional, for added protection).
- Rubbing alcohol: For
cleansingand any corrections.
Steps
- Prep & Polish:
Prepyour natural short fall nails by cleaning and shaping.Applyone thin layer of clear base coat. Allow to dry completely. - Negative Space Design: Using your fine-tip brush and the accent polish,
painta single, delicate line (e.g., a vertical line down the center, a diagonal, or a small curve) or a tiny dot on the nail. The key is to leave most of your natural nail exposed asnegative space. - Simplicity is Key: Keep the design very minimalist short nails. Less is more for this look.
- Seal (Optional): If desired,
applya clear top coat toprotectingthe design and add long-lasting wear. - Clean Up:
Cleanseany stray marks with rubbing alcohol and a fine brush for a crisp finish on yourlow-profile nails. - Hydrate: Finish with cuticle oil to
moisturizeyour tidy manicures.
Pro-Tip: For truly clean girl fall nails,
applya thin, even layer ofstrengtheningclear polish before your design. This promotes natural growth and provides a flawless base fornegative space designs. Ensuring a completely dry base coat is critical beforedetailingfor crisp lines oncompact nails.

10. Chic Chrome Finish on Short Length Autumn Nails

Glam up your short fall nails with this trendy chrome!
What You Need
- Gel base color: A dark, opaque fall gel nail colors base (e.g., black, deep brown, or dark emerald green).
- No-wipe gel top coat: Essential for chrome powder application.
- Chrome nail powder: An autumnal shade like antique gold, bronze, or coppery red.
- Silicone applicator or eyeshadow brush: For rubbing in the powder.
- Gel top coat (standard): For sealing the chrome finish.
- UV/LED lamp: For
curinggel polishes.
Steps
- Prep & Base:
Prepyour short length autumn nails.Applya base coat and two thin coats of your chosen gel base color.Cureeach layer fully. - No-Wipe Top Coat:
Applyone thin layer of no-wipe gel top coat.Curefor half the recommended time (this leaves a slight tackiness perfect for chrome powder). - Rub in Chrome: Using a silicone applicator, gently
rubthe chrome powder onto the partiallycuredtop coat until a smooth, mirror-like finish appears. - Dust Off Excess: Use a soft, clean brush to
cleanseaway any excess powder around yourcompact nails. - Seal the Chrome:
Applya thin layer of regular gel top coat over the chrome finish.Curecompletely. - Second Top Coat (Optional): For extra long-lasting wear,
applya second layer of top coat andcure. - Hydrate:
Moisturizecuticles with cuticle oil for a polished autumnal fingertips look.
Pro-Tip: The success of a chrome finish on short length autumn nails hinges on the
curing timesof your no-wipe top coat. Too littlecuringwill make it too wet; too much, and the powder won’t stick. Practice to find the perfect slight tackiness for optimal integrates chrome powder adhesion.

11. Simple Glazed Donut Short Nails for a Luminous Finish

Pin this clean girl aesthetic to your ‘Everyday Nails’ board!
What You Need
- Sheer milky white or light nude polish: A translucent, muted colors polish.
- Iridescent/pearlescent powder (or shimmering top coat): For the “glazed” effect.
- No-wipe gel top coat: If using pearlescent powder, this is essential.
- Silicone applicator (if using powder): To rub in the shimmer.
- Base coat: A
strengtheningbase for nail health. - UV/LED lamp (if using gel): For
curing.
Steps
- Prep & Base:
Prepyour short fall nails.Applya base coat.Cureif gel. - Sheer Base:
Applyone to two thin coats of the sheer milky white or light nude polish.Cureeach layer if gel. The goal is a subtle, translucent base. - No-Wipe Top Coat:
Applya thin layer of no-wipe gel top coat.Curefor about 30 seconds (it should be tacky but not wet). - Apply Shimmer: Using a silicone applicator, gently
rubthe iridescent/pearlescent powder onto the tacky top coat. Buff until you achieve the desired luminous “glazed” effect. - Dust & Seal:
Cleanseaway any excess powder.Applya final layer of no-wipe gel top coat to seal in the shimmer andcurecompletely for a durable finish. - Hydrate: Finish with cuticle oil to
moisturizeand perfect your autumnal fingertips.
Pro-Tip: The key to perfect glazed donut short nails is a perfectly smooth base. Ensure proper
cuticle debridementandbuffingof the nail plate. The final viscosity of top coats should be high enough to fullysmoothingover the powder without dulling the shimmer.

Key Takeaways: Your Quick Guide to Short Fall Nails
- Embrace the Versatility of Short Fall Nails: Short fall nails are incredibly versatile, offering both elegance and practicality that align with
low-maintenance luxuryand clean girl fall nails aesthetics. - Deep Hues and Rich Textures Reign Supreme: Fall nail colors like emerald green, burgundy, and burnt orange, especially with matte finish or chrome finish, are perfect for short length autumn nails, adding depth and sophistication.
- Intricate Designs are Achievable: Don’t shy away from fall nail art like tortoiseshell patterns, delicate
leaf art, or gold foil accents; micro-painting techniques can make them stunning on short nails. - Focus on Nail Health for Lasting Beauty: Proper
nail care basics, including cuticle oil andstrengtheningbase coats, are crucial for maintainingnail health for beginnersand ensuring long-lasting short fall manicures. - DIY is Doable with the Right Tools: Many simple short fall nails designs can be
recreated at home withfine-tip nail art brushes, striping tape, and patience, offering salon-quality results on a budget. - Trendy Finishes Elevate Any Look: From glazed donut short nails to moody autumn nails, incorporating trending finishes can significantly glam up your petite fall nails for 2026, keeping your look current and chic.
People Also Ask About Short Fall Nails
What are the best short fall nail colors for 2026?
The best short fall nail colors for 2026 lean into rich, earthy tones like deep emerald green, burnt orange, warm burgundies, and cozy matte browns. These deep pigments perfectly capture the harvest hues of the season, creating a sophisticated and classy short fall nails aesthetic. Consider accent shades like antique gold or coppery bronze for a touch of autumnal shimmer.
How to do simple fall nail art on short nails?
Simple fall nail art on short nails focuses on minimalist designs that won’t overwhelm the small nail canvas, such as delicate leaf art, subtle gold foil accents, or negative space designs. These micro-painting techniques can be easily achieved with a fine-tip brush, dotting tools, or even carefully placed foil, offering easy autumn leaf nail art for short nails and other understated beauty.
Are short nails in style for fall 2026?
Absolutely, short nails are definitely in style for fall 2026, trending significantly due to their practicality, elegance, and low-maintenance appeal. The clean girl fall nails aesthetic perfectly complements short fall nails, demonstrating that sophisticated and trendy short fall nails do not require excessive length. Many ‘celebrity manicurists’ are also advocating for compact nails this season.
What is the best nail shape for short fall nails?
The best nail shapes for short fall nails are typically short almond nails, short square nails, or a gentle squoval, as these shapes enhance small nail beds and create a polished, flattering look. Short almond nails fall designs offer an elongating effect, while short square nails provide a modern, crisp edge, making both excellent choices for short fall nail designs.
Can you do a french tip on short nails?
Yes, you can absolutely do a french tip on short nails, and it’s a very chic way to glam up a shorter length, especially with modern color variations. Instead of traditional white, opt for autumnal shades like olive french tips or deep burgundy. The key is to keep the tip line very thin and crisp to avoid overwhelming the compact nails and enhancing small nail beds.
How to make short nails look longer with fall colors?
To make short nails look longer with fall colors, choose deep pigments or darker shades that create an illusion of depth, and consider vertical minimalist short nails designs or a short almond nails shape. Using a thin, neutral base with a dark tip (like olive french tips) can also elongate the nail plate, while ensuring cuticle health prevents visual clutter at the base.
Why are short nails trending this autumn?
Short nails are trending this autumn primarily due to a societal shift towards practicality, low-maintenance luxury, and the clean girl aesthetic. They suit active lifestyles, minimize chipped polish and brittle nails, and still allow for intricate short fall nail designs with ease. This trend prioritizes comfort and elegance, making autumnal fingertips both stylish and manageable.
What are the top short fall nail trends on Pinterest?
The top short fall nail trends on Pinterest include autumn ombre skittle manicures, tortoiseshell patterns, moody autumn nails in deep greens and burgundies, and gold foil accents on natural short fall nails. Users are actively searching for visually rich yet simple short fall nails easy to recreate, often featuring cozy fall nails aesthetics and vibrant autumn colors.
What are pumpkin spice nails?
“Pumpkin spice nails” refer to short fall nails designs inspired by the warm, inviting tones of the popular autumn drink, typically incorporating shades of burnt orange, cinnamon brown, rich creams, and subtle shimmers. These harvest hues evoke a cozy fall nails feeling and often include fall nail art like small pumpkin motifs or matte finish effects, perfectly matching sweater weather.
How to apply press-on nails for short beds?
To apply press-on nails for short beds effectively, select ‘extra short fall press on nails’ that match your natural nail shape closely, prep your nails by cleansing and lightly buffing, then use a strong yet non-damaging adhesive. Trim and shape the press-ons if needed for a custom fit, ensuring they don’t extend too far beyond your natural nail plate anatomy for a seamless look and long-lasting wear.
Final Thoughts on Short Fall Nails
As we wrap up our journey through the elegant and achievable world of short fall nails, it’s clear that length is no longer a barrier to expressing sophisticated seasonal style. From classy short fall nails adorned with olive french tips to trendy short fall nails featuring a chrome finish or tortoiseshell patterns, the autumn of 2026 celebrates the beauty of practicality fused with high fashion. This guide aimed to equip you with not just inspiration, but the concrete steps and product insights needed to recreate these looks with confidence.
Embracing low-maintenance luxury with your petite fall nails means you can enjoy the rich harvest hues and cozy textures of the season without sacrificing convenience or nail health. Remember that proven nail care is the foundation of any stunning manicure, whether you choose a DIY approach or visit a ‘certified technician’. By focusing on deep pigments, precise micro-painting techniques, and quality products, your autumnal fingertips will be perfectly poised to welcome fall.
What short fall nail design are you most excited to try this season? Share your favorite in the comments below
Last update on 2026-04-01 / Affiliate links / Images from Amazon Product Advertising API