Struggling to get that flawless, chic manicure at home? You love the timeless elegance of short white nails, but achieving that perfect, streak-free finish often feels impossible, leaving you with a frustratingly uneven result. It’s a common challenge that stands between you and that polished, clean look you’re aiming for.
Short white nails are a classic, versatile, and elegant choice, epitomizing the ‘clean girl aesthetic’ that remains highly popular for 2026. This timeless style enhances any look with its crisp, sophisticated finish. A perfect manicure with this look is easier to achieve than you might think.
Drawing from comprehensive analysis and proven methodologies, this guide unlocks the secrets to a flawless manicure. We will explore 11 elegant short white nail ideas and provide a complete DIY guide to achieve salon-quality results. You’ll discover how to master everything from the perfect milky white finish to troubleshooting common issues like streaky polish.
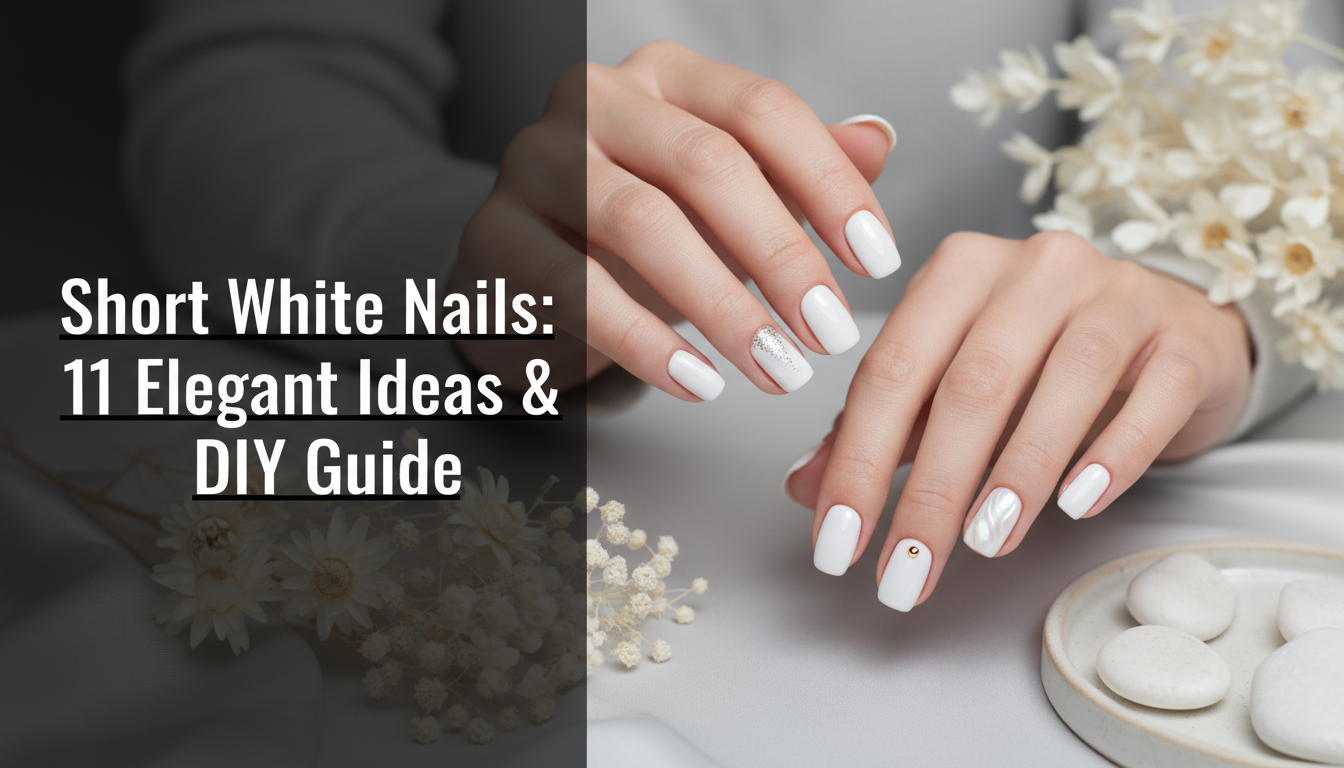
Mastering the “Clean Girl” Aesthetic: 11 Elegant Short White Nail Ideas & Your DIY Guide for 2026
The enduring appeal of short white nails lies in their unmatched versatility and chic simplicity. As a cornerstone of the clean girl aesthetic, this style offers a crisp, polished look that complements every skin tone and occasion. From the soft glow of milky white nails to the sharp definition of a classic white french tip, the possibilities are both timeless and on-trend for 2026. This guide is your complete resource for not just visual inspiration but for actionable, step-by-step instructions to create these looks yourself. We’ll dive into 11 distinct ideas, providing the exact techniques and expert tip insights needed to overcome common challenges like streaky polish and achieve a durable, professional-looking manicure at home. Get ready to master the art of the perfect short white manicure.
1. Achieving the Perfect Milky White Nails

Pin this ethereal milky white nail look to your ‘Beauty Inspo’ board!
The milky white nails look is the epitome of understated elegance, offering a softer alternative to opaque white. This style uses a sheer white or translucent white polish to create a delicate, semi-opaque finish that allows the natural pink of the nail beds to subtly show through. It’s particularly stunning on a short almond shape nails milky style, as the soft color complements the gentle taper of the nail. The key is achieving that perfect level of translucency without the finish appearing uneven or streaky.
Products & Tools Used
- Sheer milky white nail polish (specifically a non-streaky, self-leveling formula)
- Base coat (ridge-filling or strengthening)
- High-gloss top coat for a reflective finish
- Nail file (fine-grit for shaping)
- Buffer block (for smooth nail surface)
- Cuticle oil
Application/Styling Steps
- Prepare nails by gently pushing back cuticles and buffing the surface for a smooth canvas.
- Apply one thin, even layer of base coat and allow to dry completely.
- Paint the first very thin layer of milky white nail polish, ensuring even coverage from cuticle to free edge.
- Allow the first coat to dry almost completely before applying a second thin layer. Adjust the number of coats (2-3) until desired translucency is achieved.
- Seal with a generous layer of high-gloss top coat, wrapping the polish around the tip of the nail to prevent chipped tips.
- Finish by moisturizing cuticles with cuticle oil for a clean, hydrated look.
Pro-Tip: To prevent streaky polish with milky shades, ensure each coat is very thin and allowed to dry almost completely before the next. A slight shimmer in the polish can also help to mask minor imperfections.

2. Classic White French Tips on Short Nails

Save this timeless white french tip look to your ‘Elegant Nail Ideas’ board!
The white french tip is a truly timeless design that exudes sophistication. Contrary to popular belief, this look is not reserved for long nails; it looks incredibly chic and clean on shorter lengths, making it a perfect short white manicure for any occasion, from a day at the office to a special event like being a short white nails for wedding guest. The challenge on short nails is creating a thin, crisp, and perfectly proportioned white tip that enhances the nail shape without overwhelming it.
Products & Tools Used
- Opaque bright white nail polish (for the tips)
- Sheer light pink or nude base polish
- Base coat and top coat
- Thin striper brush or french tip guides
- Nail dehydrator (optional, for adhesion)
- Rubbing alcohol or acetone (for cleanup)
Application/Styling Steps
- Prepare nails by cleaning, shaping into a gentle square or squoval, and buffing the surface.
- Apply one layer of base coat, followed by 1-2 thin coats of sheer light pink or nude polish for the base. Let dry thoroughly.
- For the white french tip:
- Using a striper brush: Dip the brush into the bright white polish and carefully paint a thin, even line along the free edge of each nail.
- Using guides: Place french tip guides just below your free edge, then paint the tip white. Remove guides immediately while wet.
- Allow the white tips to dry completely.
- Seal the entire nail with a high-gloss top coat to protect the design and add shine.
- Clean up any mistakes using a small brush dipped in acetone.
Pro-Tip: For extra precision on short nail beds, use a small makeup sponge or a silicone nail stamper to dab on the white tip. This can create a softer, more natural curve than a brush and is excellent for achieving a perfect C-curve.

3. Elevated Matte White Nails

Pin this chic matte white mani for instant sophistication!
For a modern and fashion-forward take on plain white nails, a matte white finish is the perfect choice. This look swaps the traditional high-gloss shine for a velvety, non-reflective texture that feels both edgy and sophisticated. Matte white is especially striking on a short white square shape, creating a bold statement that’s perfect for those who appreciate minimalist nails. The trick is to achieve a perfectly even matte effect without any streaks or dullness.
Products & Tools Used
- Opaque, bright white nail polish
- High-quality matte top coat
- Base coat
- Nail file (for shaping)
- Lint-free wipes
Application/Styling Steps
- Prepare nails by cleaning, trimming to desired short length, and shaping into a clean square or squoval.
- Apply one coat of base coat and let it dry completely.
- Paint two thin, even coats of opaque white nail polish, allowing each layer to dry fully to avoid bubbles in polish and ensure full coverage.
- Once the white polish is completely dry, apply a single, generous layer of matte top coat. Ensure even application for a consistent matte finish.
- Allow the matte top coat to dry completely to reveal the velvety texture. Avoid touching nails while drying to prevent smudges.
- Periodically clean the matte surface with a lint-free wipe if it loses its crispness.
Pro-Tip: Matte polishes can be more prone to showing oils and dirt. A quick wipe with rubbing alcohol on a lint-free cloth can refresh their look. To ensure true salon quality matte finish, consider a gel matte top coat cured under a UV lamp.

4. Glimmering White Nails with Subtle Glitter

Add a touch of sparkle! Pin these white nails with glitter to your ‘Festive Manicures’ board.
Elevate your classic short white nail designs with a touch of sparkle. Adding white + glitter is a fantastic way to introduce a festive or glamorous element without sacrificing elegance. The key is subtlety; a delicate dusting of shimmering white glitter or a glittery French tip can catch the light beautifully. This can be achieved with a fine glitter polish or by strategically placing loose cosmetic glitter for a custom look.
Products & Tools Used
- Cream white nail polish (as base color)
- Fine glitter nail polish (sheer with micro-glitter, or loose cosmetic glitter)
- Base coat and top coat (glossy)
- Small fan brush (for loose glitter)
- Dotting tool (optional, for precise glitter placement)
Application/Styling Steps
- Prepare nails and apply one layer of base coat.
- Paint two thin coats of cream white nail polish, allowing each to dry.
- For glitter application:
- Using glitter polish: Apply one thin layer of glitter polish over the white base, concentrating it towards the tips or sparingly over the entire nail.
- Using loose glitter: While the second white coat is still slightly tacky (or apply a thin layer of top coat), sprinkle fine cosmetic glitter onto the desired areas using a fan brush. Gently tap off excess.
- Allow glitter to adhere and dry.
- Seal generously with two layers of top coat to smooth the glitter and ensure long-lasting wear.
Pro-Tip: When using loose glitter, apply a thin layer of top coat over the white polish before sprinkling. This helps the glitter stick and allows for better control. Use a small, dense brush to lightly press the glitter into place before the final sealing layer.

5. Edgy White Nails with Black Accents

Dare to contrast! Pin these white nails with black accents to your ‘Edgy Manicures’ board.
For a high-contrast, modern look, combine white + black accents. This bold pairing transforms a simple short white nail art design into an edgy statement. Minimalist designs like thin lines, tiny dots, or abstract geometric shapes work particularly well, especially on a trendy short white coffin nails shape. The precision of the black design against the stark white base is what makes this look so striking and visually appealing.
Products & Tools Used
- Opaque bright white nail polish (for base)
- Black nail art polish (with fine brush or separate striper brush)
- Dotting tool (various sizes)
- Base coat and top coat (glossy or matte, depending on desired finish)
- Rubbing alcohol (for cleanup)
Application/Styling Steps
- Prepare nails and apply base coat.
- Paint two thin, opaque coats of bright white nail polish and let dry completely.
- Designing black accents:
- Using a dotting tool: Dip the dotting tool into black polish and create small dots at the cuticle or in a pattern.
- Using a striper brush: Dip the striper brush into black polish and create thin lines, geometric shapes, or abstract designs.
- Allow the black accents to dry completely.
- Seal the design with top coat. Choose glossy for a stark contrast or matte for a softer, modern look.
- Clean tools immediately after use with rubbing alcohol or acetone.
Pro-Tip: When working with contrasting colors like black and white, ensure the base color is completely dry to prevent any smudging or bleeding. A quick-drying top coat is essential for sealing the intricate design without disturbing it.

6. Shimmering White Chrome Nails

Get ready to shine! Pin these white chrome nails to your ‘Trendy Nail Art’ board.
One of the hottest trends in gel nail designs is the chrome effect, and white chrome nails are a particularly stunning variation. This look provides an iridescent white, mirror-like finish that is both futuristic and incredibly elegant, especially on a short white square shape. While it looks complex, achieving this effect at home is possible with the right products, namely a gel nail polish system and specialized chrome powder.
Products & Tools Used
- White gel nail polish (base color)
- White chrome nail powder
- Non-wipe gel top coat
- Base coat for gel
- UV lamp or LED nail dryer
- Small eyeshadow applicator or silicone tool
- Lint-free wipes
Application/Styling Steps
- Prepare nails and apply a thin layer of gel base coat, then cure under a UV lamp (or LED dryer) according to product instructions.
- Paint two thin coats of white gel nail polish, curing each layer fully.
- Apply a thin layer of non-wipe gel top coat and cure for half the recommended time (this creates the perfect tacky surface for chrome).
- Immediately after partial curing, use the applicator to rub the white chrome nail powder onto the nail surface in small, circular motions until a smooth, metallic sheen appears.
- Brush off any excess powder from the nail and surrounding skin.
- Seal the chrome effect with a final, full layer of non-wipe gel top coat and cure completely.
Pro-Tip: The success of chrome nails depends heavily on the ‘tacky layer’ from the partially cured non-wipe top coat. Experiment with different cure time for your specific lamp and product for the perfect polymerization to get that mirror shine.

7. Soft White Almond Nails

Embrace elegance! Pin these soft white almond nails to your ‘Everyday Chic’ board.
The short white almond shape is a universally flattering choice that can make fingers appear longer and more slender. Paired with a soft, creamy white polish, it creates a look that is both feminine and sophisticated. Many people wonder which white nail shape is most flattering, and the almond shape is often a top contender because it accentuates length even on short natural white nails. The challenge lies in perfectly shaping the nail to achieve that elegant, tapered point.
Products & Tools Used
- Creamy white nail polish (opaque, smooth formula)
- Base coat and top coat
- Nail file (medium and fine grit)
- Buffer block
- Cuticle oil
Application/Styling Steps
- Prepare nails by cleaning and gently pushing back cuticles.
- Shaping for short almond nails:
- Start by filing the sidewalls of the nail straight up to the free edge.
- Then, gently begin to file at an angle from the sidewall towards the center of the tip, creating a soft point.
- Repeat on the other side, ensuring symmetry. The point should be rounded, not sharp.
- Apply one layer of base coat.
- Paint two thin, even coats of creamy white nail polish, ensuring full opacity. Let each coat dry completely.
- Seal with a glossy top coat for a polished finish.
- Finish with moisturizing cuticle oil.
Pro-Tip: For short nail beds, achieving a true almond shape can be challenging. Focus on gently tapering the sides rather than creating a drastic point. This ensures the shape is flattering and doesn’t make the nail appear too narrow. Consider starting with a squoval shape and gradually rounding the corners inward.

8. Fresh White Press-On Nails

Instant mani magic! Pin these white press on nails for a quick style upgrade.
For those who want a perfect short white manicure in minutes, press on nails are a game-changer. Modern press-ons offer a durable, salon quality look without the time or expense of a salon visit. With options like extra short white press on nails, you can get a flawless, long-lasting manicure that looks incredibly natural. Learning how to apply white press on nails correctly is the key to ensuring they stay put and look seamless.
Products & Tools Used
- Set of short white press-on nails (in various sizes)
- Nail glue or adhesive tabs (often included)
- Nail file and buffer block
- Alcohol prep pad or nail dehydrator
- Cuticle oil
- Wood stick (for cuticle pushing)
Application/Styling Steps
- Prepare natural nails: gently push back cuticles, trimming any excess. Lightly buff the natural nail surface to create grip.
- Clean nails thoroughly with an alcohol prep pad or nail dehydrator to remove oils.
- Select the correct size press-on nail for each finger; ensure it fits perfectly sidewall to sidewall without overlapping skin.
- Applying the press-on nails:
- If using glue: Apply a small drop of nail glue to your natural nail and to the back of the press-on nail.
- If using tabs: Adhere the tab to your natural nail, then peel off the backing.
- Align the press-on nail with your cuticle and press down firmly for 15-30 seconds, ensuring no air bubbles.
- Repeat for all nails. After application, avoid water for at least an hour.
- Finish with cuticle oil for a finished look.
Pro-Tip: For the best results and long-lasting wear with press-on nails, ensure your natural nails are completely dehydrated before application. Using a high-quality glue and properly buffing your nails will significantly improve adhesion and prevent premature lifting.

9. Caring for Short White Acrylics

Keep your short white acrylics flawless! Pin this guide for proper care.
Short white acrylics offer superior durability and a perfectly sculpted look that lasts for weeks. While stronger than natural nails, they still require proper care to maintain their crisp white color and prevent issues like yellowing nails or lifting. Good home maintenance not only extends the life of your manicure but also promotes better nail health underneath, ensuring a damage-free experience. Understanding the difference in care between acrylic vs gel is also important.
Products & Tools Used
- Cuticle oil
- Soft-bristled nail brush
- Non-acetone nail polish remover (for regular polish over acrylics)
- High-gloss top coat (optional, for refresh)
- Hand moisturizer
Routine Steps
- Moisturizing daily: Apply cuticle oil around your cuticles and under the free edge of your acrylics at least twice a day to keep them hydrated and flexible.
- Cleaning regularly: Use a soft-bristled brush with mild soap and water to gently clean under your nails and around the cuticles, preventing dirt buildup.
- Avoiding staining: Wear gloves when cleaning, gardening, or using dyes to prevent yellowing nails or discoloration of your short white acrylics.
- Gentle filing: Use a fine-grit nail file for minor shaping or smoothing of the free edge between appointments, but avoid aggressive buffing of the acrylic itself.
- Protecting from trauma: Be mindful of your nails to prevent impacts that could cause lifting gel or chipped tips.
- Regular fill-ins: Schedule professional fill-in appointments every 2-3 weeks to maintain the integrity and appearance of your acrylics and address the apex placement.
Pro-Tip: While short white acrylics are durable, they are still prone to yellowing nails from sun exposure or certain chemicals. A salon quality UV-protective top coat can help prevent staining and keep your white vibrant.

10. Fun White Nails with Simple Flower Design

Bloom with beauty! Pin these white nails with simple flower design to your ‘Spring Nail Art’ board.
A crisp white manicure provides the perfect blank canvas look for simple yet charming short white nail art. A short white nails with simple flower design is a delightful way to add a touch of whimsy and personality to your nails. Using just a dotting tool, you can easily create delicate pastel flowers (white + flowers) that look intricate but are surprisingly simple to execute, making this a great entry point for DIY nail artists.
Products & Tools Used
- Opaque bright white nail polish (base color)
- Assorted pastel nail art polish (for flowers)
- Dotting tool (small sizes) or fine striper brush
- Base coat and top coat
- Paper plate or foil (for polish palette)
Application/Styling Steps
- Prepare nails and apply base coat.
- Paint two thin, opaque coats of bright white nail polish. Allow to dry completely.
- Designing simple flower design:
- Place a small drop of pastel polish on your palette.
- Dip a dotting tool into the pastel polish and create 5 small dots in a circle to form petals.
- Using a contrasting pastel color or yellow, place a single small dot in the center of the petals for the flower’s core.
- Repeat on desired nails (e.g., accent nail).
- Allow the flower designs to dry completely.
- Seal the entire nail with a clear, glossy top coat to protect the design.
Pro-Tip: For the best results with simple flower design and other intricate nail art on short white nails, ensure your base color is absolutely dry before starting the art. This prevents the colors from bleeding into each other and keeps your lines crisp. A quick-drying top coat also helps set the design quickly.

11. Troubleshooting Streaky White Polish

Banish streaks forever! Pin these pro tips for perfect white polish to your ‘Nail Hacks’ board.
One of the most common questions is, why do white nails look streaky? The high pigmentation load in opaque white polish makes it notoriously difficult to apply smoothly. This section provides the ultimate problem solution guide to finally conquer streaky polish. The secret lies in a combination of proper nail preparation, the right application technique, and patience.
Products & Tools Used
- High-quality, self-leveling opaque white nail polish
- Base coat and top coat
- Buffer block (fine grit)
- Nail polish thinner (if polish is too thick)
- Clean, soft nail brush (applicator brush should be good quality)
- Nail dehydrator
Application/Styling Steps
- Preparing for smooth application:
- Ensure your natural nails are completely smooth by gently buffing with a fine-grit buffer block.
- Clean nails thoroughly with nail dehydrator to remove all oils and residue.
- Applying the base coat: Paint one thin, even layer of base coat and let it dry completely. This creates an even surface for the white polish.
- Technique for white polish:
- Use a good quality opaque white nail polish with medium viscosity. If your polish is too thick, add a drop or two of polish thinner.
- Load your brush with enough polish to cover the nail in 3 strokes, but not so much that it’s dripping. Wipe excess from one side of the brush.
- Paint the first stroke down the center, then one stroke on each side, from cuticle to free edge. Do not over-brush.
- Layering: Let the first coat dry for at least 2-3 minutes until tacky but not wet. Apply a second, thin, even coat. A third thin coat may be necessary for full opacity. Avoid thick coats, which lead to bubbles in polish and streaks.
- Sealing the finish: Once completely dry, seal with a glossy top coat to smooth any minor imperfections and add shine.
Pro-Tip: Many common problem solutions for streaky polish lie in polish pigmentation load and brush quality. Invest in a highly pigmented, self-leveling opaque white nail polish from a reputable brand, and ensure your brush is clean and free of hardened polish. Always apply in thin, even layers.

Key Takeaways
Your journey to mastering the perfect short white nail look is built on a few core principles. This scannable summary highlights the most critical insights from our guide, ensuring you have the essential knowledge to achieve a flawless, elegant manicure that embodies the clean girl aesthetic. Remember these points to transform your DIY nail sessions.
- Embrace Versatility: Short white nails are a timeless, elegant choice that complements skin tone and adapts to various styles, from milky white nails to edgy black accents, making them ideal for the clean girl aesthetic or formal events.
- Preparation is Key: Achieving a flawless, streak-free polish requires meticulous nail preparation, including buffing for a smooth surface and cleaning with a nail dehydrator to ensure optimal adhesion for any white nail polish application.
- Technique Matters: For perfect application, use thin, even coats of polish, allowing each layer to dry completely. This is crucial for opaque finishes and preventing common issues like bubbles in polish or chipped tips.
- Product Selection Influences Results: Investing in salon quality base coat, top coat, and specifically formulated opaque white nail polish or white chrome nail powder significantly impacts the durability and finish of your short white nails.
- Press-Ons Offer Convenience: For instant short white nails, high-quality press on nails provide a quick and damage-free alternative, with proper application ensuring long-lasting wear and a professional look.
- Maintain for Longevity: Regular use of cuticle oil and protecting your nails from staining or trauma are essential steps in caring for short white acrylics or any DIY manicure to prevent yellowing nails and ensure vibrant color.
- Don’t Fear Embellishments: Simple additions like subtle glitter, delicate flower design, or minimalist black accents can elevate your short white nails, allowing for creative expression while maintaining a sophisticated look.
FAQs About short white nails
Here we answer some of the most frequently asked questions about achieving and maintaining the perfect short white nails.
Are white nails classy for 2026?
Absolutely, white nails remain a timeless and incredibly classy choice for 2026, especially in shorter lengths. They embody a minimalist elegance that seamlessly aligns with current trends like the clean girl aesthetic, making them suitable for professional settings, bridal events, or everyday sophistication. Their versatility allows for various finishes, from milky white nails to opaque, adding to their enduring appeal.
How to keep white nails from turning yellow?
To prevent white nails from turning yellow, always apply a good quality base coat before your white polish, and use a UV-protective top coat. Avoid prolonged exposure to harsh cleaning chemicals (wear gloves) and direct sunlight. Additionally, certain foods or dyes can stain, so be mindful when handling them. Opting for a non-yellowing gel nail polish formula can also help.
What are milky white nails?
Milky white nails feature a translucent, semi-sheer white polish that allows a hint of your natural nail bed to show through, creating a soft, diffused white effect. Unlike opaque white, which provides full coverage, milky white offers a more subtle and natural-looking manicure, often associated with a delicate, ethereal aesthetic. It’s a popular choice for a refined and understated look.
Does white polish look good on short nails?
Yes, white polish looks exceptionally good on short nails, enhancing their clean and sophisticated appearance. The crispness of white on a short length can make fingers appear elongated and well-groomed. It’s a versatile color that flatters most skin tones and nail shapes, from short white almond to square, making it a perfect choice for practical yet chic manicures.
How to do short white nails at home without streaks?
To do short white nails at home without streaks, focus on thin, even layers of high-quality, opaque white polish, allowing each coat to dry completely before applying the next. Ensure your nails are perfectly smooth by buffing beforehand, and use a good base coat. Avoid over-brushing, and apply a glossy top coat to self-level and hide minor imperfections.
What shape is best for short white nails?
For short white nails, the most flattering shapes are typically squoval, soft square, or a gently rounded oval/almond. The squoval and soft square shapes offer a clean, modern edge that complements skin tone and is easy to maintain. A gently rounded oval or short almond shape can visually elongate the fingers, providing a more delicate and feminine look for short nail beds.
Are short white nails in style 2026?
Yes, short white nails are definitely in style for 2026, maintaining their status as a chic and versatile trend. They continue to be a staple in minimalist fashion and are integral to the popular clean girl aesthetic. With new finishes like chrome and subtle art designs, they offer modern interpretations while retaining their classic appeal, making them a top choice for any season.
Why do white nails look streaky?
White nails often look streaky due to thick application, uneven polish consistency, or insufficient drying time between coats. White polish typically has a higher pigmentation load, making streaks more noticeable. Over-brushing or using a poor-quality brush can also contribute. Proper nail preparation and using a self-leveling formula are key problem solutions.
Can you have white nails for a wedding?
Absolutely, white nails are an incredibly popular and appropriate choice for a wedding, both for brides and guests. They symbolize purity and elegance, perfectly matching the celebratory occasion. Opt for classic white french tips, a pristine opaque white, or a delicate milky white for a sophisticated bridal look that complements skin tone and attire beautifully.
Is milky white different from plain white?
Yes, milky white is distinct from plain white nail polish due to its translucency. Plain white (or opaque white) provides full, solid color coverage, completely hiding the natural nail. Milky white nails, in contrast, are semi-sheer, allowing a subtle hint of your natural nail color to show through, resulting in a softer, more diffused appearance.
Final Thoughts
Embracing the short white nail style is more than just choosing a color; it’s about adopting a look of clean, effortless sophistication. As we’ve explored, the beauty of this manicure lies in its incredible versatility—from the ethereal glow of milky white nails to the modern edge of a matte finish or the timeless appeal of a white french tip. With the right techniques and a little practice, achieving a salon quality, damage-free manicure at home is entirely within your reach.
This guide has equipped you with the knowledge to not only replicate these beautiful short white nail ideas but also to understand the principles behind a flawless application. By focusing on meticulous preparation, patient layering, and proper nail health, you can confidently create a durable and elegant short white manicure that truly reflects the chic clean girl aesthetic. Now, which stunning short white nail look will you try first?
Last update on 2026-04-06 / Affiliate links / Images from Amazon Product Advertising API