Have you ever saved a gorgeous, intricate floral manicure to your Pinterest board, only to feel frustrated when trying to recreate it at home? You’re not alone; many online tutorials showcase art that requires professional-level skill, leaving DIY enthusiasts with shaky, smudged results. It’s time to find genuinely simple floral nails that look elegant, not amateur.
Creating simple floral nails at home is achievable with basic tools like a dotting tool or even a toothpick. The key is to start with a clean base coat and use minimalist designs like simple daisies or single-stem roses. Focus on creating small, delicate patterns rather than intricate, full-nail coverage for an elegant and modern look. This approach makes beautiful nails accessible to everyone.
Drawing from comprehensive analysis of current data and proven methodologies, this guide demystifies the process. We’ll explore tried-and-tested designs that prove you don’t need to be a professional artist to achieve a stunning floral manicure. Get ready to discover 11 achievable designs that will elevate your at-home nail game.
How Can You Create Beautifully Simple Floral Nails at Home?
The dream of achieving a salon-quality floral nail art look right at home can feel out of reach, especially when faced with complex tutorials. However, the secret isn’t about having an artist’s steady hand; it’s about using the right techniques and simple tools. The core relationship for any successful DIY floral nails is straightforward: a beautiful design starts with a clean nail, is created using basic Tools like a dotting tool or a thin detail brush, and is protected with a durable Top Coat. This step-by-step guide is built on this foundation, offering a tried-and-tested pathway to creating dainty floral nails that are elegant, modern, and surprisingly easy. We’ll walk you through everything you need to know, building your confidence with each petal you paint.
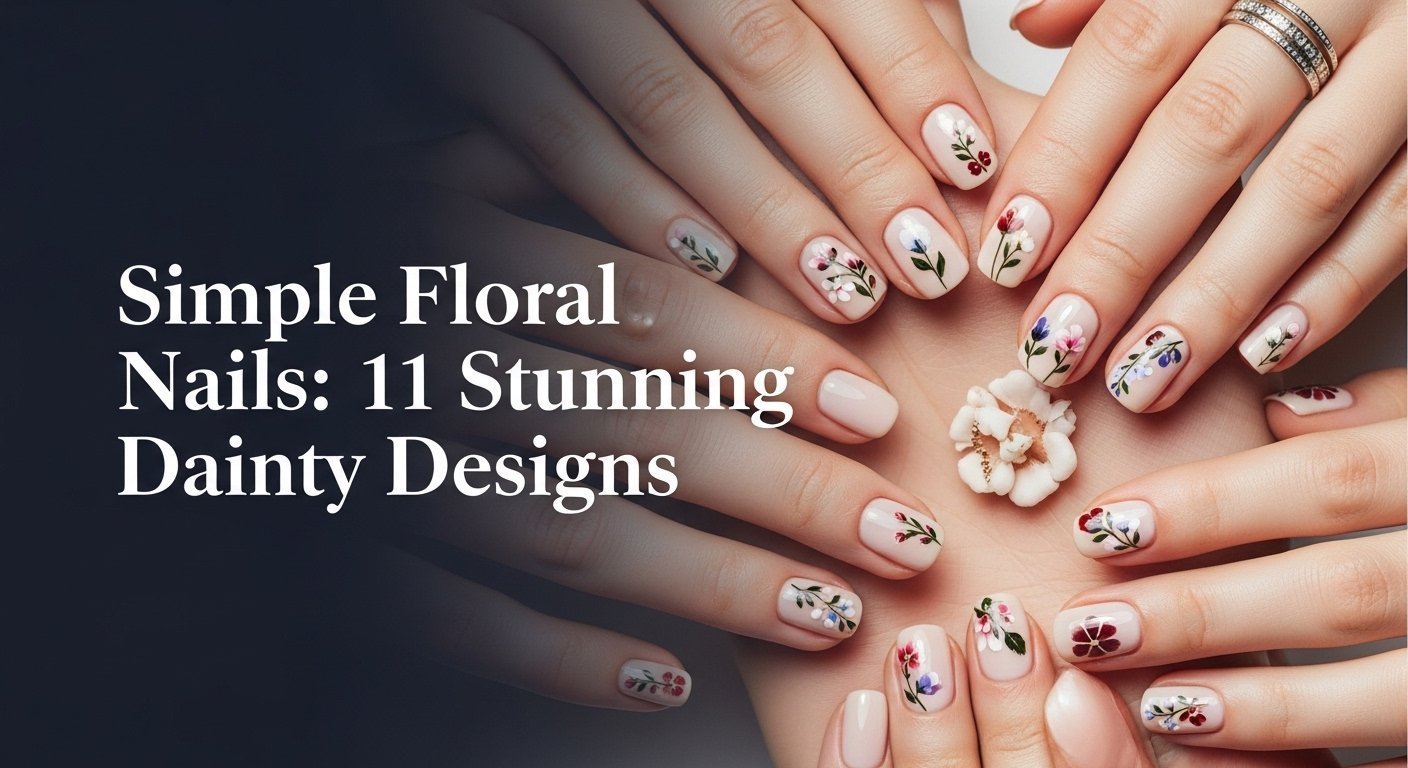
Simple Floral Nails: 11 Stunning Dainty Designs for 2026
Now, let’s dive into the inspiration you’ve been searching for. This listicle presents 11 unique and stunningly simple floral nail ideas that are perfect for 2026. Each design is broken down into a clear, actionable two-part structure: “What You Need” and “What To Do,” making them incredibly easy to follow. We’ll cover everything from minimalist daisies to elegant rose stems, ensuring there’s a style for every taste and occasion. These designs prioritize a Pinterest-friendly aesthetic, focusing on clean lines, popular color palettes like pastel and milky tones, and an overall elegant feel that you can proudly recreate.
1. Create a Minimalist Daisy Chain

Pin this delicate design for your next minimalist manicure!
Products & Tools Used
- Sheer nude or milky base coat polish
- A high-pigment white nail polish for petals
- A bright yellow nail polish for the center
- A thin detail brush or toothpick for the stem
- A fine-tipped dotting tool (or the end of a bobby pin)
- A high-shine, quick-dry top coat
Application/Styling Steps
- Prep your nails and apply one to two coats of your sheer nude base color. Let it dry completely.
- Place a small drop of white polish onto a palette (or piece of foil).
- Dip your dotting tool into the white polish and dot five small petals in a circle to create the daisy shape.
- Clean the tool, then dip it into the yellow polish and place a single dot in the center of your white petals.
- Repeat to create a “chain” of 2-3 flowers.
- Once dry, seal the design with a generous layer of top coat to prevent chipping.
Pro-Tip: For perfectly uniform petals, don’t re-dip the dotting tool for each petal. Use the polish from a single dip for all five petals to create a more delicate, tapered look as the polish lessens. This is a nail tech approved trick for a dainty finish.

2. Paint Dainty Dotted Forget-Me-Nots

Save this sweet and simple floral nail idea for a touch of elegance.
Products & Tools Used
- An opaque white or off-white nail lacquer for the base
- A pastel blue polish
- A small dot of yellow polish
- A very fine-tipped dotting tool or a toothpick
- A glossy top coat
Application/Styling Steps
- Apply two coats of your white base polish and allow it to fully dry.
- Pour a tiny amount of the pastel blue polish onto your palette.
- Using the smallest dotting tool you have, create a 5-dot flower. Make them small and close together.
- Create a small cluster of 2-3 of these flowers near the cuticle or the tip of the nail.
- After the blue dots have set for a moment, use a clean toothpick tip to place a minuscule dot of yellow in the center of each flower.
- Let the design dry for several minutes, then finish with a high-gloss top coat.
Pro-Tip: Don’t have the perfect pastel blue? Mix a single drop of a medium blue polish into a few drops of white polish on your palette. This expert advice allows you to customize your shade and is a core skill in hand-painted nail art.
3. Design a Delicate Single-Stem Rose

A single rose is all you need. Pin this elegant idea!
Products & Tools Used
- A milky white or sheer pink base polish
- A dusty rose or soft red polish
- A dark green polish for the stem and leaves
- An ultra-fine detail brush (often called a liner brush)
- A glossy top coat
Application/Styling Steps
- Paint two coats of your milky base and let it dry.
- Using your detail brush and the rose polish, draw a small, slightly messy “C” shape.
- Create another “C” shape around the first one, slightly overlapping. This forms the simple rosebud.
- Clean your brush, then dip it in the green polish. Draw a thin, slightly curved line down from the rosebud for the stem.
- Add one or two tiny, leaf shapes coming off the stem.
- Let the art dry completely, then seal with a top coat.
Pro-Tip: For a more dimensional rose, use two shades of pink. Create the initial C-shapes with the lighter pink, then add one or two tiny strokes of the darker pink near the center. This mimics the one-stroke technique used by pros and adds depth with minimal effort.

4. Apply a Simple Floral French Tip

The perfect spring update to a classic! Pin this floral french tip idea.
Products & Tools Used
- A sheer pink or nude polish for the base
- Opaque white polish
- Bright yellow polish
- A small dotting tool
- A glossy top coat
Application/Styling Steps
- Apply one or two coats of your sheer pink base polish and let it dry completely.
- Using your dotting tool and white polish, dot 4-5 small, 5-petal flowers along the free edge of your nail where the white tip would normally be.
- Don’t worry about a perfect line; a slightly scattered, organic placement looks more artistic.
- Once the white petals are placed, use a very fine tool to dot a tiny yellow center in each flower.
- Let the design set, then seal with a top coat, making sure to cap the free edge.
Pro-Tip: For a more modern, deep French look, extend the flowers further down the sides of the nail. For a classic look, keep the flowers confined to a thin line at the very tip. This small adjustment completely changes the floral nail aesthetic.

5. Try a Subtle Lavender Sprig Accent

So calming and chic. Pin this simple lavender nail art.
Products & Tools Used
- A light grey or beige base polish
- A lavender or light purple polish
- A sage green polish
- A fine detail brush
- A small dotting tool
- A matte top coat (optional, for a modern finish)
Application/Styling Steps
- Paint one or two nails with your base color and let dry. The other nails can be left plain or painted with the same base color.
- Using the detail brush and green polish, draw a thin, slightly curved line for the lavender stem.
- Clean the brush. Dip your dotting tool in the lavender polish.
- Apply small dots in a staggered pattern on either side of the top of the stem, clustering them more densely at the top and spacing them out as you move down.
- Let the design dry fully.
- Finish with a glossy or matte top coat for two distinct looks.
Pro-Tip: To make the lavender sprig look more realistic, use slightly larger dots at the base of the flower cluster and smaller dots at the very tip. This tapering effect mimics a real lavender flower and adds a professional touch to your DIY floral nails.

6. Master Milky White Wildflower Nails

The dreamiest milky flower nails! Pin this for your next set.
Products & Tools Used
- A semi-sheer milky white polish OR a clear top coat and an opaque white polish
- Several pastel polishes (e.g., pink, light blue, pale yellow)
- A dark green polish for tiny leaves/stems
- A small dotting tool and a fine detail brush
Application/Styling Steps
- Create your milky base: Apply 1-2 coats of a pre-made milky polish. Let dry.
- Using the dotting tool, create tiny 5-petal flowers with your various pastel polishes. Scatter them randomly across the nail.
- Place some flowers near the cuticle, some in the middle, and some near the tip for a natural “wildflower field” look.
- With the detail brush, add tiny green leaves or stems next to a few of the flowers.
- Finish with a high-gloss top coat to enhance the milky, layered effect.
Pro-Tip: DIY Milky Polish: If you don’t have a milky polish, create your own! In an empty polish bottle or on a palette, mix about 3 parts clear top coat with 1 part opaque white polish. Shake or mix well. This expert advice gives you complete control over the sheerness.

7. Etch a Negative Space Leafy Vine

For the true minimalist. Pin this chic negative space floral idea.
Products & Tools Used
- A clear, high-quality base coat (a ridge-filling one is ideal)
- A dark or olive green polish
- An ultra-fine detail brush
- A glossy top coat
Application/Styling Steps
- Prep your nails thoroughly. For negative space designs, a flawless base is key. Apply one coat of your clear base coat and let it dry.
- Using the detail brush and green polish, draw a single, thin, wavy line from the cuticle to the tip, or curving along one side of the nail.
- Along this line, paint tiny, simple leaf shapes. These can be simple ovals or pointed teardrops.
- Keep it sparse and delicate. The beauty of this design is in its simplicity.
- Let the green polish dry completely. This is crucial to avoid smearing.
- Apply a glossy top coat to make the design pop and protect it.
Pro-Tip: The key to stunning negative space floral nails is a perfectly smooth canvas. Use a ridge-filling base coat even if you don’t have obvious ridges. This nail health tip creates a glass-like surface that makes your simple art look incredibly professional.

8. Add a Single Gold Foil Flower

Luxury made simple. Pin this gold foil flower hack!
Products & Tools Used
- A dark base color like navy, black, or burgundy
- Nail foil glue (or use a tacky gel base)
- Gold leaf flakes for nails
- A pair of tweezers or a wax-tipped pen
- A gel top coat for encapsulation
Application/Styling Steps
- Paint two coats of your dark base color. If using regular polish, let it dry. If using gel, cure it.
- Apply a thin layer of nail foil glue in a small, rough flower shape and let it become tacky (turn clear). Alternatively, use a tacky layer of gel polish.
- Using tweezers, pick up tiny flakes of gold leaf and gently press them onto the tacky area, forming 5-6 “petals” and a center.
- Gently press the foil down to ensure it’s flat against the nail.
- Encapsulate the design with a thick layer of top coat (a gel top coat works best for a smooth finish). Cure if using gel.
Pro-Tip: Gold foil can be bulky. To ensure a perfectly smooth finish (pro results), apply two layers of top coat. Apply the first, cure, lightly buff the surface with a fine-grit buffer, wipe with alcohol, and then apply the final top coat. This is an industry-standard technique for encapsulated glitter or foil.

9. Stamp a Black and White Botanical Print

Perfect lines every time. Pin this nail stamping hack!
Products & Tools Used
- A white base polish
- A black, highly-pigmented stamping polish
- A floral pattern or botanical nail stamping plate
- A clear jelly stamper and scraper
- A liquid latex barrier for easy cleanup (optional)
- A no-smudge top coat specifically for stamping
Application/Styling Steps
- Paint your nails with the white base coat and let them dry completely. Apply the liquid latex around your nail if using.
- Apply the black stamping polish over the desired design on your stamping plate.
- Quickly scrape the excess polish off the plate at a 45-degree angle.
- Immediately press the clear jelly stamper onto the plate with a rolling motion to pick up the design.
- Look through the clear stamper to aim, then gently roll it over your nail to transfer the design.
- Peel off the liquid latex. Once the design is dry, apply a no-smudge top coat.
Pro-Tip: Is your design not picking up? You’re likely moving too slowly. Stamping polish dries incredibly fast. Have everything laid out and work quickly: apply, scrape, roll, transfer. This is the most important piece of expert advice for successful stamping.

10. Stick on a Simple Pressed Flower Decal

The ultimate no-tool method! Pin this pressed flower nail idea.
Products & Tools Used
- A clear or sheer nude base polish
- A set of tiny, real dried and pressed flower decals for nails
- A small dish of water
- A pair of fine-tipped tweezers
- A thick, gel-like top coat (builder gel or a gel top coat is best)
Application/Styling Steps
- Apply your base coat. While it’s still slightly tacky, move to the next step.
- Using tweezers, gently pick up a single dried flower. Some may need a quick dip in water to become pliable.
- Carefully place the flower onto your nail.
- Gently press it down with your finger or a silicone tool to make sure all edges are flat against the nail. This is key to avoiding snags.
- Encapsulate the flower with a thick layer of top coat. You may need two layers to create a completely smooth surface over the flower.
Pro-Tip: The biggest mistake with dried flower encapsulation is not making the flower pliable first. A quick 5-second dip in warm water makes a stiff flower flexible, allowing it to hug the curve of your nail perfectly and preventing it from cracking during application.

11. Create a Simple Sunflower Accent Nail

Bring the sunshine with you! Pin this easy sunflower nail tutorial.
Products & Tools Used
- A pale blue or white base polish
- A vibrant, sunny yellow polish
- A dark brown polish
- A small dotting tool
- A fine detail brush
- A glossy top coat
Application/Styling Steps
- Apply two coats of your light blue base polish and let it dry.
- Using the dotting tool and brown polish, create a large, slightly irregular circle in the center of the nail for the sunflower’s head.
- Clean your brush. Dip the detail brush into the yellow polish.
- Starting from the edge of the brown circle, paint short, slightly pointed petals radiating outwards. You don’t need to be perfect; variation makes it look more natural.
- Continue adding petals all the way around the brown center.
- Let the design dry completely, then finish with a glossy top coat.
Pro-Tip: To give the sunflower center texture, wait for the initial brown dot to dry. Then, use a toothpick to add a few even smaller dots of black or a lighter brown on top of it. This micro-painting hack creates depth and makes your sunflower look more artistic.

Key Takeaways
Here’s a quick rundown of the most important takeaways for achieving beautiful simple floral nails at home. This scannable summary provides the critical insights you need to get started and succeed.
- Master the Tools: A dotting tool and a thin detail brush are all you need to create the majority of simple floral nail designs. You don’t need to be a professional artist.
- Start with Dots: The easiest way to create a flower nail art design is by starting with dots. Five dots in a circle create a daisy or forget-me-not, forming the foundation of many easy flower nail designs.
- The Base Matters: A smooth, even base coat is crucial. For trendy looks, try a milky white base, and for negative space floral designs, use a ridge-filling clear coat for a flawless finish.
- Don’t Skip the Top Coat: A high-quality top coat is non-negotiable. It not only protects your design from chipping but also smooths over any slight bumps from the art, giving a pro results finish.
- Embrace Alternatives: If hand-painted art is too intimidating, nail stamping, gold foil, or real pressed flower decals are fantastic alternatives to stickers that provide a stunning, elegant look with minimal effort.
People Also Ask About Simple Floral Nails
Here are answers to some of the most frequently asked questions about creating simple floral nails. This section aims to resolve any lingering queries and help you troubleshoot common issues.
How do you do simple floral nails on short nails?
The key to floral nails on short nails is to keep the design scaled down and minimal. Opt for a single accent nail with a tiny flower cluster, a few small flowers scattered on a milky base, or a delicate vine trailing from the cuticle. Avoid large, overwhelming patterns that can make short nails look crowded. A negative space design also works beautifully.
How do you make flower nail designs without tools?
You can easily create flower designs using household items. A toothpick is perfect for creating tiny dots for flower centers or drawing thin stems. The round head of a bobby pin or a pin from a sewing kit makes an excellent dotting tool for creating petals. This no-tool method is a great beginner friendly starting point.
What is the best base color for floral nails?
Sheer nudes, milky whites, and pale pastels are the most popular base colors for simple floral nails. These colors create a clean, soft backdrop that allows the dainty floral artwork to stand out without competing. For a bolder, more modern look, a dark color like navy or black can make pastel petals or white flowers pop.
How do you use a dotting tool to make flowers?
To make a simple flower, dip your dotting tool into polish and press it onto the nail to create a petal. Create five or six dots in a circle for a daisy or blossom shape. Then, use a smaller dotting tool or a toothpick with a different color to place a single dot in the center. It’s one of the most fundamental nail art tools for beginners.
Are floral nails in style for 2026?
Yes, floral nails are a timeless trend that remains incredibly popular in 2026, especially for the spring and summer seasons. The current trend leans towards minimalist flower nails, such as the milky flower nails aesthetic, dainty single flowers on a clear base (negative space floral), and modern takes like floral french tips. They are constantly being reinvented.
How do you fix mistakes in nail art?
For small smudges, dip a fine detail brush in a small amount of acetone and gently dab the mistake away. Let the area dry before continuing. If you make a larger mistake, it’s often best to wipe the nail clean with remover and start that nail over. Working with gel polish is more forgiving as you can simply wipe away mistakes before curing.
What’s the difference between stickers and hand-painted florals?
Hand-painted florals offer unique, artistic results, while stickers and decals provide perfection and consistency. Stickers vs hand-painted is a choice of time versus customization. Stickers are faster and foolproof, ideal for beginners. Hand-painting allows for more creativity in color and design but requires more practice and a steady hand.
How do I make my floral manicure last longer?
Proper prep and a quality top coat are essential for a long lasting manicure. Make sure your nails are clean and free of oils before you start. After your design is completely dry, apply a good top coat, making sure to “cap” the free edge of your nail by running the brush along the tip. This helps prevent chipping.
Can you do floral nails with regular polish instead of gel?
Absolutely. All the designs in this guide can be done with regular nail lacquer. The main difference between gel vs regular polish is dry time and durability. You must ensure each layer of regular polish is completely dry before adding art on top to prevent smudging. A quick-dry top coat is highly recommended.
Are simple floral nails professional for work?
Yes, simple floral nails can be very professional for most work environments. Stick to subtle, dainty designs on neutral or pastel base colors. A single accent nail, a minimalist French tip variation, or a negative space design are all chic, elegant options that add a touch of personality without being distracting.
Final Thoughts on Your DIY Floral Manicure
You now have 11 stunning, dainty, and genuinely simple floral nail designs in your arsenal. The journey from a blank nail to a beautiful botanical nail art creation is a rewarding one, and as you’ve seen, it doesn’t require years of training—just the right techniques and a little bit of patience. By mastering the dotting tool and a few basic brush strokes, you can recreate endless variations of these flower nail art ideas.
Remember that every attempt is practice. Your first daisy might not be perfect, but your fifth will be noticeably better. Embrace the process, experiment with colors, and don’t be afraid to try different styles, from a milky white wildflower field to a bold, stamped botanical print. With this step-by-step guide, you have the professional tips and tried and tested methods to create beautiful manicures that are both elegant and fun.
What was your favorite design from this list? Let me know which one you’re excited to try first in the comments below.
Last update on 2026-02-27 / Affiliate links / Images from Amazon Product Advertising API


