Tired of bold colors that clash with your outfits and need a refresh? You’re looking for a manicure that’s effortlessly chic, professional, and always in style.
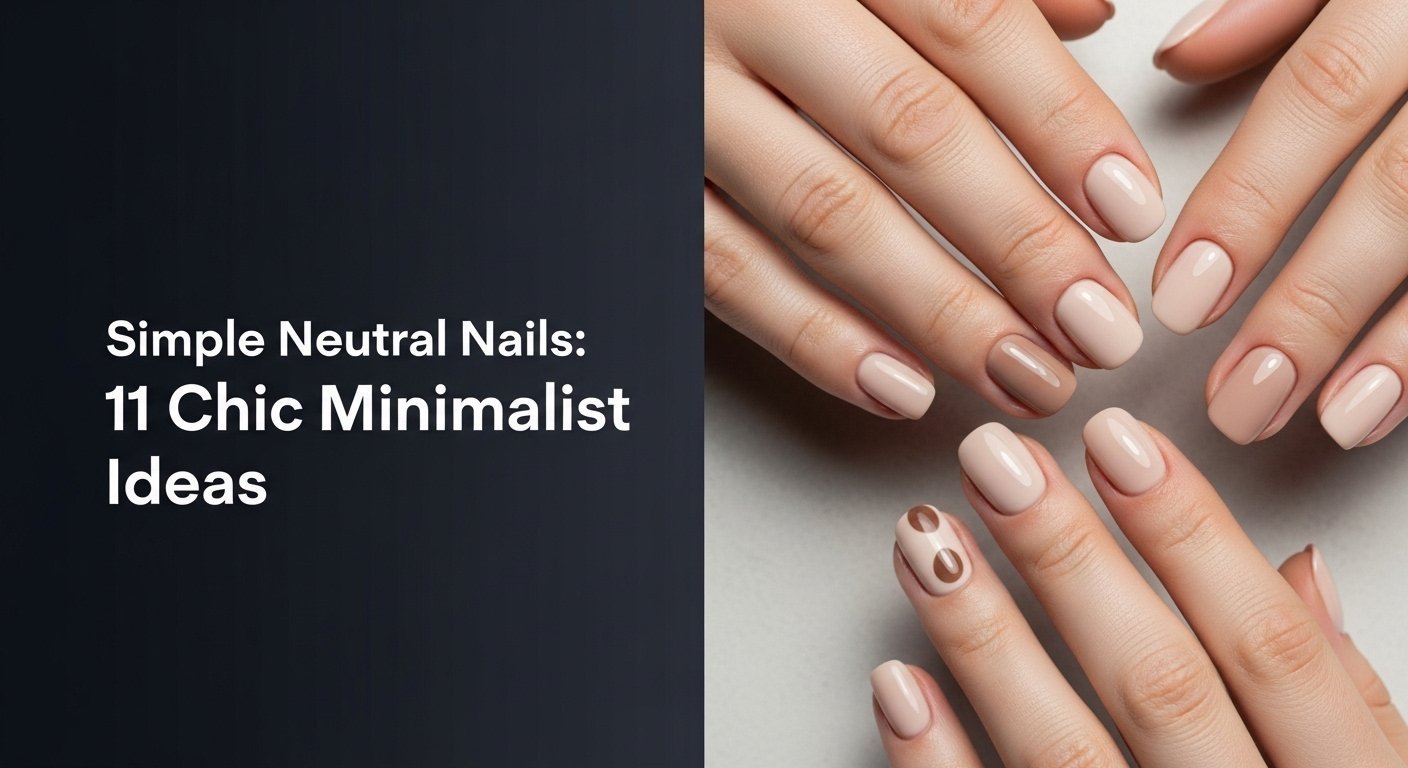
Simple neutral nails are manicures that use understated, muted colors like nude, beige, soft pink, and white to create a clean, elegant, and versatile look. They are celebrated for their ability to complement any outfit, occasion, or skin tone, offering a timeless and sophisticated alternative to bold nail art.
Drawing from comprehensive analysis of current data and proven methodologies, we’ve compiled the ultimate guide to this enduring trend. This post will reveal 11 stunning yet achievable simple neutral nails ideas. You’ll discover how to create these looks at home with expert tips for a salon-quality finish.
Why Are Simple Neutral Nails the Ultimate Chic Statement?
In a world of ever-changing, vibrant nail trends, the return to simple neutral nails feels like a breath of fresh air. But this isn’t just a fleeting moment; it’s a powerful style choice rooted in versatility and quiet confidence. A minimalist neutral nails aesthetic is the ultimate accessory because it enhances natural beauty without overpowering your personal style. These understated nails are uniquely suited for any occasion, seamlessly transitioning from an important office presentation to a casual weekend brunch or an elegant evening event. Unlike bold patterns or bright colors that can clash with your wardrobe, chic neutral nails complement every outfit, making them a practical and sophisticated choice for everyday wear. This timeless appeal is why the clean neutral aesthetic is consistently featured in beauty editor picks and embraced by style icons who understand that true elegance often lies in simplicity.
11 Simple Neutral Nail Ideas for a Flawlessly Chic Manicure in 2026
Ready to find your perfect understated nail polish look? Moving beyond the why and into the how, this section is your visual and practical guide to the most elegant neutral nails of the season. We’ve curated 11 distinct neutral nail ideas, each one combining timeless appeal with a modern twist. Whether you’re a complete beginner or looking to try some simple neutral nail art, you’ll find inspiration and clear, actionable steps to achieve a polished neutral look at home. Each idea is broken down with the exact products you’ll need and pro tips to ensure a flawless, long-lasting finish.
1. Create a Classic Glossy Nude Manicure

Pin this timeless look to your ‘Nail Inspo’ board!
This is the cornerstone of the neutral nail world. The glossy nude nails look is timeless, elegant, and universally flattering, making it the perfect choice for anyone seeking a polished neutral look.
Products & Tools Used
- A creamy nude nail polish that complements your skin tone (e.g., beige-pink, soft caramel, or warm taupe)
- Protective base coat designed for a smooth neutral application
- A high-shine, long-lasting neutral polish top coat
- Nail polish remover and a small cleanup brush
Application Steps
- Prepare nails by filing to your desired shape, pushing back cuticles, and cleansing the nail plate with remover.
- Apply one thin layer of your protective base coat and let it dry completely.
- Paint two thin coats of your chosen nude nail polish, allowing 2-3 minutes of drying time between each coat.
- Finish with one layer of a glossy shine top coat, making sure to cap the free edge of the nail to prevent chipped neutral nails.
Pro-Tip: For a salon quality neutral at home finish, load your brush with just enough polish for one nail. Place the brush slightly away from the cuticle, push back gently, and then pull forward in one smooth stroke down the center, followed by one stroke on each side.

2. Style a Modern Matte Neutral Manicure

Save this chic matte look for your next office-appropriate manicure!
For an instant touch of modern sophistication, a matte finish can completely transform your favorite neutral color. Matte neutral nails have a velvety, non-reflective look that is incredibly chic and perfect for an office neutral nails vibe.
Products & Tools Used
- Any neutral nail polish color (works especially well with taupe, gray, or deep beige)
- A high-quality matte finish top coat
- A standard base coat
Application Steps
- Apply your base coat and two coats of your chosen neutral nail polish as you normally would, ensuring the surface is smooth and even.
- Let the color coats dry for at least 5 minutes. This is key to avoid streaking neutral polish when the matte coat is applied.
- Finish with one even layer of the matte top coat. You will see the shine disappear as it dries.
- Reapply the matte top coat every 2-3 days to refresh the finish and restore neutral nail shine (in its matte form).
Pro-Tip: Matte vs glossy neutral finish: a matte top coat can sometimes highlight imperfections. Ensure your color application is perfectly smooth before applying it. For a trendy look, you can paint the nail matte and then use a glossy top coat to paint just the very tip, creating a texture-based French manicure.

3. Add a Subtle Glitter Accent Nail

Perfect for holidays or a wedding! Pin this sparkling neutral idea.
Adding a touch of glitter is the easiest way to dip your toes into simple neutral nail art. This look provides subtle glamour and is perfect for elevating your manicure for a special occasion.
Products & Tools Used
- A creamy neutral nail polish (e.g., off-white, beige, or soft pink)
- A sparkling neutral glitter polish with fine particles (e.g., gold, silver, or rose gold)
- Base coat and glossy top coat
Application Steps
- Apply your base coat and two coats of the creamy neutral polish to all nails except your accent nail (usually the ring finger).
- On the accent nail, apply the base coat.
- Paint two to three thin coats of the glitter polish on the accent nail until it is fully opaque.
- Finish all nails with a glossy top coat. You may need two coats on the glitter nail for a smooth neutral finish.
Pro-Tip: To get a fully concentrated glitter look without multiple coats, paint the glitter polish onto a makeup sponge wedge first. This absorbs the excess clear polish. Then, dab the glitter from the sponge directly onto your nail.

4. Master the ‘Barely There’ Sheer Manicure

The ultimate clean girl aesthetic! Pin this for your everyday look.
This is the epitome of the “your nails but better” philosophy. The barely there neutral look uses a sheer, translucent polish to give your nails a healthy, glossy, and impeccably clean neutral nails finish.
Products & Tools Used
- A sheer neutral polish, often a translucent pink or milky white
- A ridge-filling base coat (optional, but great for a smooth canvas)
- A high-shine top coat
- Cuticle oil for a healthy-looking finish
Application Steps
- This look is all about healthy nails. Start by meticulously prepping your nails: shape them, gently buff the surface, and apply cuticle oil, wiping off any excess from the nail plate before polishing.
- Apply one coat of a ridge-filling base coat to cover nail imperfections.
- Paint one single, thin coat of your barely there neutral polish. The goal is a wash of color, not full opacity.
- Finish with a glossy top coat to give that ‘healthy glow’ and a final application of cuticle oil around the nails.
Pro-Tip: Using a sheer polish with a slight brightening effect can make the whites of your nails appear whiter and the nail beds look pinker and healthier. This is the secret to the popular ‘rich girl nails’ trend.

5. Design a Delicate Micro-French Manicure

So chic and modern! Pin this minimalist nail art idea.
A modern update on a classic, the micro french neutral manicure features an ultra-thin line at the tip. This refined neutral aesthetic is the definition of simple classy nails.
Products & Tools Used
- A sheer pink or nude neutral nail polish for the base
- A highly pigmented, crisp white polish
- An ultra-thin nail art liner brush
- Base coat and glossy top coat
Application Steps
- Apply your base coat and one to two coats of your sheer nude base color. Let it dry completely.
- Pour a small drop of white polish onto a palette (a piece of foil works well).
- Dip the very tip of your nail art liner brush into the white polish. To create a razor-thin line, you need very little product on the brush.
- Rest your painting hand on a stable surface. Gently drag the tip of the brush along the free edge of your nail to create the micro-tip. Finish with a glossy top coat.
Pro-Tip: If you struggle with a steady hand, don’t move the brush; instead, keep the brush still and roll your fingertip against the bristles. This uses a larger muscle group and can result in a smoother, more consistent line.

6. Try a Negative Space Half-Moon Design

A cool, modern take on vintage style! Pin this negative space neutral idea.
Negative space neutral designs are effortlessly cool and surprisingly easy to achieve. This look leaves a part of the natural nail exposed, creating a chic contrast with a muted neutral color.
Products & Tools Used
- A muted neutral polish (like sage green, dusty blue, or taupe)
- Paper hole reinforcement stickers (from any office supply store)
- Clear base coat and top coat
Application Steps
- Apply a clear base coat to your bare nails and let it dry completely. This protects your nail and creates the ‘negative space’.
- Place a paper reinforcement sticker at the base of each nail, covering the area you want to keep bare (the lunula). Press it down firmly.
- Paint two coats of your chosen neutral color over the rest of the nail, painting right over the sticker edge.
- Let the polish become almost dry, but not completely hard. Then, gently peel off the sticker to reveal a crisp half-moon line. Finish with a glossy top coat.
Pro-Tip: Pull the sticker off slowly and at an angle, away from the wet polish line, not straight up. This prevents the wet polish from being pulled up with the sticker and ensures a flawless neutral finish.

7. Achieve a Seamless Neutral Ombré Gradient

The perfect wedding nail look! Pin this beautiful ombré tutorial.
Learning how to do simple neutral ombre nails is easier than you think. This blended, gradient effect looks incredibly professional and offers a soft, sophisticated neutral look.
Products & Tools Used
- Two neutral nail polish shades that blend well (e.g., milky white and a sheer pink, or a light beige and a deeper taupe)
- A disposable makeup sponge (a small wedge works best)
- Liquid latex for nails or Vaseline for cleanup
- Base and top coat
Application Steps
- Apply a base coat and one coat of the lightest neutral shade to all nails. Let dry.
- Protect your skin by applying liquid latex or Vaseline around your nail.
- On the flat surface of the makeup sponge, paint a stripe of the light color and a stripe of the darker color right next to it, slightly overlapping.
- Dab the sponge onto your nail several times, moving it slightly up and down to blend the colors. Repeat for a second coat to build opacity.
- While still wet, peel off the liquid latex. Finish with a generous layer of glossy top coat to smooth out the texture.
Pro-Tip: Before dabbing on your nail, do a test-dab on a piece of paper to see how the colors are blending and to remove some of the excess polish. This prevents flooding your cuticle and makes for a much cleaner application.

8. Play with Sheer Black and Polka Dots

An edgy yet simple neutral nail art idea! Pin this for a cool look.
Who says neutral can’t be a little edgy? Sheer black acts as a smoky, sophisticated neutral base for one of the easiest easy DIY neutral nail designs: the polka dot.
Products & Tools Used
- A sheer black polish (or a standard black polish and clear top coat)
- An opaque white polish
- A nail art dotting tool (or the tip of a bobby pin)
- Base coat and a glossy top coat
Application Steps
- Apply your base coat.
- Paint one thin coat of sheer black polish. If you only have an opaque black, mix a few drops of it into a clear top coat on a palette to create your own sheer version.
- Pour a small drop of white polish onto your palette.
- Dip the smallest end of your dotting tool into the white polish and randomly place tiny dots across your nail. Clean the tool and repeat for each nail.
- Finish with a glossy top coat to seal in the design.
Pro-Tip: The key to this understated nail polish look is keeping the dots very small and sparse. Less is more. Don’t try to make them perfectly uniform; a slightly random pattern looks more effortless and chic.

9. Create an Elegant Gold Foil Accent

Pure luxury! Pin this elegant neutral nail idea for your next special event.
For a look that appears expensive and intricate but is secretly simple, gold foil is your best friend. It transforms the appearance of a plain manicure into one of the most sophisticated neutral designs.
Products & Tools Used
- A neutral nail polish of your choice (creamy beige, off-white, or even a sheer nude)
- Gold foil flakes for nail art
- A pair of tweezers
- Base coat and a thick, glossy top coat
Application Steps
- Apply your base coat and two coats of your chosen neutral color. Let them dry almost completely.
- While the polish is still slightly tacky, use tweezers to pick up small pieces of gold foil.
- Gently place the foil onto the nail in an abstract pattern. You can concentrate it near the cuticle or scatter it randomly.
- Use a clean, dry finger or a silicone tool to gently press the foil flat against the nail.
- Finish with two generous coats of a glossy top coat to fully encapsulate the foil and create a smooth neutral finish.
Pro-Tip: Don’t use one giant piece of foil. Tearing it into smaller, irregular shapes with your tweezers will look more organic and sophisticated. This is a key expert application technique for this style.

10. Design a Simple Vertical Line

The ultimate minimalist neutral nail look. Pin this for a super modern vibe.
This is minimalism at its finest. A single, clean vertical line is a powerful piece of simple geometric nail art that is both modern and has the added benefit of making nails appear longer and more slender.
Products & Tools Used
- A matte neutral nail polish (like gray or beige)
- A contrasting polish for the line (like white, black, or metallic gold)
- An ultra-thin nail art liner brush OR nail striping tape
- Matte or glossy top coat
Application Steps
- Apply your base coat and two coats of your chosen matte neutral color. Let it dry completely.
- (Brush Method) Using your liner brush, paint a single, thin vertical line from the cuticle to the tip of the nail.
- (Tape Method) Place a piece of striping tape vertically down the center of your nail. Paint your line color right next to it. Remove the tape while the polish is still wet.
- Finish with your choice of a matte top coat to maintain the look or a glossy top coat to add shine.
Pro-Tip: According to color theory for neutral nails, a single, unbroken vertical line draws the eye upward, which can make neutral nail ideas for short fingers look more elegant and elongated. It’s a simple trick with a big impact.

11. Wear a “Skittle” Manicure with 5 Neutral Shades

Can’t pick one color? Wear them all! Pin this fun neutral nail inspo.
Why choose one neutral shade when you can wear a few? The “Skittle” manicure, where each nail is painted a different color within the same family, is one of the top trending neutral designs because it’s playful, stylish, and requires zero artistic ability.
Products & Tools Used
- Five different neutral nail polish shades from the same color family (e.g., a range of browns, pinks, or grays)
- Base coat and top coat
Application Steps
- Arrange your five polishes in order from lightest to darkest.
- Apply your base coat to all nails.
- Paint the lightest color on your thumb (or pinky), the next shade on your index finger, and so on, creating a gradient across your hand. You will need two coats of each color.
- Finish with a glossy top coat to tie all the colors together with a uniform shine.
Pro-Tip: The key to a chic Skittle manicure is choosing colors with the same undertone (all warm or all cool) and similar finish (all cream or all shimmer). This ensures the final look is cohesive and sophisticated rather than random.

Key Takeaways
- Versatility is Key: Simple neutral nails are the ultimate accessory because they are suited for any occasion, from the office to a wedding, and complement every outfit.
- Technique Over Tools: A flawless finish comes from good technique. Always use a base coat, apply thin layers of polish, and ‘cap’ the free edge with your top coat to prevent chipping.
- One Product, Many Looks: A single matte top coat can instantly double your nail polish collection by transforming any glossy polish into a modern, velvety neutral finish.
- Nail Art Can Be Simple: You don’t need to be an artist. A subtle glitter accent nail, a polka dot design with a dotting tool, or a ‘Skittle’ manicure are incredibly easy ways to create simple neutral nail art.
- Preparation is Everything: The secret to a natural looking neutral nail look like the ‘Barely There’ manicure is meticulous nail prep. Healthy, well-shaped nails and cared-for cuticles are the perfect canvas.
People Also Ask About Simple Neutral Nails
What’s the difference between nude and neutral nails?
Nude nails refer to a specific color that closely matches your skin tone, while neutral nails encompass a broader color palette. Neutrals include all nude shades, but also extend to colors like white, cream, beige, taupe, gray, and even soft, muted pastels. Think of ‘nude’ as one category within the larger family of ‘neutrals’.
How do I pick a neutral nail color that flatters my skin tone?
Look at your skin’s undertones to find the most flattering neutral shade. For cool undertones (skin looks pinkish), choose neutrals with pink or blue bases, like soft pinks and cool grays. For warm undertones (skin looks golden or olive), opt for neutrals with yellow or peach bases, like beige, caramel, and warm taupes.
What are the best simple neutral nail ideas for short nails?
The best designs for short nails often create an illusion of length. A ‘Barely There’ sheer manicure, a single vertical line down the center, or a half-moon design at the cuticle all make nails appear more elongated. Sticking to lighter neutral nail colors can also make the nail bed look larger.
How can I make my simple neutral manicure last longer?
Proper preparation and sealing are the keys to a long-lasting neutral manicure. Always start by wiping your nails with alcohol or nail polish remover to remove oils. Use a quality base coat, apply two thin coats of color, and finish with a durable neutral finish top coat, making sure to paint over the free edge of the nail tip.
Are simple neutral nails appropriate for a wedding?
Yes, simple neutral nails are an incredibly popular and classic choice for weddings. Styles like a delicate Micro-French manicure, a seamless neutral ombré gradient, or a classic glossy nude are elegant, sophisticated, and won’t distract from the dress or rings, making them a perfect bridal option.
What is the easiest neutral nail design for a beginner?
The easiest design is a glitter accent nail or a ‘Skittle’ manicure. An accent nail only requires you to paint one nail differently, with no special tools. A ‘Skittle’ look simply involves painting each nail a different, coordinating neutral shade, which requires zero artistic skill but looks intentional and trendy.
How do you make neutral nails stand out?
You can make neutral nails stand out by playing with texture and subtle details. Adding a matte top coat, a single gold foil accent, a subtle nail art design like a tiny dot, or a high-shine glossy finish can all elevate a basic neutral nail color and make it look more unique and eye-catching.
Is milky white a neutral nail color?
Yes, milky white is a very popular and on-trend neutral nail color. Unlike a stark, opaque white, milky white is slightly sheer and softer, giving it a more natural neutral feel. It’s a modern and chic option that falls squarely within the neutral palette and is flattering on most skin tones.
How do I care for my simple neutral manicure?
To extend the life of your manicure, apply a fresh layer of top coat every 2-3 days. This restores shine and adds another layer of protection to prevent chipping. Also, apply cuticle oil daily to keep the skin around your nails hydrated, which prevents hangnails and makes your manicure look fresh.
Can you do simple neutral nail art on gel nails?
Absolutely, all of these simple neutral designs can be done with gel polish. The process is the same, but you will need to cure each layer of gel polish (base, color, and top coat) under a UV or LED nail lamp for gel. Gel is a great option as it provides a durable, chip-free neutral manicure that lasts for weeks.
Final Thoughts on Your Chic Neutral Manicure
Ultimately, embracing simple neutral nails is about celebrating timeless elegance and finding a style that feels authentically you. As we’ve explored, “simple” doesn’t mean boring. From a glossy, natural looking neutral nail to a modern matte finish or a delicate micro-French tip, the possibilities are endless. This professional manicure guide has equipped you with the techniques and inspiration to experiment. You now have the professional finish secrets to achieve a salon-quality look that enhances your natural beauty and complements your personal style.
Which of these chic neutral ideas will you try first?
Last update on 2026-04-27 / Affiliate links / Images from Amazon Product Advertising API