Tired of the same old manicure and searching for fresh spring nail ideas to update your look? You want something that feels new and exciting, but scrolling endlessly through inspiration can be overwhelming. It’s frustrating when you can’t find clear, achievable designs that match the vibrant energy of the season.
Spring nail ideas for 2026 are all about balancing soft pastels and delicate florals with modern, eye-catching elements like chrome finishes and 3D charms. This season’s top trends focus on creating an aesthetic look that feels both personal and fashion-forward, transforming your manicure into a key part of your style. This guide will show you exactly how to achieve it.
Drawing from comprehensive analysis of current data and proven nail art methodologies, we’ve curated the definitive guide to this season’s most essential looks. We will explore Spring Manicure Designs as a core entity, defined by its shift toward themes of renewal and growth. Get ready to discover 13 proven trends that will elevate your aesthetic and provide you with clear, actionable inspiration for your next salon visit or at-home session.
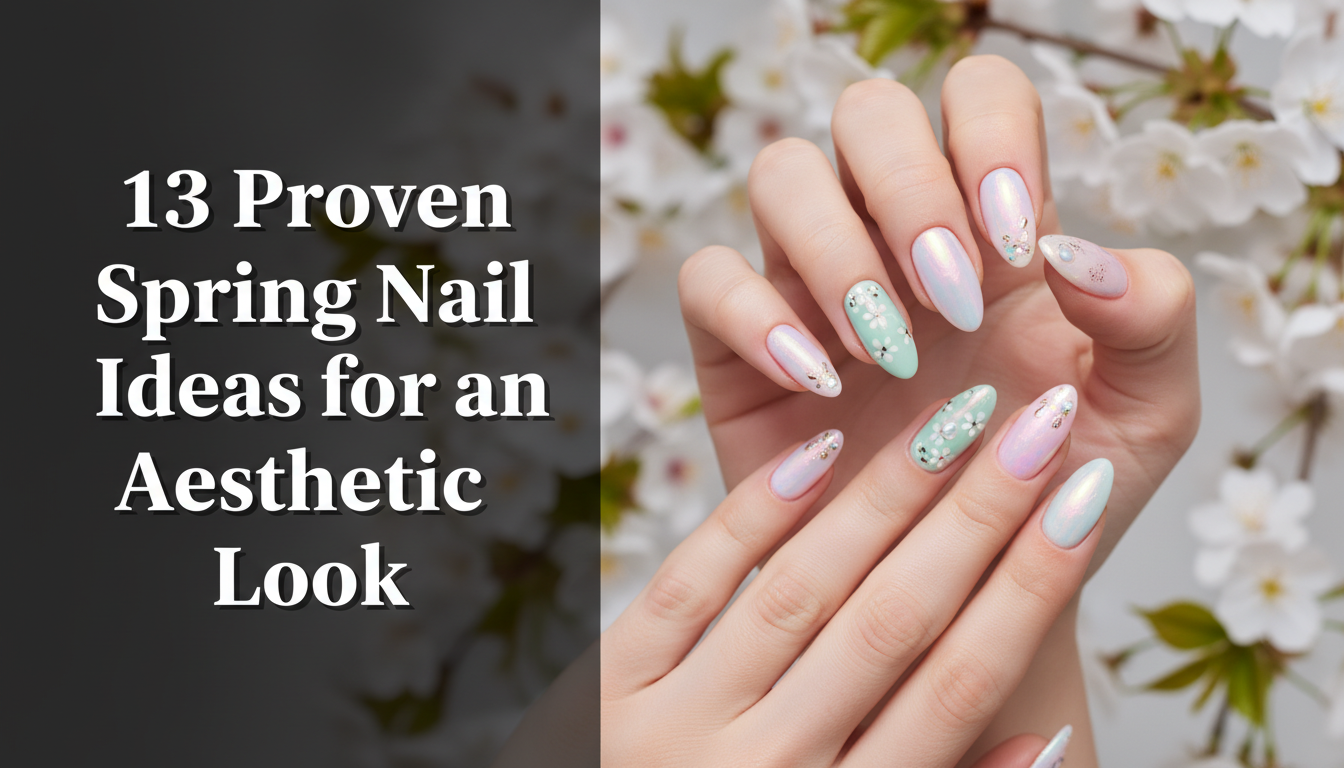
Unlocking Your 2026 Aesthetic: 13 Proven Spring Nail Ideas for the Ultimate Manicure Look
Finding the perfect spring nail art is the ultimate way to refresh your style and embrace the new season. As we move into 2026, the trending spring manicures are all about combining soft, classic motifs with bold, modern twists. This isn’t just about a simple coat of polish; it’s about transforming your nails into an accessory that complements your entire aesthetic. The core entity of Spring Manicure Designs is characterized by attributes like pastel shades, bright pops of color, minimalist details, and high-shine glossy finishes. These designs are meant to work in harmony with seasonal fashion, featuring standout elements such as delicate floral nail tips or a futuristic chrome nail finish. This curated list of 13 proven ideas moves beyond generic inspiration, offering you specific, achievable looks that provide information gain over other guides. We’ll bridge the gap between simple concepts and advanced techniques, ensuring you have the expert advice needed to achieve salon quality results, whether you’re a DIY enthusiast or visiting a professional technician.
1. Pastel Floral Nail Art

Pin this delicate floral nail art to your ‘Spring Manicure Inspo’ board!
This elegant look is a cornerstone of spring nail ideas, combining the softness of a pastel nail art palette with the timeless appeal of daisy nail art. It features delicate flower patterns that work beautifully on almond shape nails, enhancing a gentle and sophisticated aesthetic. This design is perfect for anyone looking to capture the essence of spring in a subtle yet intricate way.
Supplies Needed
- Sheer pastel base coat (e.g., OPI’s “Bubble Bath” or Essie’s “Mademoiselle”)
- Light lavender pastel nail polish
- Soft mint green pastel nail polish
- Fine detail nail art brush (000 size)
- Dotting tool
- No-wipe gel top coat
- UV/LED lamp
Instructions
- Prepare nails by filing into an almond shape and buffing the surface.
- Apply two thin coats of the sheer pastel base, curing after each.
- Using the dotting tool, create small dots in a circular pattern with the lavender polish for the daisy petals.
- With the fine detail brush, paint tiny mint green leaves around the flowers.
- Cure under the UV/LED lamp.
- Seal the design with a generous layer of no-wipe gel top coat and cure again for a glossy, long lasting finish.
Pro-Tip: For truly intricate floral nail art, consider using a blooming gel. After applying your base color, apply a thin layer of blooming gel, then immediately dot your colored polishes for a beautiful spreading effect that replicates natural flower petals. This advanced technique helps achieve professional results at home.

2. Chrome French Tip Nails

Save this trendy chrome french tip look for your next salon visit!
A modern twist on a timeless classic, the chrome French tip is one of the most trending spring manicures. This design features a sleek chrome nail finish applied to the tip, creating a stunning contrast against a milky or sheer base. It showcases an iridescent quality that catches the light beautifully and is often applied to elegant coffin nail designs for a sharp, sophisticated look.
What You Need
- Milky white gel polish
- Silver chrome nail powder
- Silicone applicator brush or eyeshadow applicator
- No-wipe gel top coat (essential for chrome adhesion)
- UV/LED lamp
- Lint-free wipes
How To Do
- Prepare nails by pushing back cuticles and gently buffing the surface.
- Apply two thin coats of milky white gel polish, curing each layer.
- Apply a very thin layer of no-wipe gel top coat to only the tip of the nail where the french tip will be, and cure for 15-30 seconds (this is critical for chrome adhesion – too long and it won’t stick, too short and it will smudge).
- Immediately, using the silicone applicator, gently buff the silver chrome powder onto the tacky no-wipe top coat at the tip until a mirrored effect is achieved.
- Carefully remove any excess powder from the surrounding nail and skin with a clean, lint-free wipe.
- Seal the entire nail with a final layer of no-wipe gel top coat and cure for 60 seconds.
Pro-Tip: The key to a perfect chrome nail finish is the timing of your no-wipe top coat cure before applying the powder. Different lamps and gel brands can vary, so a quick test on a practice tip helps find the ideal “tacky but not wet” consistency for optimal chrome adhesion. This technique prevents streaky polish and ensures a seamless transition.

3. Minimalist Daisy Nail Art on a Clear Base

Pin this simple and elegant daisy nail art for a touch of spring!
For those who love understated charm, minimalist daisy nail art is one of the most cute spring nail designs. This look features tiny, delicate daisies on a clear base, making it a perfect simple spring nail art for beginners. It works best with short, natural nails and highlights a clean, fresh aesthetic that’s both effortless and classy.
Supplies Needed
- Clear gel base coat
- Clear gel top coat
- White gel polish
- Yellow gel polish
- Fine dotting tool
- UV/LED lamp
- Alcohol wipes
Instructions
- Prepare nails by shaping them into your desired short or natural style.
- Apply a clear gel base coat and cure under the UV/LED lamp.
- Apply a second layer of clear gel polish (do NOT cure yet).
- While the second clear layer is wet, use the fine dotting tool to create five small white dots in a circle to form the petals of a daisy. Immediately place a tiny yellow dot in the center. Repeat for desired number of daisies.
- Cure the nails under the UV/LED lamp.
- Seal the design with a clear gel top coat and cure for a glossy, long lasting finish.
- Wipe off any sticky residue with an alcohol wipe.
Pro-Tip: For truly minimalist daisy nail art, limit yourself to 1-2 small daisies per nail. This prevents overdoing the design and ensures an elegant and classy spring nail design. The “naked nail trend” complements this look beautifully, focusing on natural beauty with subtle embellishments.
4. Velvet Effect Nails with a Soft Pastel Hue

Feel the luxury! Pin these velvet effect nails for a unique spring texture.
The velvet nail effect is a unique trend that adds a touch of luxury and texture to your pastel spring nails. This look features a distinctive fuzzy or muted shimmer finish that mimics the look and feel of velvet. It transforms a standard manicure into a textured, aesthetic statement piece, often highlighting soft pastel hues for a cozy yet sophisticated vibe.
What You Need
- Pastel gel polish (e.g., light pink, baby blue)
- Sheer no-wipe gel top coat
- Fine flocking powder in a matching pastel shade (or magnetic gel polish + magnet)
- UV/LED lamp
- Soft fan brush for excess powder
Instructions
- Prepare your nails and apply a base coat, curing as usual.
- Apply two thin coats of your chosen pastel gel polish, curing each layer.
- Apply a thin layer of no-wipe gel top coat (do NOT cure).
- Immediately and generously sprinkle the matching flocking powder over the entire wet nail. Gently pat down the powder for even coverage.
- Cure under the UV/LED lamp.
- Using a soft fan brush, gently remove any excess flocking powder from the nail and surrounding skin. Do NOT apply another top coat as this will flatten the velvet texture.
Pro-Tip: If opting for a magnetic gel velvet nail effect, apply the magnetic gel polish, then immediately hover a strong magnet over the nail to create the desired cat-eye or velvet texture before curing. This achieves a deeper, more dimensional velvet effect and prevents smudging. This technique requires precision but offers professional results at home.

5. Micro French Tips in a Vibrant Spring Hue

Elevate your spring style! Pin these micro french tips for a subtle pop of color.
Micro french tips are the epitome of modern elegance and a must-try for your clean aesthetic manicure. This design features an incredibly thin line of color along the nail’s free edge and is often created using vibrant spring nail colors for a subtle pop. It enhances a minimalist yet colorful spring manicure style, looking especially chic on oval shape nails.
What You Need
- Sheer nude gel base polish
- Vibrant gel polish (e.g., bright yellow, electric blue)
- Ultra-fine liner nail art brush (0000 size)
- No-wipe gel top coat
- UV/LED lamp
- Acetone for cleanup
Instructions
- Prepare nails and apply two thin coats of sheer nude gel base polish, curing each layer.
- Using the ultra-fine liner brush, pick up a very small amount of your vibrant gel polish.
- Carefully paint an incredibly thin line along the very edge of the free nail tip, maintaining a consistent thickness across all nails. This is the micro french tip.
- Cure the nail design under the UV/LED lamp.
- If needed, use a brush dipped in a tiny amount of acetone to clean up any uneven lines before applying the top coat.
- Seal with a no-wipe gel top coat and cure for a glossy, long lasting finish.
Pro-Tip: For perfectly crisp micro french tips, brace your dominant hand against your other hand or a stable surface while painting. A dot of gel polish on a palette, thinned slightly with a mixing liquid if too thick, can also aid in smooth application, preventing streaky polish. Practice on a clear nail tip first to perfect your line.

6. Gradient Pastel Ombre Nails

Blend into spring! Pin these gorgeous pastel ombre nails to your inspo board.
A classic french ombre gets a seasonal update with soft pastel colors. This technique features a seamless gradient blend, often incorporating dreamy shades like lilac spring nails and baby blue. It achieves a beautiful ombre effect that highlights a delicate spring color palette, perfect for a soft and ethereal look.
What You Need
- Pastel gel polish (e.g., light purple, light blue)
- Clear gel base coat
- No-wipe gel top coat
- Cosmetic sponge (cut into small pieces)
- Tweezers
- UV/LED lamp
- Liquid latex barrier (optional, for easy cleanup)
Instructions
- Prepare nails and apply a clear gel base coat, curing as usual.
- If using, apply a liquid latex barrier around your cuticles and skin.
- On a piece of foil, paint stripes of your chosen pastel gel polishes side-by-side (e.g., lilac next to baby blue).
- Using tweezers, pick up a small piece of cosmetic sponge and gently dab it onto the wet polish on the foil, picking up both colors.
- Lightly and repeatedly dab the sponge onto your nail, starting at the cuticle and moving towards the tip, to blend the colors.
- Cure under the UV/LED lamp.
- Repeat steps 3-5 for a second coat, building opacity and ensuring a smooth gradient.
- Remove liquid latex (if used) and seal with a no-wipe gel top coat, then cure.
Pro-Tip: To prevent streaky polish and ensure a seamless gradient for pastel ombre nails, use very thin layers when sponging. Too much polish at once can create harsh lines. Also, consider an “ombre nail kit” that often includes specialized sponges for a smoother blend. This technique results in professional results at home.

7. 3D Floral Nail Charms on a Sheer Base

Add a new dimension to your spring nails! Pin these 3D floral charms.
Elevate your manicure with one of the most intricate spring designs. This look features dimensional 3D nail charms, usually in a floral motif, that are applied over a sheer or nude base. This technique enhances a simple manicure, turning it into a unique and aesthetic spring nail set with eye-catching texture and detail.
What You Need
- Sheer nude gel polish
- 3D floral nail charms (various sizes)
- Strong nail art adhesive gel or builder gel
- Fine-tip tweezers or wax picker tool
- No-wipe gel top coat
- UV/LED lamp
Instructions
- Prepare nails and apply two thin coats of sheer nude gel polish, curing each layer.
- Apply a small dot of strong nail art adhesive gel or builder gel to the desired placement on the nail.
- Using tweezers or a wax picker tool, carefully pick up a 3D floral nail charm and gently place it onto the wet gel. Adjust position as needed.
- Once positioned, cure the nail under the UV/LED lamp to secure the charm.
- If the charm has any sharp edges or you want extra durability, carefully apply a small amount of builder gel around the base of the charm to encapsulate it, then cure again.
- Seal the entire nail (avoiding directly coating the raised parts of the charm if possible, to maintain texture) with a no-wipe gel top coat and cure.
Pro-Tip: For optimal adhesion of 3D nail charms and to prevent them from snagging, consider doing a “structural manicure” first with a layer of BIAB (Builder in a Bottle). This provides a stronger base. When applying the adhesive gel, less is more; too much can ooze out and make cleanup difficult, affecting your professional results at home.

8. Abstract Pastel Swirls

Unleash your inner artist! Pin these abstract pastel swirls for spring.
For those seeking aesthetic spring inspo, abstract nail art with swirl designs is a perfect choice. This look features free-flowing, colorful swirls using a mix of pastel shades on a neutral base. It transforms a simple nail into a unique piece of wearable art, allowing for endless creativity and making it one of the most versatile colorful spring nail sets.
What You Need
- White or light nude gel polish (as a base)
- A selection of pastel gel polishes (e.g., pink, blue, yellow, mint)
- Thin nail art liner brush
- Dotting tool (optional, for creating perfect dots within swirls)
- Clear gel base coat
- No-wipe gel top coat
- UV/LED lamp
Instructions
- Prepare nails and apply a clear gel base coat, curing as usual.
- Apply two thin coats of white or light nude gel polish and cure each layer.
- On a palette, place small dots of your chosen pastel gel polishes.
- Using the thin liner brush, pick up one pastel color and paint a wavy, organic line or swirl across the nail.
- Before curing, pick up a second pastel color and paint another line alongside or overlapping the first. Repeat with additional colors.
- (Optional) While the colors are still wet, use the dotting tool to gently drag through the colors, blending and detailing the swirls.
- Cure the design under the UV/LED lamp.
- Seal with a no-wipe gel top coat and cure for a glossy, long lasting finish.
Pro-Tip: To prevent the pastel colors from mixing too much and creating a muddy look, work quickly when creating your abstract pastel swirls before curing. You can also cure each color or swirl individually for more distinct lines, a technique that gives professional results at home. Experiment with different brush strokes to create unique patterns.

9. Glitter Accent Nails with Pastel Base

Add some sparkle to your spring! Pin these glitter accent nails.
A glitter accent nail is a classic way to add a touch of glamour to your spring manicure ideas. This design features a full-coverage glitter nail, typically on the ring finger, paired with a solid pastel base like pastel lavender on the others. It highlights a subtle yet eye-catching shimmer and complements short nail ideas perfectly for a playful and easy-to-create look.
What You Need
- Pastel gel polish (e.g., lavender, mint)
- Clear gel base coat
- Fine loose glitter powder (silver, iridescent, or matching pastel)
- Small fan brush or dedicated glitter brush
- No-wipe gel top coat
- UV/LED lamp
Instructions
- Prepare nails and apply a clear gel base coat, curing as usual.
- Apply two thin coats of your chosen pastel gel polish to all nails, curing each layer.
- On the accent nail(s) (typically the ring finger), apply a thin layer of no-wipe gel top coat (do NOT cure).
- Immediately sprinkle the loose glitter generously over the wet top coat on the accent nail(s).
- Gently pat the glitter down with your finger or a silicone tool to ensure even coverage.
- Cure under the UV/LED lamp.
- Using a clean, soft brush, gently brush off any excess glitter.
- Seal all nails, including the glitter accent, with two layers of no-wipe gel top coat for a smooth, long lasting finish, curing after each layer.
Pro-Tip: To ensure your glitter accent nails stay put and feel smooth, it’s crucial to seal them with at least two coats of a good quality no-wipe top coat. This also helps prevent the glitter from feeling rough or chipping. For an extra dazzling effect, look for iridescent glitter that catches the light beautifully, enhancing the vibrant feel of spring.

10. Matte Pastel Ombre Nails

Achieve a velvety touch! Pin these matte pastel ombre nails for spring.
Combining two major trends, matte pastel french ombre nails offer a sophisticated and modern look. This design features a velvety matte finish over a seamless pastel ombre gradient. It often integrates on-trend shades from the spring color palette, like peach fuzz and mint green, to achieve a soft, non-glossy effect that looks stunning on coffin nail designs.
What You Need
- Pastel gel polishes (e.g., soft peach, mint green)
- Clear gel base coat
- Matte gel top coat
- Cosmetic sponge (cut into small pieces)
- Tweezers
- UV/LED lamp
- Liquid latex barrier (optional)
Instructions
- Prepare nails and apply a clear gel base coat, curing as usual.
- If using, apply liquid latex around your cuticles.
- On a palette, paint stripes of your chosen pastel gel polishes side-by-side (e.g., soft peach next to mint green).
- Using tweezers, pick up a small piece of cosmetic sponge and gently dab it onto the wet polish on the foil, picking up both colors.
- Lightly and repeatedly dab the sponge onto your nail to blend the colors into a seamless ombre.
- Cure under the UV/LED lamp.
- Repeat steps 3-5 for a second coat, building opacity.
- Remove liquid latex.
- Seal with a matte gel top coat and cure for 60 seconds to achieve the non-glossy, velvet-like finish.
Pro-Tip: The key to achieving a perfect matte pastel ombre is ensuring a completely smooth and even ombre blend before applying the matte top coat. Any imperfections will be magnified by the matte finish. Also, ensure your matte top coat is specifically formulated for gel polish to prevent streaky polish or an uneven texture.

11. Gingham Print Spring Nails

Picnic-ready spring nails! Pin this cute gingham print design.
Nothing says spring quite like a classic picnic blanket, and gingham print nails capture that playful spirit perfectly. This design features the iconic crisscross pattern, which complements the spring fashion trends 2026 beautifully. It highlights a cute and classic spring aesthetic, often created with traditional blue and white nails for a timeless and charming look.
What You Need
- White gel polish
- Light blue gel polish
- Clear gel base coat
- No-wipe gel top coat
- Fine striping nail art brush (long, thin bristles)
- UV/LED lamp
- Alcohol wipes for brush cleaning
Instructions
- Prepare nails and apply a clear gel base coat, curing as usual.
- Apply two thin coats of white gel polish as your base color, curing each layer.
- Dip your fine striping brush into the light blue gel polish. Remove excess.
- Carefully paint thin, vertical lines across the nail, evenly spaced. Cure.
- Clean your brush. Dip into the light blue gel polish again.
- Now, paint thin, horizontal lines across the nail, evenly spaced, overlapping the vertical lines. This creates the gingham print. Cure.
- Seal with a no-wipe gel top coat and cure for a glossy, long lasting finish.
Pro-Tip: For perfectly crisp gingham print nails, ensure each set of lines (vertical and horizontal) is fully cured before applying the next. This prevents colors from bleeding and maintains the distinct pattern. A very thin consistency of polish on your striping brush is also key to avoiding streaky polish and achieving fine lines.

12. Naked Nail Trend with Subtle Shimmer

Embrace natural beauty! Pin the naked nail trend for effortless spring elegance.
The naked nail trend is a celebration of healthy, natural nails and aligns perfectly with the clean girl aesthetic. This look features a barely-there sheer finish with a touch of subtle glitter or shimmer. It enhances the natural look spring nails and highlights the importance of excellent hand care aesthetics for a polished, minimalist finish.
What You Need
- Sheer nude gel polish with fine shimmer or a sheer nude jelly polish
- Clear gel base coat
- No-wipe gel top coat
- Cuticle oil
- UV/LED lamp
- Nail buffer and file
Instructions
- Prepare nails by gently filing into a natural shape (oval or rounded are popular for this look) and lightly buffing the surface.
- Push back and nourish cuticles, ensuring a clean nail bed.
- Apply a clear gel base coat and cure.
- Apply two thin coats of the sheer nude gel polish with shimmer, curing each layer. The goal is a subtle, translucent wash of color, not full opacity.
- Seal with a no-wipe gel top coat and cure.
- Finish by generously applying cuticle oil to nourish the cuticles and surrounding skin, enhancing the healthy, natural look.
Pro-Tip: The true beauty of the naked nail trend lies in impeccable nail and hand health. Regular use of a quality cuticle oil and gentle filing to maintain your preferred shape will make your sheer manicure truly shine. This focus on underlying nail care is a hallmark of professional technician advice and achieves proven results.

13. Pastel Geometric Shapes

Modernize your manicure! Pin these pastel geometric shapes for a chic spring look.
For a contemporary take on abstract spring nails, look no further than pastel geometric patterns. This design features clean lines and shapes—like triangles, squares, and half-moons—that highlight a modern and colorful spring aesthetic. It works best with short, square nail shapes and provides a structured yet playful alternative in the floral vs geometric style debate.
What You Need
- White gel polish (as a base)
- A selection of pastel gel polishes (e.g., light pink, baby blue, soft yellow)
- Clear gel base coat
- No-wipe gel top coat
- Thin striping tape for nails
- Fine liner nail art brush
- UV/LED lamp
Instructions
- Prepare nails and apply a clear gel base coat, curing as usual.
- Apply two thin coats of white gel polish as your base color, curing each layer.
- Cut thin pieces of striping tape and apply them to your nail to create your desired geometric shapes (e.g., triangles, squares, lines). Ensure the tape is pressed down firmly.
- Using your fine liner brush or a dotting tool, carefully paint the exposed areas within the taped-off shapes with your chosen pastel gel polishes.
- Immediately, and very carefully, remove the striping tape while the polish is still wet. This helps to achieve crisp lines.
- Cure the design under the UV/LED lamp.
- Repeat steps 3-6 if you want to layer shapes or add more color.
- Seal with a no-wipe gel top coat and cure for a glossy, long lasting finish.
Pro-Tip: For ultra-sharp pastel geometric shapes, apply your striping tape after your base color is fully cured, then flash cure your pastel colors before removing the tape. This method minimizes bleeding and ensures a perfectly crisp edge. An “e-file technique” for precise cuticle prep also enhances the clean lines of this modern design.

Key Takeaways
Your guide to the most essential spring nail ideas is complete. To help you recall the most important trends and techniques, here are the key takeaways for achieving your perfect aesthetic spring manicure. These points reinforce the core principles behind this year’s most popular looks.
- Embrace Pastels and Chromes: Spring nail ideas for 2026 are heavily influenced by soft pastel hues and modern chrome nail finishes, offering a balance of delicate and edgy looks. These dual trends provide versatility for any aesthetic spring manicure.
- Master the Micro French Tip: The micro french tip is a standout trend, offering a minimalist yet elegant way to incorporate vibrant spring nail colors into your look. Precision in application is key to achieving this classy spring nail design.
- Experiment with 3D Charms: Adding 3D floral nail charms can instantly elevate a simple base, transforming your manicure into an intricate and unique statement piece. Ensure proper encapsulation for durability and long lasting wear.
- The Naked Nail Trend is In: For a natural yet polished spring look, the naked nail trend with a subtle shimmer focuses on healthy, well-maintained nails. Regular hand care aesthetics and cuticle nourishment are paramount for this look.
- Technique Matters for Longevity: Whether attempting gradient pastel ombre nails or gingham print nails, precise application of thin coats and proper curing are crucial to prevent chipping and ensure salon quality results. Utilizing expert advice on layering and sealing protects your intricate designs.
FAQs About spring nail ideas
Here we answer some of the most common questions about spring nail ideas, helping you clarify any lingering doubts and choose the perfect design. This section addresses frequent queries about trends, colors, and techniques.
What are the nail trends for spring 2025?
For spring 2026, key nail trends include pastel floral art, chrome French tips, minimalist daisy designs, velvet effect nails, and vibrant micro French tips. These trends balance classic spring aesthetics with modern finishes and unique textures, allowing for both subtle elegance and bold statements across various spring nail designs.
How to do floral nail art at home?
To do floral nail art at home, use fine detail brushes and dotting tools with gel polishes on a cured base, or try blooming gel for an easy spreading effect. Start with simple designs like daisies or small petals on a pastel or clear base. Finish with a strong top coat and cure to seal the design for long lasting wear and professional results at home.
What colors are popular for spring nails?
Popular colors for spring nails include soft pastels like lavender, mint green, baby blue, and peach, alongside vibrant hues such as bright yellow and neon accents. Metallic chromes and sheer nudes are also highly trending spring manicures, offering versatility to match spring outfits and diverse skin tones.
Are short nails in style for spring?
Yes, short nails are definitely in style for spring 2026, particularly with minimalist designs like tiny daisies, abstract swirls, or the ‘naked nail trend’. Short nails offer practicality and a clean, sophisticated aesthetic that complements the fresh, understated vibe of many spring nail ideas.
How to make pastel nails look vibrant?
To make pastel nails look vibrant, ensure a clean, opaque base color, use multiple thin coats for even coverage, and apply a high-gloss top coat to enhance color depth. For a bolder effect, pair pastel shades with bright accent colors or a shimmering chrome nail finish. This transforms the softness into a brighter statement.
What is the best nail shape for spring 2026?
For spring 2026, popular nail shapes include almond, oval, coffin, and natural short rounded styles, offering versatility to suit various designs and personal preferences. Almond shape nails and coffin nail designs remain popular for elegant or longer looks, while short natural shapes are perfect for minimalist and cute spring nail ideas.
Can I use regular polish for spring nail art?
Yes, you can use regular polish for spring nail art, though gel polish often offers more flexibility for intricate designs, longer wear, and faster curing times with a UV/LED lamp. When using regular polish, ensure each layer is completely dry to prevent smudging and extend wear with a quality top coat.
How to apply nail decals for spring?
To apply nail decals for spring, start with a cured base coat, carefully place the decal with tweezers onto a tacky layer (or use water-slide decals), smooth out any bubbles, and seal with a top coat. This method creates an easy cleanup process and achieves professional results at home for floral nail art or other designs.
What is a naked nail trend?
The naked nail trend focuses on enhancing the natural beauty of your nails with minimal product, typically a clear or sheer nude polish with a subtle shimmer, emphasizing nail health. This minimalist spring nail approach often involves impeccable cuticle oil care and light buffing to highlight the natural strength and shine of your nails.
How long do gel spring nails last?
Gel spring nails, when properly applied and cured, can typically last for 2-3 weeks without chipping or peeling, offering a durable and long-lasting manicure solution. This longevity depends on factors like the quality of the gel polish, thorough nail preparation, and avoiding harsh chemicals without gloves.
Final Thoughts on Spring Nail Ideas
Unlocking your ideal aesthetic for 2026 with spring nail ideas doesn’t have to be daunting. From the delicate charm of pastel floral nail art to the edgy sophistication of chrome French tips, this season features a spectrum of trending spring manicures that cater to every style and skill level. We’ve explored the magic of 3D nail charms, the understated elegance of the naked nail trend, and the artistry behind abstract pastel swirls, providing you with proven results through actionable steps and expert advice.
Remember, the true beauty of any spring nail design lies not only in its visual appeal but also in the health and care with which you protect your nails. Incorporating quality products and techniques, like proper nail preparation and sealing with a durable top coat, is paramount to ensuring your beautiful creations are long lasting and free from common issues like chipping or streaky polish. By leveraging these insights and the right tools, you can confidently recreate salon quality looks right at home.
Which of these 13 proven spring nail ideas are you most excited to try first to transform your 2026 aesthetic?
Last update on 2026-04-06 / Affiliate links / Images from Amazon Product Advertising API