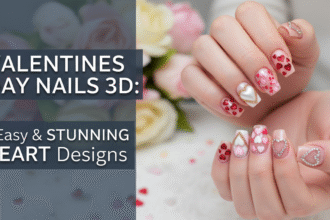
Tired of the same old red polish for Valentine’s Day? Finding the perfect valentines day nail designs that feel both fresh and achievable can be a challenge. You want something special, but you don’t want to spend hours on a look that chips in a day.
The best Valentines Day nail designs for 2026 blend classic romance with modern trends, featuring elegant styles like minimalist micro-hearts, trendy chrome finishes, and cute, hand-painted art. These designs can be adapted for short or long nails and range from simple DIY looks to professional salon-quality manicures. This guide has you covered.
Drawing from comprehensive analysis of current data and proven methodologies, we’ve curated the essential list. We’ll show you exactly how to create the most sought-after looks of the season. Get ready to discover step-by-step tutorials that make stunning love themed nails easier than ever.
What Are the Best Valentines Day Nail Designs for 2026?
The best vday nails for 2026 are all about personal expression, moving beyond a single shade of red into a world of texture, subtlety, and modern romance. This year, the trends showcase a beautiful relationship between timeless motifs like heart nail art and new-school application techniques. We’re seeing a shift towards designs that feature information gain over basic manicures, integrating elements like the coquette aesthetic, mesmerizing aura nail art, and high-shine pink chrome finish. These styles transform simple nails into a true fashion statement for the holiday. Whether you prefer a minimalist look on short nails or a bold declaration on long coffin nails, the perfect design awaits.
This curated guide validates your search for the perfect holiday manicure by offering a solution for every skill level and aesthetic. We’ve distilled dozens of proven techniques and client favorites into 11 essential designs. Unlike simple galleries that only provide images, we offer actionable, step-by-step instructions and pro tips for each idea, delivering significant value and ensuring you can recreate these looks with confidence.
11 Essential Valentines Day Nail Designs to Create in 2026
Ready to find your perfect match? This list is your ultimate guide to the most trendy and aesthetic valentines day nail ideas for the season. We’re moving beyond just pictures to give you a complete, actionable tutorial for each design. We’ll cover everything from the specific gel polish and tools you’ll need, like rhinestones or a fine liner brush, to the exact steps to create a flawless finish. Each design demonstrates a particular style, whether it’s elegant or cute, ensuring you can find a look that perfectly matches your Valentine’s vibe.
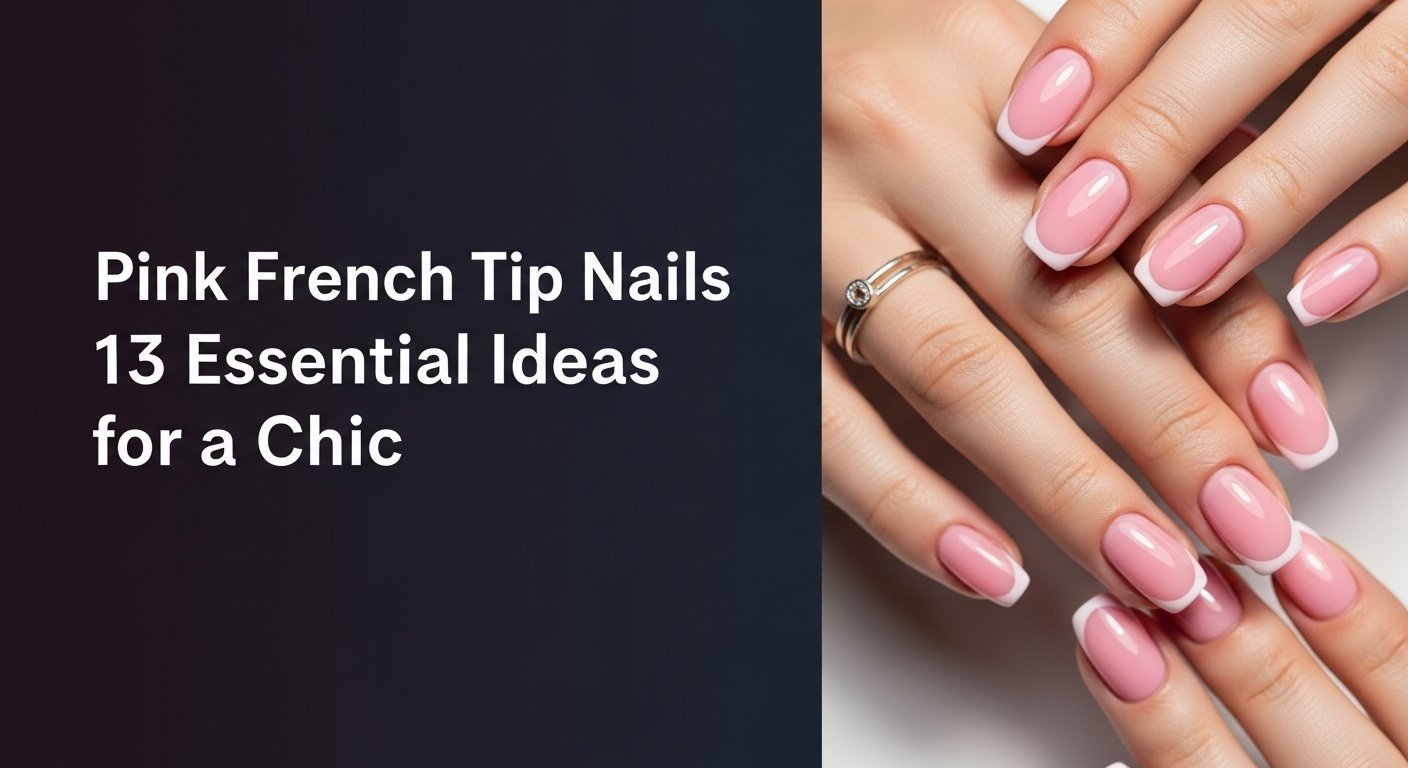
1. Create Elegant Micro-Heart French Tips

Pin this classy V-Day look to your ‘Nail Inspo’ board!
This sophisticated take on french tip nail designs is perfect for a work-appropriate yet festive look. The classic French tip is enhanced by delicate micro heart details, creating a subtle and modern design that whispers romance instead of shouting it. This minimalist style is all about precision and clean lines, proving that a simple touch can be incredibly elegant.
Products & Tools Used
- Sheer nude or pink base coat
- Opaque white nail polish for the tips
- Bright red gel polish
- Ultra-fine liner nail art brush (00 size)
- High-gloss, quick-dry top coat
Application Steps
- Prep the nails by filing to your desired shape and cleaning the cuticles. Apply one coat of your sheer nude base and cure if using gel.
- Paint the French tips using the opaque white polish. You can use guide stickers for a cleaner line.
- Dip your fine liner brush into the red polish, removing any excess. Design a tiny heart near the cuticle or on the corner of the tip.
- Let the heart design dry completely, then seal the entire nail with a generous layer of high-gloss top coat.
Pro-Tip: For perfectly symmetrical micro-hearts, I use a dotting tool to place two tiny dots side-by-side, then drag them down and together with a liner brush to form the point. This technique gives you more viscosity control than trying to draw the curves freehand.

2. Apply Trendy Pink Chrome Heart Nails

Save this aesthetic chrome nail idea for your next salon visit!
Embrace one of the year’s biggest trends with chrome heart nails. This look demystifies the viral pink chrome finish, making it achievable whether at home or the salon. To create the signature metallic sheen, Chrome Powder is applied over a special No-Wipe Top Coat. For an even more trendy look, a 3D heart accent is sculpted from Builder Gel to add stunning dimension.
Products & Tools Used
- A neutral base color gel polish (like light pink or nude)
- No-Wipe Gel Top Coat
- Pink or silver chrome powder
- A small eyeshadow applicator or silicone tool
- Builder gel in a bottle (BIAB) for the 3D heart
- UV lamp
Application Steps
- Apply two coats of your neutral base color, curing each layer under the UV lamp.
- Apply a thin layer of the No-Wipe Gel Top Coat and cure for only 30 seconds (or as directed). The surface should be warm and non-tacky.
- Using your applicator, pick up a small amount of chrome powder and rub it firmly onto the nail surface until it becomes a reflective mirror finish.
- Dust off excess powder. Use BIAB to create a 3D heart shape. Cure fully. Finally, seal the entire nail with another layer of the top coat and cure completely.
Pro-Tip: The key to a flawless chrome finish, as any licensed manicurist will tell you, is the top coat cure time. Over-curing will make the surface too slick for the powder to adhere, while under-curing leaves it too sticky, resulting in a glittery mess instead of a smooth mirror.

3. Design Sweet & Simple Negative Space Hearts

Trying this minimalist look for my short nails! Pin it if you love it too.
Negative space hearts are the ultimate short nail solution for a chic, understated look. This simple and easy DIY design uses the natural nail as a canvas, which contrasts with the crisp painted outline. It’s a modern, graphic take on heart nail art that is incredibly versatile and grows out gracefully since the base is bare.
Products & Tools Used
- A strengthening or clear base coat
- A highly pigmented red or pink nail art liner polish
- A glossy top coat
- Optional: Heart-shaped vinyl stickers
Application Steps
- Start with clean, prepped nails. Apply one layer of your clear base coat and let it dry completely.
- Using the liner polish, carefully paint the outline of a heart in the center of your nail. Don’t fill it in.
- (Alternative Method): Place a heart-shaped vinyl sticker firmly on the nail. Paint around the sticker with your color. a
- Once the outline is dry (or after you’ve removed the sticker), seal the design with a glossy top coat to protect it from chipping.
Pro-Tip: For perfect negative space etching freehand, I recommend starting the design with a pencil-like dotting tool to lightly sketch the heart shape with polish. You can easily wipe away mistakes with a cleanup brush dipped in acetone before committing to the final lines with your liner brush.

4. Master the Soft Coquette Aesthetic with Bows

So in love with the coquette aesthetic! Pinning this cute bow idea.
The viral coquette aesthetic nails trend is all about embracing hyper-femininity. This soft girl aesthetic is defined by delicate elements like bows, pearls, and lace motifs. This design integrates these romantic details onto a nail canvas, often using a soft, milky color palette. You can achieve this cute pink and white nail art by hand-painting the bows or by using easy-to-apply nail stickers or charms.
Products & Tools Used
- A milky white or sheer pink gel polish
- White nail art liner polish
- Tiny pearl rhinestones
- Nail glue or gem gel
- Optional: 3D bow charms or nail stickers
Application Steps
- Apply two to three thin coats of the milky base color, curing each layer, to build up a semi-sheer, plush look.
- Using the white liner polish, design a small, delicate bow on an accent nail. Think of it as two connected triangles with trailing ribbons.
- Adhere a tiny pearl rhinestone to the center of the bow using a small dot of nail glue or gem gel, then cure.
- Finish by sealing the entire design with a glossy top coat, making sure to encapsulate the edges of the pearl.
Pro-Tip: To make 3D charms last, I always use a dedicated gem gel. After placing the charm, I use a liner brush to apply more gel around the base of the charm, creating a secure ‘setting’ just like for a diamond. This infill procedure at the micro-level prevents snagging and ensures durable wear.

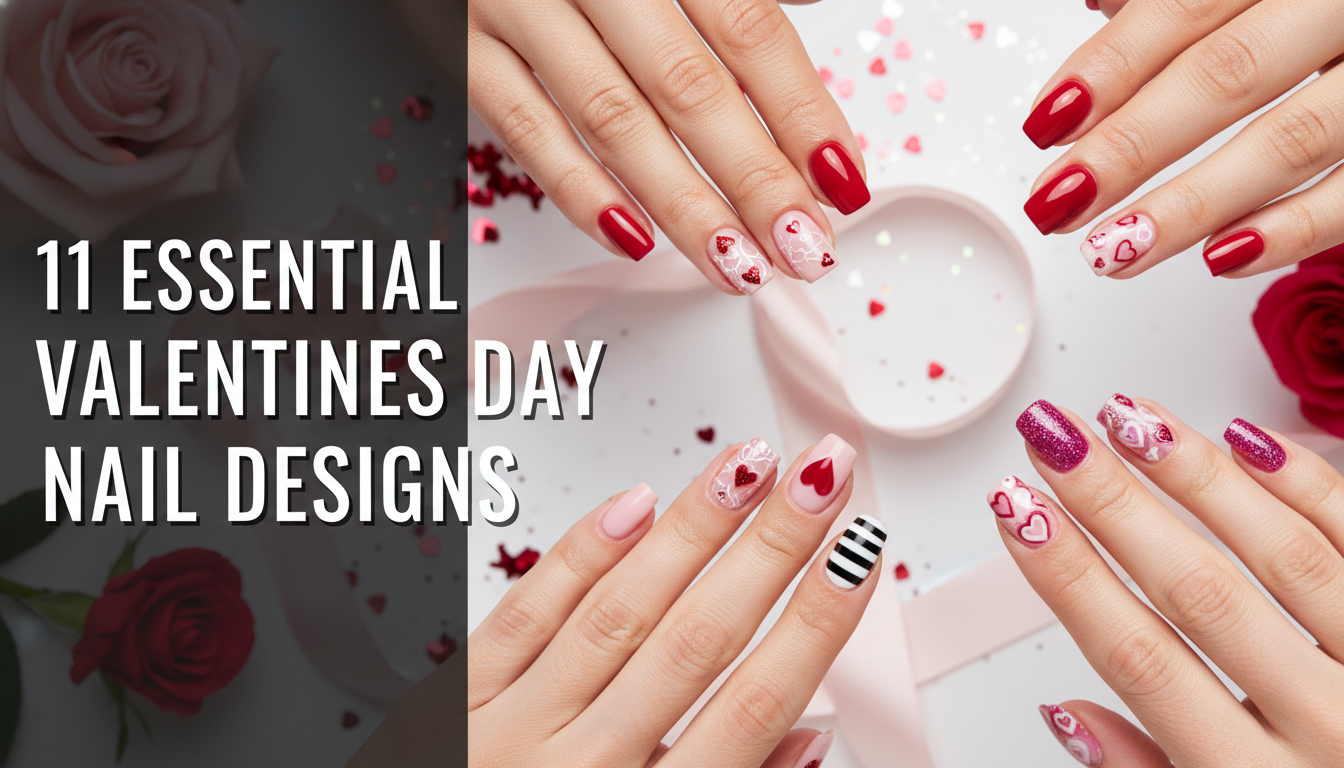
5. Paint a Classic Red and White Heart Manicure

You can’t go wrong with a classic! Pinning this red and white heart idea.
A classic valentines day manicure is timeless for a reason. For this cheerful and traditional look, Red Polish is paired with White Polish to create a high-contrast design that symbolizes love and romance. This is a perfect opportunity to master your hand-painted heart art, and the dotting tool method makes it incredibly easy for beginners to achieve cute, uniform hearts.
Products & Tools Used
- A classic red nail polish
- An opaque white nail polish
- A nail art dotting tool
- A glossy top coat
Application Steps
- Paint two coats of red polish on your thumb, middle, and pinky fingers. Let dry.
- Paint two coats of white polish on your index and ring fingers. Let this layer dry completely.
- Pour a small amount of red polish onto a palette. Dip your dotting tool into the polish.
- On the white nails, press two dots side-by-side. Use the same tool or a fine brush to drag the polish down from each dot to meet at a point, forming a heart. Repeat as desired. Seal all nails with a top coat.
Pro-Tip: To prevent smudging your heart art, use a quick dry top coat. Instead of brushing it on, ‘float’ a generous bead of top coat over the design without letting the brush bristles actually touch the red polish. This salon grade technique prevents the colors from bleeding.

6. Achieve Ethereal Aura Nail Art

Obsessed with this aura nail art trend! Pinning for my next set.
Aura nail art is a mesmerizing trend that creates a soft, airbrushed-style gradient. This form of ombre gradient blending mimics a spiritual aura, typically featuring a vibrant circle of color radiating from the center of a nude nail. While professionals use an airbrush, you can easily simulate this ethereal effect at home with gel polish and a simple makeup sponge.
Products & Tools Used
- A nude or sheer base color gel polish
- A vibrant pink or red gel polish
- A small piece of a makeup sponge
- Blooming Gel (optional, for advanced effect)
- A glossy top coat and UV Lamp
Application Steps
- Apply two coats of your nude base color and cure. Do NOT wipe the tacky layer.
- Place a small dot of the pink/red gel polish in the center of the nail.
- Using the corner of a dry makeup sponge, gently tap around the dot, blending the edges outward to create a soft, diffused circle of color.
- Cure the aura layer. You can repeat with a smaller, more intense dot in the center for more depth. Seal with a top coat and cure fully.
Pro-Tip: For an expert-level aura, use Blooming Gel. After your base color is cured, apply a thin layer of blooming gel (do not cure). Place your colored dot in the center, and watch as the gel makes the color spread out into a perfect, soft-edged circle. This process, which relies on pigment dispersion within an uncured polymerization layer, is the secret to a true airbrushed look.

7. Adorn Your Nails with Dainty Strawberry Glaze

How cute is this strawberry glaze nail art? Perfect for V-Day!
Capitalize on the viral strawberry glaze nails trend with this sweet, Valentine’s-ready twist. This look, inspired by Hailey Bieber, is defined by its sheer, milky finish. For a playful and cute pink and white heart nail art alternative, this version integrates tiny, hand-painted strawberry motifs, turning a popular culture moment into a unique holiday manicure.
Products & Tools Used
- A sheer milky pink or white nail polish
- Red, green, and white nail art polishes
- A fine liner brush and a small dotting tool
- A high-gloss top coat
Application Steps
- Apply two coats of your sheer milky polish to create the ‘glazed’ base.
- Using the red polish and a brush or dotting tool, create a small, rounded heart-like shape for the strawberry body.
- With the green liner polish, paint two or three small leaves at the top of the red shape.
- Use the white polish and a tiny dotting tool to add “seeds” to the strawberry. Let it all dry completely before applying a glossy top coat to seal the design.
Pro-Tip: Can’t find the perfect sheer pink? Make your own! I often mix a few drops of an opaque pink or red polish into a clear top coat. This allows you to fully control the sheerness and create a custom jelly nail polish look that’s unique to you.

8. Try a Bold Black and Red Gothic Romance

For an edgier vibe. Pinning these gothic Valentine’s nails.
If traditional pink isn’t your style, this black and red gothic valentine’s day nail art offers a bold, alternative option. This design contrasts with typical romantic themes by using a dark, moody color palette. The key to the look is textural play: a velvety matte finish on the black nails is juxtaposed with a high-gloss, bloody red heart, creating a dramatic and eye-catching effect.
Products & Tools Used
- Opaque black nail polish
- Deep red nail art polish
- A matte top coat
- A glossy top coat
- A dotting tool or liner brush
Application Steps
- Paint two coats of black polish on all nails and let them dry completely.
- Apply a single, even layer of the matte top coat over all the black nails. Let it dry fully; the finish will transform from shiny to flat.
- Using the red polish, design a heart on an accent nail. To create a ‘bleeding’ effect, drag some of the polish down from the bottom of the heart in wavy lines.
- Carefully apply the glossy top coat ONLY over the red heart design, leaving the surrounding black area matte. This creates a striking textural contrast.
Pro-Tip: Be aware that matte top coats can absorb oils and pigments from makeup and lotions, leading to staining. To keep your matte mani looking crisp, I recommend a quick wipe with a bit of rubbing alcohol on a lint-free pad every day to refresh the finish.

9. Layer Delicate Jelly Polish with Gold Flakes

So elegant and luxurious! Pinning this jelly nail and gold flake idea.
For a look that exudes luxury, try layering jelly nail polish with gold flakes. Jelly Polish is a translucent formula that allows for incredible depth. It’s used to create encapsulated art, where decorative elements like Gold Flakes are suspended between sheer coats. This “sandwich” technique results in a sophisticated, dimensional manicure that looks far more complex than it is to create.
Products & Tools Used
- A sheer red or pink jelly nail polish
- Gold leaf flakes or foil
- A pair of tweezers
- A glossy top coat
Application Steps
- Apply one thin coat of the jelly polish and let it dry.
- While the second coat is still wet, use tweezers to delicately place small pieces of gold flake onto the nail.
- Apply a third coat of the jelly polish over the gold flakes. This ‘sandwich’ technique creates the encapsulated, dimensional look.
- Once dry, finish with a final glossy top coat to smooth everything out and add a brilliant shine.
Pro-Tip: This technique is a simplified form of encapsulated art, a professional nail tech favorite. The key is thin layers. Thick coats of jelly polish can look clumpy and may not cure properly. Building depth with 3-4 very thin layers yields a much more delicate and high quality result.

10. Design with Velvet Magnetic Polish

The velvet nail effect is so mesmerizing! Pinning this for a glam look.
The mesmerizing velvet nail effect, also known as cat eye nails, is a glamorous and surprisingly simple way to get a dimensional, textured look. This effect is created by a special Magnetic Polish, which contains tiny metallic particles. A Magnet is used to manipulate these particles into a shimmering line before the polish is cured, creating the illusion of soft, plush velvet.
Products & Tools Used
- A dark base color like black or deep burgundy (optional, but enhances the effect)
- Red or pink velvet/cat eye magnetic gel polish
- A nail art magnet wand
- A glossy top coat and UV Lamp
Application Steps
- Apply a coat of your dark base color and cure. This makes the velvet effect pop.
- Apply a thick but even coat of the magnetic polish. DO NOT CURE IT YET.
- Hold the magnet wand close to the wet polish for 10-15 seconds. Hold it diagonally for a classic cat eye, or hover it over the tip for a French tip effect. You will see the shimmer particles move into a line.
- Immediately cure the nail under the UV lamp to lock the design in place. Seal with a top coat and cure one final time.
Pro-Tip: For the popular ‘universal’ velvet look where the whole nail shimmers, hold the magnet flat against each of the four sides of your nail (left, right, top, bottom) for a few seconds each before curing. This pushes the magnetic particles away from the edges, concentrating the shimmer in the center from all angles.

11. Create a Sweet Candy Heart Look

This is the cutest! Definitely trying these candy heart nails.
For a fun, playful, and nostalgic manicure, look no further than these candy hearts nails. This easy design mimics the iconic Conversation Hearts candy perfectly. It requires a sweet Pastel Color Palette and, crucially, a Matte Finish to replicate the candy’s signature chalky texture. The lettering can be done with a nail art pen or even a simple toothpick, making this an accessible design for all skill levels.
Products & Tools Used
- A set of pastel nail polishes (pink, purple, yellow, green)
- A matte top coat
- A red nail art pen or a fine liner brush with red polish
- A white polish (optional, for base)
Application Steps
- Paint each nail a different pastel color. Apply two coats for full opacity. Let them dry completely.
- For a more authentic look, you can first paint a heart shape in the pastel color over a white base.
- Using the red nail art pen or a very fine brush (or even the tip of a toothpick), carefully write short messages like ‘XOXO’, ‘LUV U’, or ‘BE MINE’ on the nails.
- Let the lettering dry for several minutes. Apply the matte top coat to give the nails that classic, chalky candy finish.
Pro-Tip: Pastel polishes can sometimes be streaky. For a smooth, even application, always start with a good ridge-filling base coat. If the polish is still streaky, try applying a thin layer of opaque white polish first; this gives the pastel color a solid foundation to stick to and makes the color pop.

Key Takeaways: Your Quick Guide to Valentines Day Nail Designs
- Trends for 2026 Go Beyond Red: While classic red is timeless, top trends include pink chrome finish, aura nail art, and the coquette aesthetic, offering modern and elegant alternatives.
- Technique is Key: Mastering simple techniques like using a dotting tool for hearts, ‘floating’ your top coat to prevent smudging, or using a sponge for an ombre gradient can create salon quality at home.
- Texture Adds Dimension: Don’t be afraid to mix finishes. Combining a matte finish with glossy details or using dimensional products like velvet nail effect polish adds a sophisticated, high-end touch.
- DIY is Accessible: Many trendy looks like negative space hearts or jelly nail polish with gold flakes are surprisingly easy to create at home with the right tools, such as a fine liner brush or tweezers.
- Preparation Matters: The secret to a long lasting manicure is always in the prep. Properly cleaning cuticles, buffing the nail plate, and using a quality base coat prevents chipping and ensures a professional result.
People Also Ask About Valentines Day Nail Designs
What is the most popular nail color for Valentine’s Day?
The most popular nail colors for Valentine’s Day are traditionally classic red and various shades of pink. Red symbolizes passion and romance, while pink offers a softer, sweeter aesthetic. In 2026, trendy variations like deep burgundy, milky whites, and metallic chromes are also extremely popular choices that offer a modern twist on the classic holiday palette.
How can I do heart nail art on short nails?
Yes, heart nail art is perfect for short nails; the key is to scale the design down. Opt for minimalist styles like a single micro heart near the cuticle, a delicate negative space heart outline, or tiny hearts on a French tip. Using a fine dotting tool or a toothpick will give you the precision needed to create cute, well-defined hearts that don’t overwhelm a smaller nail bed.
Are chrome nails still in style for 2026?
Chrome nails are absolutely still in style for 2026 and remain a major trend for Valentine’s Day. The look has evolved from a simple silver mirror to include colored chrome, especially pink chrome finish, and dimensional effects like 3D heart accents. This aesthetic is a favorite for those seeking a modern, high-shine, and glamorous manicure.
What are some classy vday nail ideas?
Classy Valentine’s Day nail ideas focus on subtlety and elegance. Consider a minimalist design like a sheer nude base with tiny, delicate red hearts (micro heart details). Other elegant options include a sophisticated matte burgundy manicure, a classic French manicure with a single heart accent, or a sheer jelly nail polish with delicate gold flakes encapsulated within.
How do I make my Valentine’s nail art last longer?
To make your nail art last, focus on preparation and sealing. Always start by cleaning the nail plate with alcohol to remove oils. Use a quality base coat to help the polish adhere. After painting your design, ‘float’ the top coat over the art to avoid smudging, and be sure to ‘cap’ the free edge of the nail with the top coat. This creates a seal that prevents chipping and peeling.
What is the coquette nail trend?
The coquette nail trend is a hyper-feminine aesthetic inspired by vintage romance and delicacy. It primarily features elements like pearls, lace patterns, ribbons or bows, and soft, milky colors like pale pink and white. For Valentine’s Day, this often translates to soft girl aesthetic designs with tiny painted bows and pearl rhinestones.
How do you use a dotting tool for hearts?
Using a dotting tool to create hearts is a simple and effective technique for beginners. Place two dots of polish side-by-side on your nail. Then, using either the same tool or a fine liner brush, drag a line down from the bottom of each dot to meet at a single point. This easily forms a perfect, symmetrical heart shape.
Is red or pink better for Valentine’s Day nails?
Neither red nor pink is ‘better’; the choice depends on the mood you want to convey. Red is a bold, classic, and passionate choice that symbolizes love and confidence. Pink is often seen as sweeter, more playful, and romantic. A popular trend is to use both colors together in a red + pink manicure, offering the best of both worlds.
How can I fix a smudged nail design?
You can often fix a small smudge without starting over. If the polish is still wet, you can sometimes smooth it out with a clean finger dipped in a tiny bit of water. If it’s partially dry, take a small brush with a bit of nail polish remover and gently dissolve the smudged area, then carefully repaint that small section and re-apply the top coat.
What nail shape is best for Valentine’s designs?
Any nail shape can work, but almond and coffin shapes are particularly popular for Valentine’s designs. Almond shape nails offer an elegant, tapered canvas that elongates the fingers, perfect for French tips and delicate art. Long coffin shapes provide a larger surface area, ideal for more intricate designs, 3D heart accents, and bold color statements.
Final Thoughts on Your 2026 Valentines Day Manicure
Ultimately, the perfect valentines day manicure is one that makes you feel confident, festive, and beautiful. Whether you choose a timeless classic like red and white nails or embrace a modern trend like the velvet nail effect, this guide has provided the best practices to help you achieve a stunning result. By focusing on proper prep and mastering a few simple process_action_keywords like how to layer, seal, and design, you can create a salon grade look at home.
Don’t be afraid to experiment and combine ideas. Use the expertly curated tutorials as a starting point and let your creativity flow. What matters most is that you have fun with your love themed nails and enjoy the process of self-expression.
Which design will you be trying first for Valentine’s Day?
Last update on 2026-04-01 / Affiliate links / Images from Amazon Product Advertising API