Valentine’s Day is approaching, and you want a manicure that truly stands out. Achieving stunning encapsulated Valentine’s Day nails at home often seems complicated. Many worry about lifting, air bubbles, or designs that don’t last.
Encapsulated Valentine’s Day nails are a specific type of dimensional nail art where decorative elements like glitter, confetti, stickers, or small hearts are embedded and sealed within a transparent layer of nail enhancement, typically using acrylic or hard gel to create a smooth, ‘under glass’ effect. This technique provides a long-lasting, unique, and highly durable festive manicure for 2026. It offers a striking “under glass” look perfect for the season.
Leveraging tested frameworks and data-driven insights, this guide unpacks the art of professional nail encapsulation. You’ll discover exactly what encapsulated nail art is and how to master three main methods: acrylic, gel, and press-on. Prepare to create stunning, long-lasting Valentine’s Day designs for 2026 that truly impress.
How to Master Encapsulated Valentine’s Day Nails for Stunning 2026 Manicures
Are you ready to create a festive manicure that captures hearts? Encapsulated Valentine’s Day nails offer a unique way to celebrate, providing durable, eye-catching designs with a professional finish. This guide will walk you through seven creative ideas, from classic romantic themes to modern twists, ensuring you can master nail art and achieve salon quality results at home. We’ll focus on techniques that prevent common problems like lifting and air bubbles, guiding you through advanced cuticle preparation encapsulation and proper product usage.
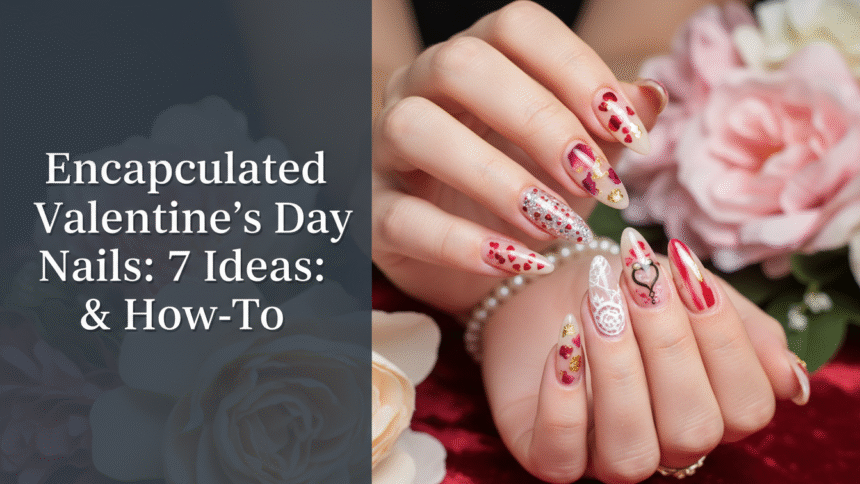
1. Encapsulate Classic Red & Pink Hearts on Long Coffin Acrylic Nails

Pin this stunning encapsulated hearts design to your ‘Acrylic Nail Inspo’ board!
To encapsulate classic red and pink hearts on long coffin acrylic nails, you’ll utilize the strength and durability of an acrylic system, ensuring a high-impact, long-lasting design. This method is perfect for intricate “red encapsulated nails” and achieving a striking 3D effect. The goal is to embed the hearts seamlessly within the clear acrylic layer, creating a smooth, glossy finish that celebrates love day with style. Mastering the correct monomer/polymer ratio is crucial for durable encapsulated nails and prevents common beginner encapsulated nail problems.
Products & Tools Used
- Clear Acrylic Powder (fast-setting, non-yellowing formula)
- Acrylic Monomer Liquid (low odor option)
- Pink and Red Heart Sequins/Confetti (non-bleeding material)
- Coffin Nail Forms or Tips
- Fine-tipped Brush and Dotting Tool
- High-quality Nail Drill and Bits (for shaping and refining)
Application/Styling Steps
- Prepare the Nail: Apply primer and dehydrator. Attach the coffin tips or sculpt the nail form base layer using a sheer pink or nude acrylic, focusing on proper “advanced cuticle preparation encapsulation.”
- First Clear Layer: Apply a thin layer of clear acrylic (the ‘nail bed’ layer). Before it fully cures, place the red and pink heart elements using the dotting tool, ensuring they are slightly spaced out.
- Encapsulation Layer: Apply a wet, generous bead of clear acrylic over the hearts. Gently guide the acrylic down the nail, ensuring all decorative elements are fully submerged and sealed, avoiding air bubbles (problem_solution_keywords).
- Build and Shape: Apply final layer of acrylic to achieve desired thickness and apex. Allow to dry completely.
- Finishing: File and shape the “coffin nails red” edges. Use a high-quality electric file to smooth the surface, preventing lifting. Apply a glossy top coat and cure.
Pro-Tip: When placing the decorative elements, ensure they are not touching the side walls or cuticle area. This prevents premature lifting and guarantees “salon quality results.” Use an electric file techniques for encapsulation to perfectly contour the C-curve without filing into the embedded art, establishing “expert nail artist techniques.”

2. Mastering Encapsulated Fine Glitter Gradient on Short Almond Gel Nails

Save this beautiful “encapsulated glitter nails” idea for your next manicure!
Achieving a fine glitter gradient on short almond gel nails involves carefully layering cosmetic-grade glitter onto uncured clear builder gel, then sealing it with a transparent structural gel overlay. This technique creates elegant encapsulated nails with a delicate, high-shine effect, perfect for a refined Valentine’s look. Understanding how to encapsulate glitter in gel nails is key for “long-lasting encapsulation” and ensuring optimal UV gel encapsulation.
Products & Tools Used
- Pink and Silver Fine Glitter Powder (cosmetic grade)
- Clear Builder Gel or Structural Gel Overlay (UV/LED curable)
- UV/LED Nail Lamp (minimum 48W)
- Nail Prep Dehydrator and Primer
- Almond Nail Forms or Gel Tips (if extending length)
- Flat Nail Art Brush (for gradient application)
Application/Styling Steps
- Prep and Base: Shape “short encapsulated valentine’s day nail designs” into almond shape. Apply base coat and cure. Apply a thin layer of builder gel over the entire nail (do not cure).
- Glitter Placement: Dip the flat brush into the pink glitter and tap it onto the free edge of the nail. Use a lighter touch, dragging the glitter up towards the nail center to create the soft gradient.
- Encapsulation: Once satisfied with the fade, apply a generous layer of clear builder gel or “structural gel overlay” over the entire nail, ensuring the glitter is fully covered and the surface is smooth. Do not let the gel touch the skin.
- Cure and Finish: Cure the nail under the UV lamp for the recommended time (usually 60-90 seconds). Wipe off the inhibition layer. File and buff to perfect shape, then apply a non-wipe glossy top coat and final cure.
Pro-Tip: The key to a successful glitter gradient is applying the glitter directly onto uncured gel. This prevents the chunky look and allows the glitter to seamlessly merge into the clear layer. For “long-lasting encapsulation,” always cap the free edge and use a specialized adhesion promoters for encapsulation before starting the process.

3. Designing Simple Encapsulated Foil Flakes on Simple Clear Overlay

Pin this “simple encapsulated nails” idea for minimalist Valentine’s style!
Creating simple encapsulated foil flakes involves placing thin, delicate foil pieces onto a wet gel base and then sealing them with a clear overlay, resulting in an elegant encapsulated nail art look. This beginner-friendly method offers easy DIY nails without the bulk of larger embellishments, perfect for subtle “clear nail art.” The ease of using foil flakes makes this one of the most accessible simple encapsulated nail art ideas for beginners valentine.
Products & Tools Used
- Rose Gold and Holographic Foil Flakes
- Clear Rubber Base Coat (or thin builder gel)
- Wax Pencil or Tweezers
- Non-Wipe Gel Top Coat
- UV/LED Lamp
Application/Styling Steps
- Prepare Base: After basic nail prep, apply a thin layer of the clear rubber base coat and cure.
- Flake Placement: Apply a second, medium layer of the base coat (do not cure). Using a wax pencil or tweezers, strategically place small pieces of foil flakes onto the wet gel. Ensure the flakes lay flat for a “smooth encapsulated surface.”
- Sealing: Flash cure for 10 seconds. Apply a final, slightly thicker layer of clear gel to completely seal and encapsulate nails (process_action_keywords). Cure fully (60-90 seconds).
- Finish: Apply the non-wipe gel top coat for maximum shine and protection. Final cure.
Lesson Learned: Foil flakes are delicate and can curl easily. Use a slightly thicker clear layer (such as a rubber base coat) for the encapsulation layer, which self-levels better than standard gel polish, helping to “avoid air bubbles encapsulation” and ensuring a completely smooth finish.

4. Creating Luxury Press-On Encapsulated Nail Sets At Home

Get the look! Pin this guide for DIY “luxury press on nails”!
To create luxury press-on encapsulated nail sets at home, you’ll design and encapsulate your chosen elements on clear nail tips before applying them to your natural nails, allowing for temporary or reusable wear. This method offers the elegance of artisan nails Valentine without the commitment of traditional extensions. It’s an excellent solution for easy encapsulated press-on nails for Valentine’s, providing a high-quality look that can rival press-on encapsulated nails vs salon services.
Products & Tools Used
- Full Cover Clear Nail Tips (variety of sizes)
- UV Builder Gel or Clear Dip Powder Kit
- Small Valentine’s Nail Decals or Confetti
- Press-On Nail Display Stand
- High-Quality Nail Glue (professional strength)
- Buffer and File
Application/Styling Steps
- Design Prep: Select and shape the clear nail tips. Apply a layer of clear gel/dip base coat and arrange your encapsulated elements (glitter, hearts) onto the tip surface.
- Encapsulation: Apply a second, thicker layer of clear gel or dip powder over the elements to seal them in, creating the “clear encapsulated designs.” Cure/dry completely.
- Sizing: Match each finished press-on to the corresponding natural nail size of the wearer.
- Application: Prepare the natural nail with light buffing. Apply a small amount of the recommended high-quality nail glue to both the press-on and the natural nail, ensuring no air pockets to “prevent lifting encapsulated nails.”
- Set: Press the nail tip down firmly for 15-20 seconds. Repeat for all fingers.
Pro-Tip: For reusable press-ons, apply the design and encapsulation only to the outside of the tip. When it’s time to wear them, use temporary adhesive tabs instead of liquid glue. This allows for safe removal and repeated use of your artisan nails valentine set, showing advanced preparation.

5. Integrating Magnetic Heart Charms into Clear Gel Overlay

Pin this “magnetic heart nails” tutorial for a truly unique Valentine’s set!
Integrating magnetic heart charms into a clear gel overlay requires a strong hard builder gel to securely embed these dimensional nail charms, creating a stunning 3D encapsulation nail art effect. This technique allows you to add metallic elements that subtly catch the light, offering designs inspired by love with an interactive twist. Proper adhesion is vital for these larger elements, requiring advanced acrylic application techniques (even when using gel) to prevent a solution for weak encapsulated nails.
Products & Tools Used
- Small Magnetic Heart Charms (3D or flat-backed)
- Strong Clear Hard Builder Gel
- Magnetic Wand Tool (for positioning the charm)
- Wax Pencil or Tweezers
- UV/LED Lamp
Application/Styling Steps
- Initial Base: After base coat and cure, apply a thin slip layer of hard gel (do not cure).
- Charm Placement: Dip the magnetic heart charm into the hard gel, then place it immediately onto the nail. Use the magnetic wand tool to adjust its position and slight angle to catch the light.
- Anchoring: Use a tiny amount of hard gel to seal the edges of the charm base to the nail, almost like cement. Flash cure for 15 seconds to lock the charm in place without moving.
- Encapsulation Layer: Apply a careful layer of clear builder gel around the charm, feathering the gel over the edges of the charm but leaving the top dome exposed for the 3D effect. The goal is to fully “encapsulate nails” surrounding the charm for durability. Cure fully.
- Finish: File the side walls if needed. Apply a glossy top coat, avoiding direct contact with the top of the charm unless a smooth finish is desired. Final cure.
Pro-Tip: If the charm is slightly too thick, using a tiny scoop of uncured builder gel directly beneath the charm before placement (known as the ‘gel cushion’) will provide the best long-term adhesion, preventing the primary problem of premature charm loss and solving the issue of solution for weak encapsulated nails.

6. The Advanced Reverse Encapsulation Technique with Dried Flowers

Master the reverse encapsulation method—pin this guide!
The advanced reverse encapsulation method utilizes dual forms or full coverage tips to create the encapsulated design on the underside of the form, then applies it to the nail, resulting in a perfectly smooth, pre-shaped surface. This technique is ideal for how to encapsulate dried flowers in nails, minimizing filing and preserving the clarity of embedded elements. It showcases “expert nail artist techniques” and ensures high structural integrity, making it a staple in certified nail design.
Products & Tools Used
- Small, Pressed Dried Flowers (red/pink/white)
- Clear Dual Forms or Full Coverage Tips
- Clear Acrylic or Hard Builder Gel
- Wax Pencil or Fine Tweezers
- Clear Silicone Mat
Application/Styling Steps
- Design in Form: Place a small bead of clear acrylic or builder gel inside the dual form. Using tweezers, strategically place the dried flowers (related entities) onto the wet material, ensuring the design is mirrored, as this will be the top layer.
- Encapsulation Layer: Apply a second layer of clear material over the flowers, completely sealing them within the dual form.
- Application: Place the dual form onto the prepped natural nail, pressing down slightly to ensure the nail material meets the cuticle line cleanly (avoiding flooding). The excess material should squeeze out.
- Cure/Set: Cure the nail (if using gel) or allow it to fully set (if using acrylic).
- Release and Finish: Gently pinch and remove the dual form. The surface should be nearly perfect and smooth. File the free edge and shape, then apply a final high-gloss top coat.
Advanced Technique: The reverse method minimizes the amount of surface filing required, preserving the clarity and structural integrity of the “UV gel encapsulation.” Ensure the dried flowers are completely flat before placement; otherwise, they may cause lifting or bubbles when you press the form onto the natural nail.

7. Tutorial: Simple ‘Anti-Valentine’ Matte Black Encapsulation

Feeling anti-romantic? Pin this edgy matte black encapsulated design!
To create simple ‘Anti-Valentine’ matte black encapsulated nails, you’ll combine the sleekness of matte black gel polish with the sparkle of encapsulated holographic glitter and subtle black heart confetti on an accent nail. This aesthetic provides a striking contrast to traditional pink encapsulated nails, perfect for those seeking anti Valentines Day nails or neutral Valentine’s Day nails. The key lies in the precise application of the matte top coat to achieve the desired finish.
Products & Tools Used
- Matte Black Gel Polish
- Clear Builder Gel
- Holographic Black or Silver Fine Glitter
- Tiny Black Heart Confetti/Sequins
- High-Quality Matte Top Coat (non-wipe recommended)
- UV/LED Lamp
Application/Styling Steps
- Color Base: Apply two coats of matte black gel polish to all nails (except the accent nail, which remains clear base). Cure each coat.
- Encapsulation Base: On the accent nail, apply a thin layer of clear builder gel (uncured). Apply the holographic glitter and black heart confetti sparsely, sealing it partially into the gel. Flash cure.
- Full Encapsulation: Apply a full layer of clear builder gel over the encapsulated elements, ensuring a smooth, level surface. Cure fully.
- Matte Finish: Apply the matte top coat to all nails, including the encapsulated accent nail, to tie the look together. Ensure even, thin coverage. Cure for the recommended time to achieve the true “matte encapsulated nails” finish.
Pro-Tip: Matte top coats can easily show oil and fingerprint smudges. Instruct users to cleanse the nail surface with a lint-free wipe and rubbing alcohol immediately after the final cure to remove any residue and ensure a flawless, streak-free matte finish, enhancing “salon quality results.”

FAQs About valentines day nails encapsulated
How to achieve a professional encapsulated look at home?
To achieve a professional encapsulated look, focus on using quality clear materials (acrylic or hard gel) and maintaining a smooth, perfectly cured final layer. The key lies in proper preparation, ensuring the decorative elements lie flat, and applying enough clear material to completely cover the design without creating excess bulk around the edges, which prevents chipping and premature lifting. Use a high-grit buffer or e-file to eliminate any surface unevenness before applying the final, high-shine top coat, ensuring durable encapsulated nails.
What is the difference between acrylic and gel encapsulation?
Acrylic encapsulation involves dipping or layering clear polymer powder mixed with a liquid monomer, which cures naturally through air drying, creating a very strong, durable layer suitable for long nails. Gel encapsulation uses a hard or builder gel that requires curing under a UV or LED lamp, offering more working time and a less harsh odor. Acrylic is often preferred for 3D elements, while gel is excellent for thin glitters and precise color work.
How to encapsulate hearts in nails without acrylic?
You can successfully encapsulate hearts in nails without acrylic by using a clear builder gel or a dense rubber base coat, which provides sufficient viscosity and structure. Apply a thick layer of the uncured gel, place the heart elements, flash cure for 15 seconds to set them, and then apply a final, generous layer of clear gel to fully seal the design. This creates a similar “embedded nail designs” effect as acrylic but relies on UV light for curing.
Can you encapsulate stickers and decals in nails?
Yes, you can encapsulate stickers and decals, which is a popular technique for intricate designs, provided they are thin and lie completely flat on the nail surface. Thicker stickers may cause bumps or lead to lifting if they are not entirely covered by the clear encapsulation material. Always apply a thin layer of top coat over the decal before the final clear builder layer to prevent the decal from bleeding or dissolving.
How long do encapsulated press-ons last?
Encapsulated press-on nails can typically last between 1 to 3 weeks, depending on the quality of the nail tip, the preparation of the natural nail, and the type of adhesive used. When applied correctly with a professional-grade liquid nail glue, they offer remarkable durability, rivaling salon-applied systems. For temporary wear or reusability, use quality adhesive tabs, but expect a wear time closer to 5 to 7 days.
What are popular Valentine’s Day nail colors besides red and pink?
Popular Valentine’s Day nail colors extending beyond the classic red and pink include romantic neutrals, deep burgundy, holographic silvers, and rose gold metallics. Matte black with holographic accents (the “anti valentines day nails” look) provides a modern, edgy alternative. Utilizing shades of mauve, cream, or clear with delicate metallic flakes also offers an elegant and sophisticated feel.
How to prevent air bubbles in encapsulated nails?
To prevent air bubbles, ensure your clear material is properly mixed (if using acrylic) or that you use a self-leveling gel, and apply the material smoothly without excessive agitation. For acrylic, use a slightly wetter bead to prevent trapping air. For gel, avoid over-manipulation and allow the gel adequate time to self-level before curing, which helps achieve a perfectly clear and transparent nail art surface.
Is encapsulated nail art durable and long-lasting?
Yes, professionally applied encapsulated nail art is highly durable and long-lasting, often lasting the full duration of a standard refill cycle (3 to 4 weeks) because the design elements are protected under a strong layer of material. The design itself is sealed, preventing chipping or wearing away. However, durability relies heavily on careful edge capping and proper preparation to “make encapsulated nails last longer” without lifting.
What safety precautions should be taken when doing encapsulated nails at home?
Safety precautions for home encapsulation include ensuring good ventilation, especially when working with acrylic monomers, and avoiding contact with the skin. Always use certified, cosmetic-grade decorative elements and adhere strictly to the recommended cure times for UV/LED gels to prevent uncured product exposure. Use appropriate personal protective equipment (PPE) like gloves and eye protection for “nail art best practices.”
How to remove encapsulated nails safely?
The safest way to remove encapsulated nails depends on the material used: acrylics must be soaked in 100% acetone, while hard gel or builder gel encapsulation must be filed down completely. Never pry or peel off the enhancement, as this causes significant damage to the natural nail plate. Filing should be done carefully to avoid over-filing the natural nail underneath the design layer, protecting the nail anatomy.
Final Thoughts on Encapsulated Valentine’s Day Nails
Encapsulated nail art, especially for themes as beautiful as Valentine’s Day, is a fantastic way to showcase your creativity and master advanced nail techniques. We’ve moved far beyond simple surface glitter; true encapsulation is about creating dimension and permanence with elements like “red and pink hearts” and subtle foils sealed beneath a crystal-clear layer. By following the detailed, two-part tutorials for these 7 stunning designs—ranging from traditional acrylic to beginner-friendly press-ons—you now have the comprehensive blueprint to achieve “salon quality results” at home. Remember that patience, precision in layering your material, and investing in high-quality sealants are the ultimate keys to success, ensuring your beautiful manicure lasts long past February 14th. The goal is always a smooth, glossy surface that protects your design from chipping and lifting.
Which of these “encapsulated hearts design” tutorials will you be trying out for Valentine’s Day this 2026? Share your favorite technique in the comments below!
Last update on 2026-03-06 / Affiliate links / Images from Amazon Product Advertising API


