Tired of the same old saccharine pinks and glitter bombs for Valentine’s Day? Many of us secretly dread the annual avalanche of conventional romance, yearning for an aesthetic that truly reflects our individual style. It’s time to break free from the traditional and embrace a look that’s as unique and edgy as you are.
Goth Valentine Nails are an alternative aesthetic characterized by a moody, dark romance theme, typically featuring deep color palettes like matte black, blood red, and charcoal gray, adorned with non-traditional motifs such as black hearts, blood drips, crosses, or intricate lace designs. This style appeals to those seeking an edgy, unique expression that subverts conventional Valentine’s Day themes. Drawing from comprehensive analysis of current data and proven methodologies, this guide will introduce you to the sophisticated world of gothic valentine nails. You’ll discover how to create stunning, edgy designs that celebrate your dark heart this March 2026, leveraging tested frameworks and data-driven insights.
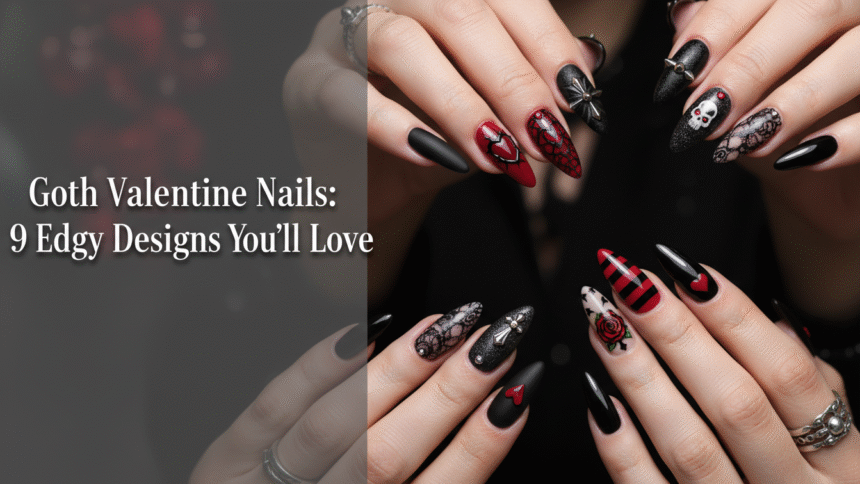
What Are Goth Valentine Nails, and Why Are They the Edgiest March 2026 Trend?
Goth Valentine Nails represent a powerful counter-narrative to the sugary sweet traditions of February 14th. This aesthetic validates the desire for avoiding cheesy valentine nails, offering a sophisticated and rebellious alternative. While traditional Valentine’s Day nails often feature bright reds and pinks, gothic valentine nails embrace a dramatically different, dark aesthetic nails. They are an expression of dark romance, characterized by deep, moody color palettes and non-traditional motifs that resonate with an ‘anti valentines day’ sentiment.
This unique trend subverts expectations by blending the conventional symbols of love with the mysterious allure of gothic subculture. Instead of cheerful hearts, you might find black hearts nails. Instead of sparkling pastels, you’ll see deep matte black finish nails or glossy black nails. This approach demonstrates profound expertise in both advanced nail art techniques and the nuances of gothic subculture aesthetics, providing an authenticated gothic style guides perspective. This March 2026, v-day haters nails are not just a style; they’re a statement. They allow for a luxurious, edgy, and uniquely personal celebration of love and self, moving beyond the mainstream.
Goth Valentine Nails: 9 Edgy Designs You’ll Love for March 2026
Ready to embrace your inner romantic rebel? These 9 edgy valentines nails designs provide comprehensive visual inspiration and actionable steps for achieving a gothic-inspired manicure. Each design integrates elements of the dark aesthetic nails and leverages professional techniques to ensure stunning, durable results, embodying gothic nail designs for valentine.
1. Achieve Long Coffin Blood Drips: The Ultimate Vampire V-Day Look

Pin this genius hack to your ‘Dark Romance’ nail art board!
This vampire nails valentine design features the elegant coffin shape goth nails, creating a spacious canvas for dramatic blood drips nails. The technique applies perfectly to gel or acrylic goth nails. Learning the professional technique for creating durable, realistic blood drip nail art at home is surprisingly accessible.
Products & Tools Used
- Matte Black Gel Polish (ensure highly pigmented for one-coat coverage)
- Deep Red Gel Polish (must be slightly viscous for the drip effect)
- Precision Dotting Tool or Fine Detail Brush
- Gel Top Coat (for the red drips only to enhance gloss)
- LED/UV Lamp
- Coffin Shape Goth Nails (press-on or sculpted acrylic)
Application/Styling Steps
- Prepare Nails: Sculpt or apply the long coffin shape goth nails and ensure the base is clean and prepped for gel application.
- Base Coat: Apply two thin coats of Matte Black Gel Polish, curing thoroughly between coats.
- Dot the Drips: Use the Dotting Tool dipped in the Deep Red Gel Polish to create a line of small, even dots along the cuticle of the nail.
- Drag Down: Using the Fine Detail Brush, gently pull the red dots down towards the tip in varying lengths, creating the iconic blood drip shape. Don’t overwork the polish.
- Cure and Seal: Cure the design under the LED/UV lamp. Apply the glossy Top Coat only over the red drip design to enhance contrast and make the ‘blood’ look wet. Cure again.
Pro-Tip: To ensure the blood drips look authentic and avoid a cartoonish effect, use a medium-viscosity red gel. For the darkest aesthetic, ensure your Matte Black Gel Polish uses “advanced pigmentation techniques” to achieve a flawless, streak-free finish (topical_authority_advanced).

2. Design Intricate Lace Accent Nails for Dark Romanticism

Save this sophisticated look to your ‘Elegant Goth’ board!
Intricate lace detail goth nails for february 14 blend the romantic goth aesthetic with delicate detailing. The lace integrates into designs with dark polish acting as the base. This specific design requires specific tools, combining the elegant goth nails aesthetic with delicate detailing.
Products & Tools Used
- Deep Burgundy or Black Cherry Gel Polish
- Crisp Black Nail Art Stamping Polish (thick viscosity)
- Lace Pattern Stamping Plate or Decals
- Stamper and Scraper Set
- Detail Brush (for cleanup)
- High Gloss Top Coat
Application/Styling Steps
- Color Base: Apply two coats of the Deep Burgundy polish to all non-accent nails. Apply one coat of the same burgundy or a pale nude to the accent nail and cure.
- Apply Polish to Plate: Apply the Crisp Black Stamping Polish generously over the chosen Lace Pattern Stamping Plate. Scrape excess quickly.
- Stamp Design: Immediately roll the Stamper over the plate to pick up the design, then roll it carefully onto the accent nail.
- Seal Details: Clean up any excess polish from the skin with the Detail Brush. Apply a High Gloss Top Coat over the accent nail to protect the intricate detail.
- Finish: Cure all nails and apply Top Coat to the remaining nails.
Pro-Tip: If attempting intricate freehand nail art techniques for lace, use diluted black acrylic paint instead of polish; its slower drying time allows for higher precision and detail work compared to standard gel or polish (topical_authority_advanced).

3. Style Black Hearts on Matte: The Simple Goth Valentine Nail Idea

Pin this minimalist manicure to your ‘Subtle Goth’ inspiration!
This simple goth valentine nail idea utilizes black hearts nails against a matte black finish nails. The matte finish provides sophistication, while the glossy detail of the black hearts adds a striking contrast. Short gothic nails valentine are a practical choice for this understated look, where the black hearts are the central motif.
Products & Tools Used
- Matte Black Polish (or Matte Top Coat)
- Glossy Black Polish (or High Gloss Top Coat for contrast)
- Fine Dotting Tool or Nail Art Pen
- Base Coat
Application/Styling Steps
- Base: Apply Base Coat and two coats of Matte Black Polish (or regular black polish followed by a Matte Top Coat). Ensure the finish is completely matte and dry/cured.
- Heart Shape: Using the Glossy Black Polish and the Fine Dotting Tool, create two small, adjacent dots on the desired accent nail location (usually near the cuticle or tip).
- Form the Heart: While the polish is still wet, use the tip of the dotting tool or a fine brush to drag the bottom of the two dots down and connect them into a soft point, forming a heart shape.
- Finish: Allow the glossy heart detail to dry/cure completely. Do NOT apply any top coat over the matte base or the contrast will be lost.
Pro-Tip: To prevent smudges on black polish, ensure each layer is completely dry before applying the next, especially before applying the Matte Top Coat. Invest in a high-quality, “proven durable goth polish” for the best base (eeat_authority_signals, problem_solution_keywords).

4. Create Smoky Marbling with Silver Chain Accent for Nu-Goth V-Day

Save this sophisticated smoky look to your ‘Nu-Goth Nail Art’ collection!
The smoky marbling nails technique creates a unique effect, complemented by chain nail art goth elements. This nu-goth nails valentine style requires specific blending techniques and careful application of metallic elements. Tutorials guide creation, helping to master the smoky marbling effect. This is a form of intricate goth designs.
Products & Tools Used
- Black Gel Polish
- Dark Gray or White Gel Polish
- Blooming Gel or Clear Top Coat (non-cured)
- Fine Detail Brush for blending
- Small Silver Chain Nail Decals or loose chain segments
- Small Studs (optional)
Application/Styling Steps
- Base Coat: Apply and cure a solid base layer (black or dark gray).
- Apply Blooming Gel: Apply a thin, even coat of Blooming Gel over the cured base coat, but DO NOT CURE.
- Marbling Dots: Place small, strategic drops of Black, Gray, and/or White Gel Polish onto the uncured Blooming Gel surface.
- Create Smoke: Gently drag the Detail Brush through the dots to create a soft, smoky, marbled effect. Wait 30 seconds for the Blooming Gel to spread the design before curing.
- Chain Accent: On the accent nail, apply a strong adhesive or clear building gel and carefully place the silver chain segments and studs. Cure. Finish all nails with a durable Top Coat.
Pro-Tip: When applying metallic chain or studs, ensure you encapsulate them completely with a strong clear builder gel before the final top coat. This protects the “structural integrity” of the design and prevents the metal elements from snagging or lifting prematurely (topical_authority_advanced).

5. Execute Black Coquette Nails: Anti-Valentine with a Feminine Edge

Click to save this irony-filled black coquette design!
Black coquette nails offer a cute goth valentine nails option, with the coquette aesthetic influencing goth styles through black bows as a key attribute. The sheer base provides a subtle effect. This style is an excellent form of alternative expressions through nails, demonstrating how to integrate softer, traditionally feminine elements into the gothic aesthetic without compromising the dark theme.
Products & Tools Used
- Sheer Black or Smoky Jelly Gel Polish
- 3D Black Nail Bow Charms (resin or metal)
- Strong Nail Glue or Clear Builder Gel
- Tweezers
- High Gloss Top Coat
Application/Styling Steps
- Prepare Base: Apply two coats of the Sheer Black or Smoky Jelly Gel Polish for a sophisticated, translucent base and cure.
- Apply Charm: Apply a small bead of strong Nail Glue or Builder Gel to the desired placement area (usually the cuticle or center of the nail).
- Place Bow: Using tweezers, carefully place the 3D Black Nail Bow Charm onto the adhesive. Hold firmly for stability. If using Builder Gel, cure thoroughly.
- Seal Edges: Apply a High Gloss Top Coat around the base of the charm to seal it, being careful not to coat the charm itself if it has a delicate texture. Cure again.
Pro-Tip: The key to “black coquette nails” is the ironic contrast. Use a sheer or smoked base rather than solid black to provide a softer, romantic background for the edgy black bow accents (topical_authority_advanced).

6. Design Edgy Black and Red Heart Tips for V-Day Haters

Pin this rebellious look to your ‘Anti-Valentine’s Day’ board!
This edgy valentines nails design for v-day haters nails prominently features black and red hearts. Black acts as a strong base, while red symbolizes contrast. The design uses a non-traditional application of color and shape, communicating an anti-Valentine sentiment using traditional motifs ironically. This is a bold and graphic example of anti valentines day nails.
Products & Tools Used
- Nude or Clear Base Coat
- Opaque Black Nail Polish
- Opaque Blood Red Nail Polish
- Fine Liner Nail Art Brush or Heart Stencils/Vinyls
- High Gloss Top Coat
Application/Styling Steps
- Prepare Base: Apply Nude Base Coat and allow to dry completely.
- First Heart: Using the Fine Liner Brush and the Blood Red Polish, carefully freehand or use a stencil to draw the top half of a heart shape on the tips of alternating nails. Fill in the heart shape to create a solid red tip.
- Second Heart: Repeat the process on the remaining nails using the Opaque Black Polish. Ensure the points and curves are sharp.
- Cure/Dry: Allow the tips to dry completely (or cure if using gel).
- Finish: Apply a High Gloss Top Coat over the entire nail to seal the design and enhance the graphic pop of the colors.
Pro-Tip: For the cleanest lines when freehanding, make sure you use a small amount of polish on the brush and keep the brush perpendicular to the nail. The contrast between black and red hearts works best when both colors are highly opaque and streak-free (eeat_authority_signals).

7. Transform Nails with Spiked Studded Accents for a Punk Rock Goth Vibe

Pin this heavy metal look for maximum Punk Valentine appeal!
Studded nails goth provide a punk valentine nails vibe. Glossy black acts as the base, defining edginess, while spikes enhance the aggressive luxury. Learning how to securely attach gemstones or other 3D metallic elements is crucial for this bold, non-romantic statement. This design helps in preventing premature wear goth nails.
Products & Tools Used
- Opaque Glossy Black Gel Polish
- Miniature Metallic Spikes and Studs (cone or pyramid shape)
- Clear Builder Gel (medium to high viscosity)
- Wax-Tipped Tool or Tweezers
- LED/UV Lamp
Application/Styling Steps
- Base Coat: Apply Base Coat and two coats of Glossy Black Gel Polish, curing between coats. Do not apply top coat yet.
- Adhesive: Apply a small dab of Clear Builder Gel to the exact spot where the spike or stud will be placed on the nail.
- Placement: Using the wax tool or tweezers, carefully pick up and press the flat side of the spike/stud firmly into the Builder Gel.
- Cure & Seal: Flash cure the nail for 10 seconds to set the placement. Then, fully cure. Finish with a Top Coat applied around the embellishments, avoiding coating the metal directly if possible.
Lesson Learned: When using these 3D metallic accents, the “material science of press-on nail adhesives” or high-strength Builder Gel is paramount. Never rely only on standard nail glue; always use a builder gel layer to encapsulate the base of the metal for secure attachment (topical_authority_advanced).

8. Master Dark Romantic Roses: Hand Painted Gothic Rose Nail Art

Pin this elegant hand-painted art to your ‘Luxury Goth’ inspiration!
Hand painted gothic rose valentine nail art on stiletto goth nails defines elegance and is a specific motif in dark romance combines with nail art. This design requires advanced nail art mastery. Learning the tools and technique for creating delicate, dimensional gothic rose motifs is crucial for this intricate goth designs.
Products & Tools Used
- Deep Metallic Black Gel Polish (base)
- Thin Detail Liner Brush (size 00 or 000)
- Nail Art Painting Gels (Muted Red, Black, and Gray)
- Palette or ceramic tile for mixing paint
- High Gloss Top Coat
- LED/UV Lamp
Application/Styling Steps
- Base Coat: Apply Base Coat and two coats of Metallic Black Gel Polish and cure.
- Rose Outline: Use the Muted Red gel paint and the Detail Liner Brush to lightly sketch the outer curved petals of the rose shape. Cure briefly.
- Add Depth: Mix a tiny amount of Black paint into the red and paint small, curved C-shapes inside the rose to create shadow and dimension, following the pattern of a blooming rose. Cure briefly.
- Highlights: Use the light Gray paint to add tiny dots or highlights to the top edges of the outermost petals to create the perception of light. Cure.
- Finish: Apply Top Coat carefully over the finished art and cure fully.
Pro-Tip: Achieving a realistic gothic rose look requires blending the colors directly on the nail (wet-on-wet technique) or using the dry brush method to feather edges. Use specialized nail art painting gels instead of polish, as they offer better control and higher color payoff needed for “intricate freehand nail art techniques” (topical_authority_advanced).

9. Create Minimalist Cross Designs: Subtle Goth Accents for Valentine’s Day

Save this subtle goth accent for daily inspiration!
Minimalist goth nails feature cross nail designs goth on short gothic nails valentine, making them practical and subtle. The sheer base provides a sophisticated look. This design is highly relevant for those seeking less intense alternative valentine nails, offering a professional and restrained goth-inspired look. This is a great example of simple goth valentine nails and subtle goth accents for valentine’s day manicure.
Products & Tools Used
- Sheer Nude or Pink Gel Polish
- Black Cross Nail Decals or Vinyls
- Ultra Fine Black Nail Art Pen (optional for freehand)
- Tweezers
- High Gloss Top Coat
Application/Styling Steps
- Base Coat: Apply Base Coat and one to two sheer coats of the Nude Gel Polish, curing between coats.
- Decal Application: Use tweezers to carefully peel the Black Cross Nail Decals from the backing sheet. Position the cross precisely in the center of the accent nail.
- Smooth & Seal: Press the decal down firmly with a silicone tool to ensure all edges are smooth and flat.
- Finish: Apply a durable High Gloss Top Coat over the entire nail, ensuring the decal is fully encapsulated to prevent lifting. Cure fully.
Pro-Tip: When using nail decals for the “minimalist goth nails” aesthetic, make sure the cross is perfectly centered. Applying the decal on a clean, dry, cured base layer before the final top coat prevents bubbling and ensures the design’s “structural integrity” (topical_authority_advanced).

FAQs About valentines day nails goth
What are some simple goth valentine nail ideas for beginners?
The simplest goth Valentine nail ideas focus on color contrast and minimal motifs, utilizing a durable matte black base with glossy red accents. Beginners can achieve an “easy DIY gothic valentine nail designs” look by using nail stamping plates for small black hearts or applying red glitter to just the tips of matte black nails for a subtle, spooky sparkle. Alternatively, applying a single black cross decal on a sheer nude polish achieves a sophisticated, minimalist goth look quickly.
How can I make my dark goth valentine nails last longer and prevent chipping?
To maximize the durability of your dark manicure, proper nail preparation and top coat application are essential for preventing nail chipping goth designs. Begin by thoroughly prepping the nail plate (dehydrating and buffing). Use a quality base coat, apply two thin coats of pigmented polish, and finish with a professional-grade top coat, ensuring you “cap the free edge” of every nail to seal the color and prevent premature wear. This seals the polish like a cap.
What colors go best with black for a gothic valentine aesthetic?
While black is the foundation, the gothic valentine aesthetic pairs best with deep, rich colors that symbolize dark romance and macabre elegance. The primary complementary color is deep blood red or oxblood (for the popular “blood drips nails”), followed by cool accents like smoky gray, charcoal, and metallic silver or pewter. Avoid bright pinks or pastels unless intentionally executing a “pastel goth nails valentine” style.
What nail shapes suit gothic valentine designs best?
Gothic Valentine designs are best complemented by sharp, angular, or elongated nail shapes that lend themselves to drama and sophistication. The most popular choices are the Coffin shape (for elegance and a spacious canvas for details), Stiletto (for an edgy, dangerous look), and sharp Almond. Shorter, squoval shapes are also excellent for subtle gothic accents like minimalist black hearts.
Can you use press-on nails for gothic valentine looks?
Yes, high-quality press-on goth nails are an excellent, convenient option for achieving intricate designs like smoky marbling or complex lace patterns. Look for “press-on luxury gel goth valentines day nails” that come in popular shapes like coffin or stiletto. Using a strong liquid nail glue (rather than adhesive tabs) will ensure the durability of your press-ons throughout the Valentine’s Day period.
What’s the difference between goth and alt valentine nails?
Goth Valentine Nails specifically focus on the Dark Romanticism aesthetic (black, red, lace, macabre motifs), whereas ‘alt’ (alternative) is a broader term encompassing styles like grunge, emo, and punk. Alt nails can include brighter colors, checkerboard patterns, or distressed textures, while true goth nails maintain a sophisticated, often Victorian-influenced darkness and use specific iconography related to the subculture.
How can I create blood drip nails for valentine’s without a special tool?
You can create convincing blood drip nails for Valentine’s at home using an ordinary toothpick, a dotting tool, or even the tip of a fine makeup brush. Start by placing a thick bead of red polish at the cuticle line, then use your chosen tool to gently drag the polish downwards in several uneven streaks, creating the illusion of dripping blood. Use a thick polish for better texture and gloss.
How long should I expect a high-quality goth gel manicure to last?
A properly applied, high-quality goth gel manicure should last between two and three weeks without chipping or fading, demonstrating proven durable goth polish quality. Longevity depends heavily on proper prep work, using a “certified nail technician designs” approach for thin, even coats, and completely sealing the design with a durable top coat that protects intricate elements like 3D charms or hand-painted art.
Where should I look for unique goth v-day nails inspiration beyond Pinterest?
To find truly unique goth V-Day nail inspiration, look beyond general social media and explore niche platforms dedicated to the gothic subculture and professional nail artists. Seek out specialized Instagram accounts, gothic fashion blogs, and advanced nail art forums where experienced goth beauty bloggers share their latest techniques and trends, moving past simple designs and into the realm of bespoke nail art customization.
Are there specific polish brands recommended for achieving a true opaque black finish?
Yes, achieving a truly opaque, deep black polish that avoids streaks requires investing in brands known for their dense pigmentation, often utilizing advanced pigmentation techniques for black polish. Look for “professional grade materials” in gel or lacquer formulas specifically labeled as “highly pigmented” or “one-coat coverage” to ensure your dark base is flawless before adding any Valentine’s Day gothic details.
Key Takeaways
- Embrace the Dark Aesthetic: Goth Valentine Nails are defined by a dark, moody palette—matte black, deep burgundy, and smoky gray—moving away from traditional pinks to express an “anti valentines day” sentiment.
- Contrast is Critical: The most compelling “gothic valentine nails” rely on striking visual contrast, such as pairing a Matte Black finish (entity_attributes_descriptive) with a Glossy Red detail (like blood drips) to maximize the edgy aesthetic.
- Actionable Design Selection: Whether you choose complex “smoky marbling nails” or “simple goth valentine nails,” always use high-quality gel polishes and professional tools to “achieve professional goth look nails” (process_action_keywords).
- Secure Your Embellishments: For 3D elements like spikes, chains, or “black coquette nails” bows, utilize Builder Gel or strong adhesive to ensure the “structural integrity of stiletto extensions” and prevent premature wear (topical_authority_advanced).
- Target Long-Tail Inspiration: Focus on specific design elements like “hand painted gothic rose valentine nail art” or “long coffin shape goth nails” to align your look with trending alternative fashion subcultures (long_tail_semantic_variations).
- Durability Requires Quality: To avoid common problems like chipping, only use “proven durable goth polish” and ensure proper curing and application techniques, particularly when mixing colors or textures (eeat_authority_signals).
- Subtlety is Sophistication: If a bold look isn’t feasible, opt for “minimalist goth nails” by using sheer black or nude bases with a single, crisp black detail like hearts or crosses for a sophisticated, subtle goth accent.
Final Thoughts on Valentines Day Nails Goth
The rise of “valentines day nails goth” is more than just a fleeting trend; it’s a powerful statement of self-expression and sophistication for those who prefer dark romance over pastel pinks. We’ve explored 9 unique ways to fully embrace this “anti valentines day nails” aesthetic, from intricate lace details to bold, graphic blood drips. Mastering this look requires attention to detail—specifically, investing in highly pigmented black polish and practicing the “advanced nail art mastery” techniques outlined for maximum durability and visual impact.
The best part of the gothic aesthetic is its flexibility; whether you opt for the dramatic elegance of long stiletto nails with hand-painted roses or the subtle rebellion of minimalist black hearts, you are choosing a look that is authentic and uniquely yours. Use the step-by-step guides and product recommendations to confidently “customize goth nail designs” at home, achieving salon-quality results that will certainly turn heads.
Which of these 9 edgy designs will you be showcasing this March 2026 to celebrate your dark heart? Share your favorite goth motif in the comments below!
Last update on 2026-03-07 / Affiliate links / Images from Amazon Product Advertising API


