Struggling to find a nail color that’s both daring and sophisticated? You want a look that’s modern and chic, but versatile enough for any occasion, from the office to a night out. It’s a challenge to find a style that feels both timeless and perfectly on-trend.
Short black nails are a top style choice because they offer a unique combination of edgy sophistication and practical elegance. This versatile look enhances any outfit, works on all nail shapes, and projects a sense of modern confidence. A classic yet bold statement, it remains a timeless trend for its chic, minimalist appeal.
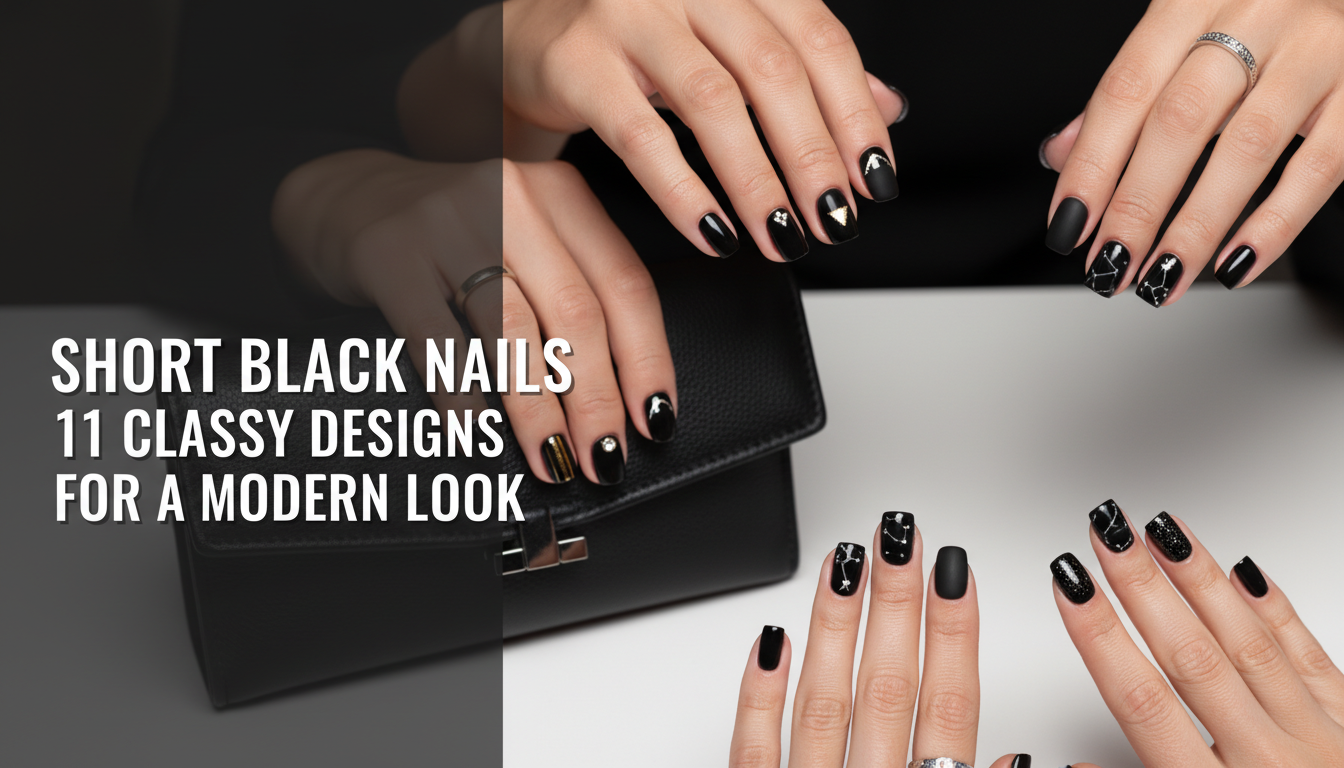
Drawing from an analysis of current trends and proven nail art methodologies, this guide establishes short black nails as a powerful fashion statement. We will explore 11 classy designs that redefine this classic look for 2026. You’ll discover how to create everything from a velvety matte finish to elegant gold-accented art, empowering you to achieve a perfect, professional-looking manicure.
Why Are Short Black Nails the Ultimate Statement of Modern Style?
In the world of fashion, short black nails have solidified their status as the ultimate accessory for modern style. They represent a departure from fleeting trends, offering a look that is simultaneously edgy and incredibly elegant short black nails. The beauty of this choice lies in its inherent versatility; it’s a color that refuses to be typecast. No longer confined to a short black nails for a gothic look, the short black nail aesthetic is now embraced on runways, in corporate boardrooms, and by style icons everywhere. This shift reflects a broader change in fashion where confidence and personal expression are paramount. A chic short black nails manicure acts as a neutral foundation that can be styled up or down, making it the perfect canvas for both minimalist short black nails and more intricate designs. It’s a choice that says you are bold, in control, and appreciate timeless sophistication.
11 Classy Short Black Nail Designs for a Modern Look
Ready to find your perfect short black nail styles? This curated list of 11 designs offers something for every taste, from the understated and simple short black nails to glamorous and eye-catching nail art. Each idea comes with a step-by-step guide to help you create short black nail art at home or to show your nail tech for inspiration. We’ll cover various finishes and techniques, demonstrating how products like gel nail polish black and nail art tools can transform this classic look. Whether you’re a DIY enthusiast or a salon regular, you’ll find the perfect design to express your style.
1. Create a Timeless Full Matte Black Manicure

Pin this sophisticated look to your ‘Nail Inspo’ board!
The full matte black short nails look is the epitome of understated cool. This design is characterized by its non-reflective, velvety finish, which gives the deep black color a soft, modern edge. The key to this look is achieved with a specialized matte top coat, which transforms any glossy black polish into a sophisticated, fashion-forward statement.
Products & Tools Used
- Black Nail Polish: An ultra-pigmented, jet black short nails polish (gel or regular) that provides full coverage in one to two coats.
- Base Coat: A quality base coat to prevent black nail polish stains and improve adhesion.
- Matte Top Coat: A high-quality top coat specifically designed to create a velvety, non-glossy finish.
- Nail file and buffer
- Cuticle pusher and oil
- Isopropyl alcohol and lint-free wipes
Application Steps
- Prep Nails for Black Polish: Shape your nails to your desired short, square or round shape. Gently push back cuticles and cleanse the nail plate with an alcohol wipe to remove any oils.
- Apply Base Coat: Apply one thin layer of base coat and allow it to dry completely (or cure if using gel).
- Paint Short Black Nails: Apply one to two thin coats of your black nail polish. Let each coat dry thoroughly (or cure for 30-60 seconds per layer under an LED lamp).
- Seal with Matte Finish: Apply one even layer of the matte top coat, making sure to cap the free edge of the nail. Let it dry completely (or cure for 60 seconds). Your sophisticated black nails short are complete.
Pro-Tip: Matte top coats can sometimes highlight imperfections. For a flawless finish, ensure your final color coat is perfectly smooth before applying the matte layer. If you notice any smudges or oiliness later, a quick wipe with an alcohol pad can temporarily restore the matte effect.

2. Design an Ultra-Glossy Black Gel Manicure

Love that liquid shine? Pin this for your next salon visit!
For a timeless look with incredible shine and durability, short black gel nails are the gold standard. This style is characterized by its liquid-like, high-gloss finish and chip-proof wear. The process requires a UV or LED lamp to cure the polish, which is part of the polymerization process black gel uses to harden into a resilient, glossy layer.
Products & Tools Used
- Black Gel Polish: A high-quality, opaque black gel polish.
- Gel Base Coat and No-Wipe Glossy Top Coat: A matched set for optimal adhesion and shine.
- UV/LED Nail Lamp: A lamp with sufficient wattage to cure your chosen gel products.
- pH Bonder/Dehydrator: To prep the nail plate for maximum adhesion.
- Lint-free wipes and 99% isopropyl alcohol.
- Nail file and a soft buffer (180 grit or higher).
Application Steps
- Prep Nails for Gel: Gently file nails into a short almond shape. Lightly buff the shine from the natural nail—do not over-file. Cleanse with an alcohol wipe.
- Apply Bonder and Base: Apply a layer of pH bonder/dehydrator. Follow with a thin layer of gel base coat, capping the free edge. Cure under the lamp as per the manufacturer’s instructions (typically 30-60 seconds).
- Apply Black Gel Polish: Paint a very thin coat of black gel polish. Be careful not to touch the skin or cuticles. Cure for 60 seconds. Apply a second thin coat for full opacity and cure again.
- Achieve the Glossy Finish: Apply a generous layer of the no-wipe glossy top coat, ensuring you seal the entire nail and the free edge. Cure for a final 60-90 seconds. Let nails cool for a moment before applying cuticle oil.
Pro-Tip: To avoid short black nails looking dirty or bulky, apply gel polish in extremely thin layers. If you get any polish on your skin, clean it up with a small brush dipped in alcohol before curing.

3. Style a Modern Black French Tip

The modern French mani is here. Pin this chic update!
The black french tip is a modern, edgy take on a timeless classic. This design pairs with a sheer nude or pink base, creating a stunning contrast that is both minimalist and bold. The look is characterized by a crisp, thin black line at the nail’s free edge, making it one of the most requested classy chic short black nails styles.
Products & Tools Used
- Sheer Nude or Pink Polish: As the base color.
- Opaque Black Polish: For the tip.
- Fine Liner Nail Art Brush: A very thin brush (5mm or 7mm) for precision.
- Glossy Top Coat: To seal the design.
- (Optional) French tip guide stickers or nail stamping plate with a French tip design.
Application Steps
- Prep and Base: After prepping your nails, apply one to two coats of your sheer nude base polish and let it dry completely (or cure).
- Create the Tip Line (Freehand): Pour a small amount of black polish onto a palette. Dip your fine liner brush into the polish and, with a steady hand, paint a thin, curved line across the tip of your nail. Fill in the tip.
- Create the Tip Line (Guides): Alternatively, place a French tip guide sticker just below the free edge of your nail. Paint the tip with black polish and remove the sticker immediately while the polish is still wet.
- Clean Up and Seal: Use a cleanup brush dipped in acetone to perfect the smile line. Once dry, apply a glossy top coat to protect your short black french tip design.
Pro-Tip: For super short nails, a “micro” or “skinny” French tip is most flattering. Keep the black line very thin to elongate the look of the nail bed rather than shorten it.

4. Add a Subtle Pop with a Glitter Accent Nail

A little sparkle goes a long way. Pin this easy glam idea!
Adding a glitter accent nail is a simple yet effective way to elevate your manicure. This design element is combined with a solid black base to add a touch of glamour without being over the top. It enhances the entire look, making it perfect for special occasions like a holiday party or even as short black nails for a wedding guest.
Products & Tools Used
- Opaque Black Polish
- Chunky Glitter Polish: A dense glitter in a clear or black base (silver, gold, or holographic).
- Glossy Top Coat: A thick top coat to smooth out the glitter.
- (Optional) A small makeup sponge.
Application Steps
- Paint the Base: Apply your base coat and two coats of black nail polish to all nails except the accent nail (usually the ring finger).
- Apply the Glitter: On the accent nail, apply one coat of your glitter polish. For more density, use the dabbing method: paint the glitter polish onto the corner of a makeup sponge, let the clear base soak in for a moment, then dab the concentrated glitter directly onto your nail.
- Build Opacity: Repeat the dabbing process until you have the desired glitter coverage.
- Smooth and Seal: Glitter creates a rough texture. Apply one or two thick layers of glossy top coat over the glitter nail to get a smooth, glossy finish. Apply a regular layer of top coat to the black nails.
Pro-Tip: Removing glitter polish can be difficult. Before you start, apply a peel-off base coat to the accent nail. When you’re ready to remove it, you can often peel the entire glitter polish off in one piece, saving you from scrubbing.

5. Incorporate Elegant Gold Foil Accents

Pure luxury. Pin this gold-accented design for an instant upgrade.
For a truly luxurious and elegant look, gold foil is the perfect addition to a black manicure. This nail art material is combined with the black base to create a stunning, textured effect that looks incredibly high-end. The design involves applying delicate flakes of foil onto a tacky layer of polish, resulting in a look that’s both artistic and sophisticated.
Products & Tools Used
- Black Polish (Gel is recommended for this technique)
- Gold Nail Foil Flakes
- A Pair of Tweezers or a wax-tipped pen
- Glossy Top Coat (preferably gel)
Application Steps
- Apply Base Color: Apply your base coat and two coats of black gel polish, curing after each layer. Do not wipe the sticky (inhibition) layer after the final color coat.
- Place the Foil: Use tweezers to pick up small pieces of gold foil. Gently press them onto the sticky layer of the gel polish in a random, abstract pattern. Use a silicone tool or your finger to gently pat them flat.
- Don’t Overdo It: Less is more. Focus the foil near the cuticle, along one side, or just on the tip for a more artistic effect.
- Encapsulate and Seal: Apply a layer of gel top coat over the entire nail, making sure all the foil is completely covered and encapsulated. Cure for 60-90 seconds. Apply a second layer of top coat if needed for a perfectly smooth surface.
Pro-Tip: For a more delicate, shattered look, place a larger piece of foil on a silicone mat and use your tweezers to break it into smaller, more varied shapes before applying it to the nail. This gives you more control over the final design.

6. Achieve an Edgy Black and Nude Negative Space Look

Minimalism at its edgiest. Pin this negative space design now!
Negative space is a nail art technique that delivers a majorly modern short black nails vibe. This style involves leaving parts of the natural nail exposed, creating sharp, geometric patterns against the opaque black. It creates an airy and sophisticated look that’s particularly effective for making short nails appear thoughtfully styled and intentionally minimalist.
Products & Tools Used
- Clear Base Coat
- Opaque Black Polish
- Thin Nail Art Striping Tape
- Glossy Top Coat
- A pair of small scissors and tweezers
Application Steps
- Prep and Base Coat: After prepping your nails, apply a clear base coat to protect the natural nail. This will be the ‘nude’ part of your design. Let it dry completely.
- Apply the Tape: Cut small pieces of striping tape and press them firmly onto the nail to create your desired pattern (e.g., a diagonal line, a chevron at the cuticle, a vertical stripe).
- Paint the Black Section: Carefully paint the black polish over the sections of the nail you want to be colored. Work quickly but neatly.
- Remove Tape Immediately: While the black polish is still wet, use tweezers to gently pull off the striping tape. Pulling it off a wet polish gives you the crispest line.
- Seal the Design: Wait for the black polish to dry completely, then apply a glossy top coat over the entire nail to seal in your edgy design.
Pro-Tip: To prevent the polish from bleeding under the tape, make sure your base coat is 100% dry and press the tape down very firmly, especially at the edges. Applying a layer of top coat over the tape before the black polish can also help seal the edges.

7. Combine Finishes with Matte & Glossy Details

Subtle sophistication. Pin this matte and glossy combo.
Playing with the matte vs glossy short black nails trend on the same nail is the secret to a truly sophisticated black nails short look. This design is characterized by the textural contrast between a velvety matte base and high-shine glossy accents. It creates a subtle, tone-on-tone effect that is visually captivating without adding any extra colors.
Products & Tools Used
- Black Polish (Gel works best for control)
- Matte Top Coat
- Glossy Top Coat (No-Wipe gel version is ideal)
- A Fine Liner Nail Art Brush
Application Steps
- Create the Matte Base: Complete a full manicure using your black polish, finishing with a matte top coat. Ensure the matte layer is fully dry or cured and wiped clean of any sticky residue.
- Plan Your Design: Decide where you want the glossy accents. Popular choices include a glossy French tip over the matte nail, glossy polka dots, or a single glossy stripe.
- Paint the Glossy Details: Pour a tiny amount of the glossy top coat onto a palette. Dip your fine liner brush in and carefully paint your design over the matte nail.
- Cure the Final Design: If using gel, cure the glossy design under your lamp. There’s no need to top coat the whole nail again. The contrast is the final look.
Pro-Tip: This technique is perfect for a short black nails valentine look. Create a matte black base, then use a dotting tool and your glossy top coat to draw a small, shiny heart on an accent nail. It’s subtle, romantic, and chic.

8. Master the “Black Velvet” or “Cat Eye” Effect

Get hypnotized by this velvet nail look. Pin it to try later!
The black velvet nails or “cat eye” effect is a trending short black nails style that adds mesmerizing depth to your manicure. This look is achieved with a special cat eye gel polish and a magnet. The magnet is used for shifting the metallic particles within the wet polish to create a luminous band of light that mimics the look of velvet or a cat’s eye.
Products & Tools Used
- Black Gel Polish: As a solid base color.
- Black Cat Eye/Magnetic Gel Polish: A polish containing tiny metallic particles.
- A Nail Art Magnet: Usually a small bar magnet or a disc magnet in a wand.
- Gel Base and Top Coat, and a UV/LED lamp.
Application Steps
- Apply Base Layers: Prep the nail. Apply a gel base coat and cure. Then, apply one coat of regular black gel polish and cure. This dark base makes the magnetic effect more dramatic.
- Apply Magnetic Polish: Apply a thick but even layer of the cat eye gel polish. Do not cure it yet.
- Use the Magnet: Hold the magnet close to the wet polish (without touching it). Hold it diagonally across the nail for a classic cat eye line, or hold it at the tip to push the glitter back. Hold for 5-10 seconds until you see the particles shift.
- Cure Immediately: Once you are happy with the effect, cure the nail immediately under your lamp to lock the design in place.
- Seal the Manicure: Apply a glossy top coat and cure for a final time.
Pro-Tip: For the trendy “velvet” look, after applying the magnetic polish, hover the magnet over all four sides of the nail and then from the top. This pulls the magnetic particles away from the center, creating a diffused, all-over shimmer that looks like velvet fabric.

9. Apply Simple and Chic Black Press-On Nails

Perfect nails in minutes? Yes, please! Pin this press-on nail guide.
For a flawless manicure in minutes, press on short black nails are a game-changer. These are an alternative to polish that involves adhering pre-made artificial nails to your natural nails. They offer a quick, damage-free, and often reusable way to get a perfect set of short black nails coffin shape without a trip to the salon, making them one of the best easy diy short black nail art ideas.
Products & Tools Used
- A Kit of Short Black Press-On Nails: Choose a shape you like, such as short black nails coffin.
- Nail Glue or adhesive tabs (glue is more durable).
- Nail File and Buffer
- Alcohol Prep Pad (usually included in kits).
- Cuticle Pusher.
Application Steps
- Size and Prep: Match each press-on nail to your natural nails to find the perfect size. Gently push back your cuticles and lightly buff the surface of your natural nails to remove shine.
- Dehydrate the Nail: This is the most important step. Thoroughly wipe each of your natural nails with the alcohol prep pad to remove all oils and dust.
- Apply Glue: Apply a dot of nail glue to your natural nail and a small amount to the back of the press-on nail.
- Press On the Nail: Align the press-on with your cuticle at a 45-degree angle, then press it down firmly, rolling forward to the tip. Hold it in place for 20-30 seconds, ensuring there are no air bubbles.
- Final Touches: Avoid contact with water for at least an hour to allow the glue to fully bond.
Pro-Tip: For a truly seamless look, you can gently file the base of the press-on nail to better match the curve of your own cuticle before you glue it on. This little bit of customization makes them look much more like salon acrylics.

10. Design a Subtle Black Ombré or “Smoke” Effect

Smoky and subtle. Pin this elegant ombré nail art idea.
A black ombré, or “smoke” effect, is a sophisticated black nails short style that adds an air of mystery. Ombré is a nail art technique that creates a beautiful gradient by blending colors. For these short dark nails, a sheer black is blended from the tip into a nude base, which creates an illusion of length and a soft, ethereal finish.
Products & Tools Used
- Nude Base Polish
- Sheer or Opaque Black Polish
- A Small Piece of a Makeup Sponge
- Liquid Latex Peel-Off Barrier (for easy cleanup)
- Glossy Top Coat
Application Steps
- Prep and Base: Apply your nude base color and let it dry completely. Apply the liquid latex barrier to the skin around your nail.
- Prepare the Sponge: On a flat surface, paint a stripe of your nude polish and a stripe of your black polish right next to it, slightly overlapping.
- Sponge the Gradient: Dab the sponge a few times on the surface to blend the colors, then gently dab the sponge onto your nail. Use a slight up-and-down motion to further blend the gradient.
- Build the Color: Let the first layer dry for a minute, then repeat the process, dabbing a second layer slightly lower down to concentrate the black at the tip.
- Clean Up and Seal: While the polish is still tacky, peel off the liquid latex. Once the design is fully dry, apply a glossy top coat to smooth out the texture and make the gradient seamless.
Pro-Tip: To prevent little bubbles in your sponged design, slightly dampen your makeup sponge with water and squeeze it out before applying the polish to it. This stops the sponge from absorbing the polish too quickly.

11. Add Tiny Rhinestone Details for a Touch of Glam

Minimalist glam is just a rhinestone away. Pin this chic idea!
For a minimalist yet glamorous touch, look no further than short black nails with rhinestones. Rhinestones are a classic nail art embellishment that is used for adding a focal point of sparkle. A single, tiny gem placed at the base of the nail requires a strong adhesive and creates an incredibly cute short black nails look that’s perfect for any celebration.
Products & Tools Used
- Black Polish
- Tiny Nail Art Rhinestones (1.5mm or 2mm are great for short nails)
- A Wax-Tipped Picker Pen or a toothpick with a dab of top coat
- Nail Glue or a “Gem Glue Gel” for a stronger hold
- Top Coat
Application Steps
- Complete Your Manicure: Apply your black polish and a layer of top coat. Let it dry completely (or cure if using gel).
- Apply Adhesive: Place a tiny dot of nail glue or gem gel exactly where you want the rhinestone to go (e.g., at the center of the cuticle line).
- Place the Rhinestone: Use your wax-tipped pen to easily pick up a single rhinestone and gently place it onto the dot of glue. Lightly press it into place.
- Secure (Do Not Cover): If using gem gel, cure it under the lamp. To seal, take a very fine brush and apply a little bit of top coat around the base of the rhinestone, not over the top of it. Painting over the top will make it lose its sparkle and facets.
Pro-Tip: Never use regular top coat as a “glue” for rhinestones. It doesn’t have the adhesive strength, and your gems will pop off within a day. A dedicated nail glue is essential for any 3D embellishments to last.

Key Takeaways
- Nail Prep is Non-Negotiable: The secret to long-lasting short black nails, whether using polish, gel, or press-ons, is proper prep. Always cleanse the nail plate with alcohol to remove oils before application to prevent black nails chipping.
- Finish Defines the Vibe: The same black nail polish can look completely different depending on the top coat. A matte finish provides a sophisticated, velvety look, while a glossy finish delivers a classic, high-shine elegance.
- Thin Coats are Key: To avoid a thick or short black nails looking dirty appearance, always apply polish (especially gel) in multiple, paper-thin layers rather than one thick coat. This ensures even drying and a professional finish.
- Embrace Modern Designs: A short black manicure is a versatile canvas. Simple additions like a black french tip, a glitter accent nail, or subtle gold foil accents can elevate the look from simple to stunning without overwhelming a shorter nail length.
- Use the Right Tools for the Job: Achieving professional results requires the right tools. Invest in a good matte top coat, a fine liner nail art brush for details, and proper nail glue for embellishments to make your DIY manicure look like it was done by a pro.
People Also Ask About Short Black Nails
Can short black nails be classy and professional?
Yes, absolutely. Short black nails are widely considered a chic, classy, and professional choice in modern workplaces. The key is to keep them neat, well-manicured, and styled appropriately. A simple glossy or matte finish on a clean, short nail shape like squoval or oval looks sophisticated and powerful, far from the outdated “goth” stereotype.
Are black nails in style for 2026?
Black nails are a timeless trend that remains consistently in style, including for 2026. While specific designs may evolve, the classic short black manicure is like the “little black dress” of the nail world—always fashionable. In 2026, finishes like matte black, subtle chrome, and minimalist designs with negative space keep the look fresh and modern.
What nail shape is best for short black nails?
The best nail shapes for short black nails are squoval, round, and oval. These shapes are practical and tend to follow the natural line of the fingertip, creating a very clean and elegant look. While short square and coffin shapes can also look great, they can sometimes make very short fingers appear wider.
How do I prevent black nail polish from staining my nails and skin?
To prevent staining, always use a quality base coat before applying black polish. This creates a protective barrier. For skin, apply a liquid latex peel-off barrier or a bit of petroleum jelly around your cuticle before painting. When removing, soak a cotton ball in remover, press it on the nail for 10 seconds, then swipe off in one motion towards the tip.
Is a matte or glossy finish better for short black nails?
Neither is better; it purely depends on the desired aesthetic. A glossy short black nail is a timeless classic, offering a sleek, polished, and ‘finished’ look. A matte short black nail provides a more modern, edgy, and velvety appearance that is very on-trend. For a unique look, you can even combine both, as shown in the mixed-finish design.
How do you stop short black nails from looking messy or “dirty”?
The key is thin, precise application and clean cuticle lines. Use thin coats of polish to avoid a thick, bulky look. Before curing (for gel) or before it dries (for regular polish), use a small, flat brush dipped in acetone or alcohol to carve out a clean line around your cuticle. This creates that sharp, professional short black nails look.
How long do black nails last?
A black gel manicure can last 2-3 weeks, while regular black nail polish typically lasts 3-7 days without chipping. The longevity greatly depends on your nail prep, application quality, and daily activities. Using a quality top coat and reapplying it every few days can extend the life of a regular manicure.
What are the benefits of choosing short black nails?
Short black nails are practical, powerful, and incredibly versatile. They are less prone to breaking than long nails, making them ideal for active lifestyles or jobs that require a lot of typing. The bold color makes a confident statement, and it acts as a neutral that pairs with virtually any outfit or color scheme.
Are press-on short black nails any good?
Modern press-on nails are excellent and offer a fantastic alternative to salon manicures. High-quality brands like BTArtbox offer durable, reusable nails in trendy shapes that look very realistic. When applied correctly with a good quality nail glue, a set of press on short black nails can last for 1-2 weeks.
How can I make my short nails look longer with black polish?
To make short nails appear longer, choose an oval or almond shape and maintain clean, pushed-back cuticles. Creating a small, clean gap between the polish and the cuticle wall also creates an illusion of length. Designs with vertical lines or a nude-to-black ombré can also help elongate the look of the nail bed.
Final Thoughts on Your Modern Black Manicure
Ultimately, short black nails are a statement of confidence. They’ve evolved far beyond a niche trend to become a staple of modern, chic style. Whether you opt for a simple short black nails look with a high-gloss finish or experiment with edgy matte black short nails and gold accents, the result is undeniably sophisticated.
This guide has shown you that achieving a flawless black manicure is all about technique. By focusing on proper nail prep, applying thin, even coats, and using the right tools, you can create any of these 11 classy designs right at home. Don’t be afraid to experiment and let your personal style shine through.
Now that you have all the inspiration and expert tips, which design will you try first?
Last update on 2026-04-27 / Affiliate links / Images from Amazon Product Advertising API