Dreaming of that effortlessly cool, supermodel hair with tons of bounce and movement? You’ve seen the iconic 90s butterfly haircut everywhere, a stunning revival that promises incredible volume, but maybe you’re unsure how to make it work for your hair type or achieve that signature feathery finish at home.
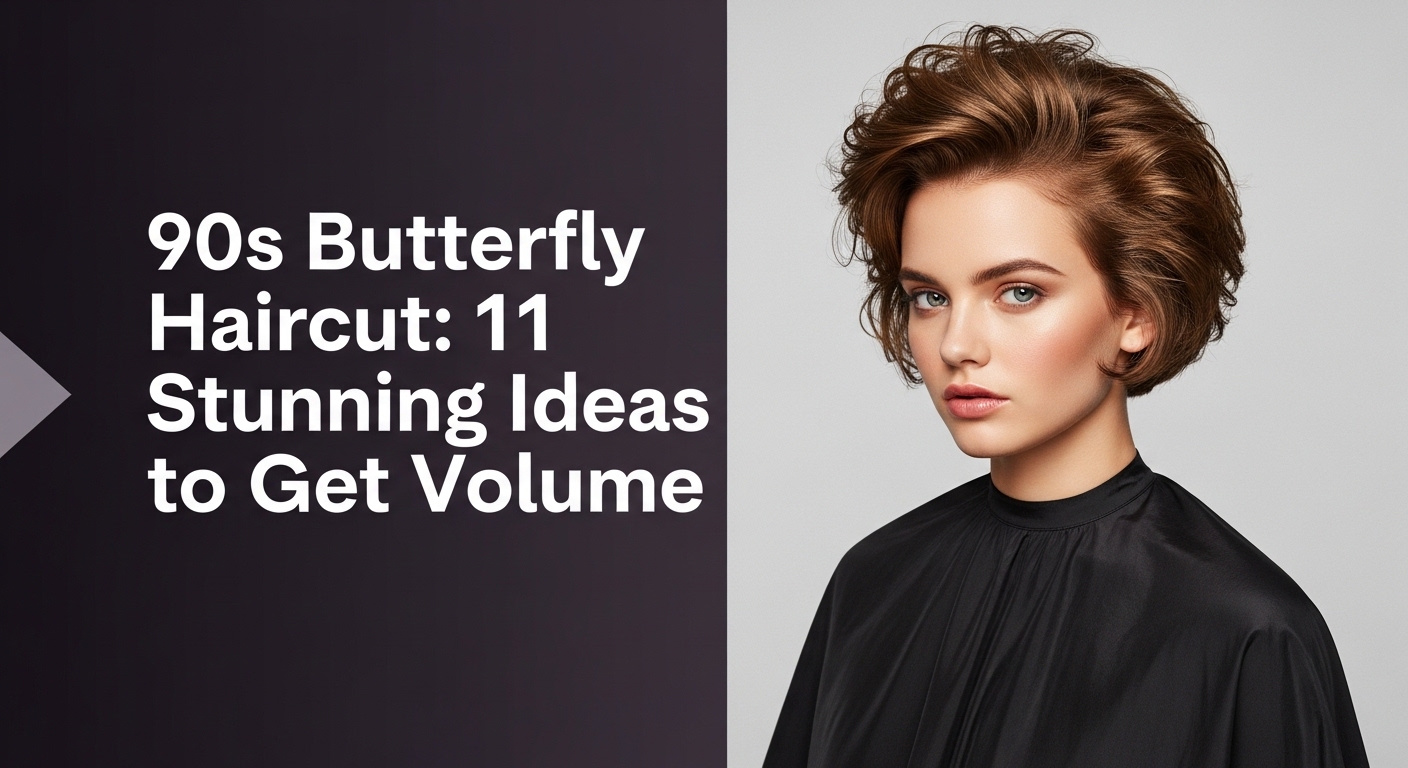
The 90s butterfly haircut is a highly layered, voluminous style featuring face-framing layers around the crown, creating the illusion of shorter hair while maintaining overall length, known for its bouncy, ’90s supermodel aesthetic. It focuses on achieving significant volume and movement through strategic layering and styling.
Drawing from established best practices and current trend analysis, this guide unlocks the secrets to this gorgeous look. We will explore 11 stunning ideas to help you achieve maximum volume and the perfect butterfly cut for 2026. Prepare to transform your hair with these expert tips and techniques.
Unleash the 90s Butterfly Haircut: Stunning Volume Ideas for 2026
The enduring appeal of the 90s butterfly haircut lies in its remarkable ability to create dynamic volume and movement. This style isn’t just a haircut; it’s a styling philosophy centered around creating bouncy, face-framing layers that evoke the effortless glamour of the 90s supermodel era. By blending shorter layers on top with longer lengths below, it mimics the graceful shape of butterfly wings, offering a versatile look that adds dimension without a drastic chop. This section breaks down 11 actionable ways to master the 90s butterfly style, ensuring you can achieve that coveted voluminous and feathery finish, no matter your hair type. We’ll dive into the specific techniques and products needed to bring this iconic 90s volume haircut to life.
1. Master the Classic Voluminous Butterfly Cut

Pin this iconic 90s butterfly hair look to your “Retro Hair Goals” board!
What You Need
- Volumizing mousse (lightweight, heat-activated)
- Large round brush (ceramic or boar bristle, 2-3 inch diameter)
- Sectioning clips (non-crease)
- Hair dryer with concentrator nozzle
- Texturizing spray (for flexible hold and airy finish)
- Heat protectant (lightweight, non-greasy formula)
Routine Steps
- Start with damp, towel-dried hair. Apply a generous amount of heat protectant and then volumizing mousse evenly from roots to ends.
- Sectioning hair into 4-6 manageable parts, securing with clips. Begin at the nape of the neck.
- Blow-drying each section using the round brush, lifting at the root for maximum volume. Point the nozzle downwards to smooth the cuticle.
- Once dry, wrap each section around the round brush and let it cool completely for lasting bounce. Alternatively, use large velcro rollers on cooled sections.
- Release sections and gently brush through with fingers or a wide-tooth comb to blend the disconnected layers.
- Finish with a few spritzes of texturizing spray for a feathery and dimensional look.
Pro-Tip: For ultimate volume at the crown, over-directing hair sections forward while blow-drying, then letting them cool in that position, will create an impressive lift that defies gravity, a key advanced blowout mechanics technique.

2. Achieve the Face-Framing Butterfly Layers

Save this look to your “Haircut Inspiration” board for your next salon visit!
What You Need
- Light hold styling cream or serum
- Small round brush (1-inch diameter)
- Mini flat iron or curling wand (optional, for specific piece-y definition)
- Fine-tooth comb for sectioning
Routine Steps
- After drying your hair, isolate the face-framing layers around your temples and jawline.
- Apply a pea-sized amount of styling cream to your fingertips and gently work it through these specific layers.
- Using the small round brush and a hair dryer on low heat, direct these layers away from your face for an outward flip or inwards for a softer curve.
- For extra piece-y definition, use a mini flat iron to create a slight bend at the ends of a few individual sections.
- Gently tousle the layers with your fingers to ensure a natural, feathery look.
- Avoid over-styling to maintain the soft edges and airy feel.
Pro-Tip: When styling face-framing layers, always consider your natural face shape analysis. For rounder faces, direct layers outwards to create width, while for longer faces, styling them inwards can soften angles, a key aspect of
face shape correction.

3. Style the Voluminous Butterfly Blowout

Pin this ultimate 90s supermodel hair transformation!
What You Need
- High-quality blow dryer (ionic for shine, powerful for speed)
- Large ceramic round brush (heat-retaining for faster drying)
- Velcro rollers (large size, 2-3 inches)
- Volumizing spray at the roots
- Smoothing serum or oil (for frizz control)
- Strong hold hairspray (flexible finish)
Routine Steps
- After applying a root volumizing spray to damp hair, roughly dry your hair until it’s 80% dry, lifting at the roots to build initial volume.
- Sectioning your hair into 4-6 manageable parts, starting from the bottom.
- Using the round brush, blow-dry each section, focusing on lifting the roots and smoothing the mid-lengths and ends. Use tension to create sleekness.
- For maximum bounce, wrap each fully dried section around a velcro roller (rolling away from the face for face-framing layers, or upwards at the crown). Secure.
- Allow rollers to cool completely (at least 15-20 minutes, or use a cool shot from your dryer). This sets the volume and curl.
- Gently remove rollers, shaking hair upside down for extra lift. Apply a smoothing serum to ends and finish with a light mist of flexible hold hairspray.
Pro-Tip: The secret to a long-lasting voluminous butterfly blowout lies in the “cool-down” phase. Hair sets when it cools, so letting each section completely cool on the round brush or in velcro rollers is crucial for maximizing style longevity and bounce.

4. Integrate Butterfly Layers with Curtain Bangs

Pin this chic combo to your “New Hair, Don’t Care” board!
What You Need
- Small-to-medium velcro rollers (1-1.5 inches)
- Hair dryer with concentrator nozzle
- Texturizing spray or light hold hairspray
- Small round brush or paddle brush
- Dry shampoo (for refreshing bangs)
Routine Steps
- After washing, gently towel dry your curtain bangs until they are slightly damp.
- Apply a small amount of volumizing spray or mousse to the roots of your bangs.
- Using a small round brush and your blow dryer, blow-dry the bangs, sweeping them from side to side to remove excess moisture and create volume at the root.
- Once nearly dry, take a single velcro roller and roll the entire bang section upwards and back, away from your face.
- Allow the roller to cool completely, or use a cool shot setting on your dryer to set the shape.
- Gently remove the roller and part your bangs down the middle, letting them fall naturally into their face-framing shape. Finish with a light spritz of texturizing spray.
Pro-Tip: For the most natural-looking curtain bangs that integrate seamlessly with your butterfly layers, aim for a soft edges finish rather than a blunt cut. This can be achieved by point cutting the ends, a hairstylist recommended technique for layer blending.

5. Adapt the Butterfly Cut for Shorter Hair

Pin this bold short butterfly cut for major hair inspo!
What You Need
- Root lifting spray or powder
- Mini to small round brush (1-1.5 inch diameter)
- Texturizing spray for definition
- Hair dryer with a fine nozzle
- Light hold paste or wax (for piece-y ends)
Routine Steps
- Apply root lifting spray or powder directly to the roots of damp hair, especially around the crown and face-framing layers.
- Using a mini round brush, blow-dry small sections of hair, lifting at the roots to maximize volume. Focus on the top layers to create the “butterfly wing” effect.
- Once dry, gently tousle the hair with your fingers, emphasizing the shorter layers at the top.
- Spritz texturizing spray throughout for enhanced movement and airy texture.
- For specific piece-y definition at the ends, use a tiny bit of light hold paste or wax on individual strands.
- Avoid heavy products that could weigh down shorter, voluminous styles.
Pro-Tip: When adapting the butterfly cut for shorter hair, the key is to ensure adequate crown elevation and careful disconnection point placement to prevent a mushroom shape. Your stylist should focus on removing internal weight to create lift without sacrificing the overall bluntness of a bob or lob, an expert technique.

6. Enhance Butterfly Layers on Long Hair

Pin this dream long butterfly cut to your “Hair Goals” board!
What You Need
- Volumizing shampoo and conditioner (sulfate-free, lightweight)
- Leave-in volumizing spray or foam
- Large paddle brush or wide-tooth comb
- Hair dryer with a diffuser (if natural waves) or concentrator nozzle
- Large barrel curling iron or hot rollers (for added bounce)
- Lightweight hair oil (for shine and frizz control on ends)
Routine Steps
- Begin with a thorough wash using volumizing shampoo and conditioner. Detangle gently with a wide-tooth comb.
- Apply a leave-in volumizing product to damp hair, focusing on the roots and mid-lengths.
- Roughly blow-dry hair until about 70% dry, using your fingers to lift roots for initial volume.
- Sectioning hair, use a large paddle brush or round brush to finish drying, pulling hair upwards to create lift, especially around the crown.
- For enhanced bounce and curl, use a large barrel curling iron or hot rollers on the mid-lengths and ends, curling away from the face.
- Finish with a tiny amount of lightweight hair oil on the ends for shine, then gently shake out the curls to blend the layers.
Pro-Tip: For long hair with butterfly layers, managing perimeter weight is crucial to prevent the cut from looking too heavy or shapeless. A stylist might use internal layering to remove bulk from the underside of the hair, allowing the top layers to appear more airy and voluminous, a salon-tested technique.

7. Define Curly Hair Butterfly Layers

Pin this gorgeous curly butterfly cut for defined volume!
What You Need
- Curl-defining cream or gel (for hold and frizz control)
- Leave-in conditioner (for moisture and detangling)
- Microfiber towel (to reduce frizz)
- Hair dryer with a diffuser attachment
- Hair picks or wide-tooth comb (for root volume)
- Lightweight hair oil (for scrunching out the crunch)
Routine Steps
- After washing and conditioning, gently squeeze excess water from your hair with a microfiber towel. Apply leave-in conditioner.
- While hair is still wet, apply curl-defining cream or gel evenly, raking it through and then scrunching upwards towards the scalp to encourage curl formation.
- Sectioning your hair, use a hair dryer with a diffuser attachment on low heat and low speed. Hover the diffuser around your roots first for volume, then gently cup sections of hair to dry.
- Avoid touching your hair too much while diffusing to prevent frizz. Dry until 80-90% dry.
- Once dry, gently use a hair pick at the roots to lift and create more volume without disturbing the curl pattern.
- If desired, apply a few drops of lightweight hair oil to your palms and gently scrunch your curls to break any product cast and add shine.
Pro-Tip: For curly hair butterfly layers, request your stylist to cut the layers dry (dry cutting). This allows them to see how your natural curl pattern falls and create precise disconnected layers that complement your individual curls, minimizing the risk of a
bad butterfly cutand ensuring optimalstructural integrity.

8. Smooth and Sleek Straight Hair Butterfly Layers

Pin this sleek butterfly cut for a sophisticated look!
What You Need
- Heat protectant spray or cream
- Large flat brush or paddle brush
- Large round brush (for subtle bends)
- Hair dryer with concentrator nozzle
- Shine serum or lightweight hair oil
- Volumizing mist for roots
Routine Steps
- Apply heat protectant and a volumizing mist to damp, towel-dried hair, focusing on the roots.
- Roughly blow-dry hair until 70% dry using a paddle brush, keeping the hair lifted at the roots.
- Sectioning hair, use a large round brush to smooth and blow-dry each section. For subtle movement, create a slight C-curl on the ends by turning the brush under.
- Focus on the top and face-framing layers, gently lifting and shaping them away from the face to create the butterfly wing effect.
- Once completely dry, apply a small amount of shine serum or lightweight hair oil to the mid-lengths and ends for a polished finish.
- Avoid over-brushing to maintain the volume created at the roots.
Pro-Tip: For straight hair butterfly layers, achieving significant volume requires strategic elevation during blow-drying. Always pull sections up and away from the head at a 90-degree angle (or higher for more lift) to build maximum root volume, which will prevent flat butterfly layers. This is an expert technique for structural integrity.

9. Create a Playful Shaggy Butterfly Cut

Pin this edgy shaggy butterfly cut for an effortless vibe!
What You Need
- Texturizing sea salt spray or wave spray
- Light hold mousse (for initial volume)
- Diffuser attachment for hair dryer (optional, for enhancing natural texture)
- Fingers or wide-tooth comb (for styling)
- Dry shampoo (for added texture and longevity)
Routine Steps
- Apply a light hold mousse to damp hair, scrunching upwards from ends to roots for initial volume and texture.
- Allow hair to air dry partially, or use a diffuser on low heat to enhance natural waves and texture.
- Once mostly dry, generously spritz texturizing sea salt spray throughout your hair, focusing on the mid-lengths and ends.
- Gently scrunch and tousle your hair with your fingers to activate the shaggy layers and create an undone look.
- Use a small amount of dry shampoo at the roots for extra lift and a matte, lived-in finish.
- Avoid over-brushing; simply use your fingers to reshape throughout the day.
Pro-Tip: The key to a great shaggy butterfly cut is embracing imperfection. Don’t aim for perfectly uniform curls or sleekness; instead, focus on enhancing natural texture and allowing the disconnected layers to do their work. For maximum texture, a stylist might use
slice cuttingto remove weight unevenly, creating that desirablepiece-yeffect, aproven resultsmethod.

10. Emphasize Fine Hair Butterfly Layers

Pin this clever butterfly cut for fine hair for instant volume!
What You Need
- Lightweight volumizing spray or root booster
- Texturizing powder (for targeted volume)
- Small to medium round brush
- Hair dryer with a fine nozzle
- Dry shampoo (for lift and oil absorption)
- Light hold hairspray (flexible, non-sticky)
Routine Steps
- On damp hair, apply a lightweight volumizing spray or root booster directly to the roots.
- Roughly blow-dry hair until 50% dry, using your fingers to lift the roots.
- Sectioning hair, use a small to medium round brush to blow-dry each section, lifting at the root and over-directing for maximum volume.
- Once hair is dry, sprinkle a small amount of texturizing powder at the crown and at the base of the face-framing layers, gently massaging it in for instant lift.
- Lightly mist with a flexible hold hairspray to keep the volume in place without weighing down fine strands.
- Use dry shampoo between washes to refresh roots and maintain volume.
Pro-Tip: For fine hair butterfly layers, less is often more. Avoid excessive layering, which can make fine hair look sparse. Instead, focus on creating subtle, strategically placed disconnected layers around the face and crown for the illusion of fullness. A hair density analysis by a certified stylist is crucial to determine the optimal layering without
weight removalthat compromises density.
11. Maintain Your Butterfly Haircut Longevity

Pin these essential tips to keep your butterfly cut looking fresh!
What You Need
- Sulfate-free shampoo and conditioner (suitable for your hair type)
- Deep conditioning mask or treatment
- Heat protectant spray or serum (for all heat styling)
- Silk pillowcase (to reduce friction)
- Gentle detangling brush or wide-tooth comb
- Hair oil (for daily hydration and shine)
Routine Steps
- Washing your hair 2-3 times a week with a sulfate-free shampoo and conditioner. Avoid over-washing to preserve natural oils and prevent dryness.
- Apply a deep conditioning mask once a week to maintain moisture and prevent damaged ends.
- Always use a heat protectant before any heat styling (blow-drying, curling, or flat ironing) to prevent heat damage prevention.
- Sleep on a silk pillowcase to reduce friction, which can lead to frizz and breakage, thus preserving your style longevity.
- Brush your hair gently with a wide-tooth comb or a soft-bristle brush, starting from the ends and working your way up to avoid tugging on layers.
- Schedule regular trimming appointments (every 6-8 weeks) to remove split ends and refresh the shape of your butterfly layers, ensuring optimal style longevity.
Pro-Tip: The secret to truly long-lasting butterfly layers goes beyond styling; it’s rooted in excellent hair care routine. Investing in clinical scalp care and consistent deep conditioning will improve hair tensile strength, making your layers more resilient to damage and maintaining their bounce and volume between cuts.

Key Takeaways
- The 90s Butterfly Haircut is a multi-layered, voluminous style defined by face-framing layers and impressive bounce, offering the illusion of shorter hair without sacrificing length. This iconic cut thrives on strategic layering and a voluminous blowout for its signature 90s aesthetic.
- Achieving maximum volume is paramount, regardless of hair length or texture. Techniques like proper sectioning, elevating hair at the roots, and using volumizing products are crucial to combating low volume.
- Personalization is key: The butterfly cut can be adapted for short, long, curly, or straight hair. Tailoring the face-framing layers and styling methods ensures the cut complements face shape and enhances natural texture.
- Strategic styling tools and products are essential for maintaining bounce and movement. From Dyson Airwrap techniques to velcro rollers and texturizing spray, the right arsenal ensures style longevity and definition.
- Regular maintenance, including proper hair care and trimming, is vital for preserving the cut’s shape and health. Consistent hair care routine and timely trimming prevent damaged ends and ensure the butterfly layers retain their airy and dimensional look.
FAQs About 90s butterfly haircut
What is a 90s butterfly haircut?
A 90s butterfly haircut is a highly layered, voluminous style that creates the illusion of shorter hair around the crown while maintaining overall length, characterized by face-framing layers and bouncy, airy movement. This iconic cut blends the soft layers of the ‘Rachel’ with the full, voluminous blowout of 90s supermodels, mimicking the shape of butterfly wings.
How to style 90s butterfly haircut for maximum volume?
To maximize volume in a 90s butterfly haircut, focus on blow-drying with a large round brush, lifting at the roots, and using velcro rollers to set sections as they cool. Apply volumizing mousse or spray to damp hair, then direct airflow upwards and away from the face to create lift, ensuring each section cools completely before releasing for lasting bounce.
Can I get a butterfly cut with short hair?
Yes, a butterfly cut can be successfully adapted for short hair lengths like bobs or lobs by strategically placing shorter, face-framing layers and focusing on root lift for volume. The key is to create disconnected layers that add movement and the signature “butterfly wing” effect without sacrificing the desired short length or making the hair appear sparse.
Will a butterfly cut work on curly hair?
Absolutely, a butterfly cut can beautifully enhance curly hair by reducing bulk, defining natural curl patterns, and adding voluminous bounce without creating a triangular shape. When cut dry, the layers can be tailored to complement the natural fall of curls, creating a dimensional and movable style that embraces natural texture.
What is the difference between a butterfly cut and a wolf cut?
The butterfly cut is characterized by soft, face-framing layers that blend seamlessly to create volume and bounce, focusing on a glamorous, polished finish, while the wolf cut features more aggressive, choppier shaggy layers and a punk-rock edge. The butterfly cut aims for a refined blowout look, whereas the wolf cut embraces a more undone, textured aesthetic with noticeable disconnection.
How often should I trim butterfly layers to maintain the shape?
To maintain the precise shape and volume of your butterfly layers, it is generally recommended to get a trim every 6-8 weeks. Regular trims help remove split ends, refresh the disconnected layers, and prevent the cut from losing its distinctive face-framing qualities and overall movement.
What products do I need for a butterfly cut?
Essential products for a butterfly cut typically include a volumizing mousse or spray, heat protectant, a large round brush for blow-drying, and a texturizing spray or light hold hairspray for finishing. For added bounce, velcro rollers are highly recommended, while hair oil can add shine and tame frizzy layers.
How to ask for a butterfly haircut at the salon?
To ask for a butterfly haircut at the salon, describe it as a style with short, face-framing layers around the crown that create volume and movement, blending into longer layers underneath, often styled with a 90s supermodel blowout. Bring reference photos that showcase the desired voluminous and bouncy aesthetic with distinct disconnected layers.
Is butterfly cut high maintenance?
The butterfly cut can be moderately high maintenance, as it relies on specific styling techniques, particularly blow-drying with a round brush and potentially velcro rollers, to achieve its signature voluminous and bouncy look. While the cut itself is versatile, maximizing its full potential often requires daily styling efforts and consistent product application for optimal volume and movement.
Can you tie up a butterfly haircut?
Yes, you can absolutely tie up a butterfly haircut, and its layers actually lend themselves well to various updos, creating softness and interest around the face. For a ponytail, the shorter face-framing layers may fall out, which can be styled as soft tendrils or pinned back, adding to the romantic, effortless 90s aesthetic.
Final Thoughts
The 90s butterfly haircut is more than just a fleeting trend; it’s a timeless testament to voluminous, bouncy hair that beautifully frames the face and exudes a captivating 90s aesthetic. As we’ve explored through 11 stunning ideas, this versatile cut can be tailored to virtually any hair length or texture, from fine hair butterfly layers to curly hair butterfly layers, offering a dynamic solution for those seeking enhanced movement and a significant boost in volume. Mastering the styling techniques, from the classic voluminous butterfly blowout to incorporating curtain bangs, empowers you to recreate this iconic look with confidence and flair.
Remember, achieving and maintaining butterfly layers for optimal style longevity involves a combination of strategic cutting, the right products, and a consistent hair care routine. Whether you’re aiming for a sleek finish on straight hair butterfly layers or embracing a playful shaggy butterfly cut, the core principles of elevation, sectioning, and proper blow-drying remain paramount. By understanding the nuances of this expert technique and incorporating the hairstylist recommended tips, you’re well on your way to unlocking the full potential of your 90s butterfly haircut for 2026.
Which of these voluminous butterfly cut ideas will you try first? Share your thoughts and butterfly hair journey in the comments below
Last update on 2026-03-27 / Affiliate links / Images from Amazon Product Advertising API