Tired of choosing between stunning hairstyle ideas braids and keeping your natural hair healthy? It’s a common struggle—you want a gorgeous, long-lasting protective style, but you fear the tension, frizz, and potential for breakage that can come with it.
The best hairstyle ideas for braids include boho knotless braids, jumbo box braids, and stitch feed-in cornrows. These protective hairstyles minimize scalp tension, lock in moisture, and promote natural hair growth when installed correctly using a tension-less feed-in method and lightweight hair extensions. This approach balances beauty with hair wellness.
Drawing from trichologist-approved methods and professional stylist recommendations, this guide is your definitive resource. We’ll explore 11 breathtaking braid hairstyles for 2026, complete with the essential techniques to ensure your hair not only looks incredible but is also truly protected underneath.
What Are The Best Hairstyle Ideas Braids For Protective Styling?
The best braid hairstyles serve a dual purpose: they are a form of beautiful self-expression and one of the most effective protective hair styles available. The core principle of a truly protective style is minimizing daily manipulation of your natural hair, which reduces breakage and helps with moisture retention. Modern braiding styles have evolved significantly to prioritize hair health. Techniques like the tension-less feed-in method used in knotless braids are now industry standard, designed specifically for traction alopecia prevention. A successful protective style begins before the first braid is even installed—with proper cleansing, deep conditioning, and a commitment to ongoing scalp care. This guide focuses on styles that not only look stunning but also adhere to these crucial principles of healthy hair maintenance, ensuring your braids support your hair growth journey.
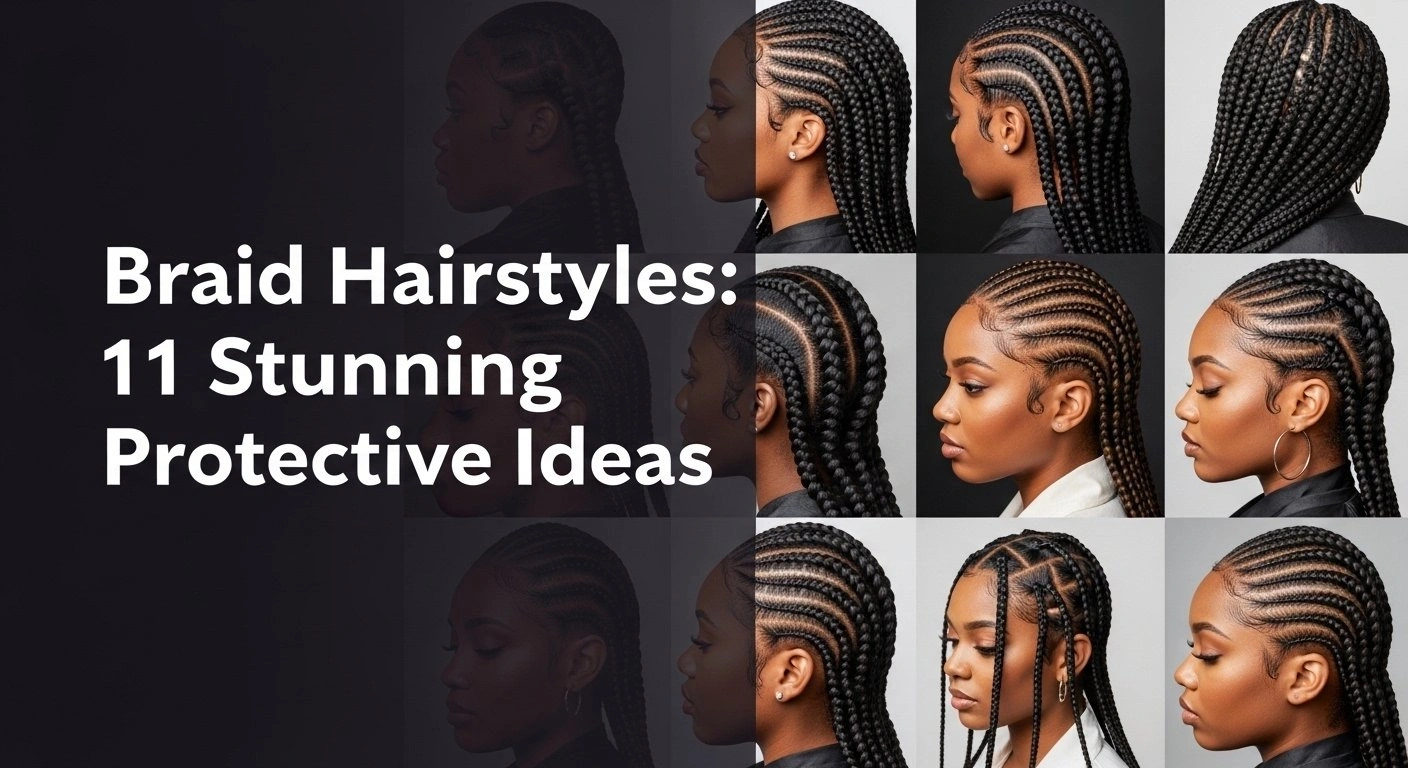
Braid Hairstyles: 11 Stunning Protective Ideas for 2026
Now, let’s dive into the visual inspiration and practical steps you need. This curated gallery showcases 11 of the most sought-after and beautiful braid hairstyles for 2026. Each style is broken down into the specific products and tools you’ll need, along with actionable steps for achieving a salon-quality look at home or guiding your stylist. From the flowing, romantic feel of Boho Knotless to the sharp, geometric precision of Stitch Cornrows, you’ll find a style that fits your aesthetic, hair type, and lifestyle while keeping long-term hair health at the forefront.
1. Beautiful Boho Knotless Braids for Low-Tension Glamour

Save this stunning boho knotless look to your “Dream Hairstyles” Pinterest board for your next salon visit!
Boho knotless braids are the epitome of trendy, carefree style combined with a serious commitment to hair health. Unlike traditional braids that start with a tight knot at the scalp, these use a feed-in method that eliminates tension, making them lightweight and ideal for preventing traction alopecia. The look is defined by seamless roots and flowing pieces of boho knotless braids with curly human hair woven throughout, creating effortless volume and a romantic, beachy vibe.
Products & Tools Used
- 3-4 packs of pre-stretched synthetic braiding hair (matched to your base color)
- 1-2 bundles of 100% human deep wave hair for the curly boho pieces
- High-hold edge control gel (crucial for clean, crisp parting)
- A metal-tipped rat tail comb for precise sectioning
- Lightweight styling mousse to seal the final look
Application Steps
- Begin by detangling thoroughly and blow-drying the hair to stretch the natural texture, making the blending process seamless.
- Use the rat tail comb to begin parting the hair into uniform, brick-layered square or triangle sections at the nape of the neck.
- Apply a small dab of edge control to the root of the section, smoothing the natural hair down to ensure a frizz-free base.
- Start braiding the natural hair for about half an inch before seamlessly feeding in the first small pinch of synthetic braiding hair.
- Continue weaving down the shaft, randomly tucking in small pieces of the deep wave human hair, leaving the curly ends exposed for that signature bohemian volume.
Pro-Tip: As a professional stylist recommended practice, always use 100% human hair for the curly boho pieces instead of synthetic. Synthetic curls tangle rapidly and mat, while human hair allows for long-term hair health and can be easily refreshed with a light moisture mist.

2. Classic Jumbo Box Braids for Quick Protective Styling

Pin these pristine jumbo box braids to keep your parting game strong and inspired!
For those who want a bold, statement-making look without spending an entire day in the salon, jumbo box braids are the perfect solution. These thick, traditional box braids are much quicker to install than their micro counterparts and offer a dramatic, stylish aesthetic. The key to a flawless jumbo style is achieving perfectly crisp parting and maintaining excellent frizz control at the roots, creating a look that is both striking and supports a low-manipulation philosophy.
Products & Tools Used
- 6-8 packs of thick, pre-stretched Kanekalon braiding hair (reduces bulk at the ends)
- Heavy-duty conditioning braiding jam or pomade for maximum grip
- Clarifying shampoo (for prep to remove alkaline film from extensions)
- Large hair clips for heavy sectioning
- Boiling water and a microfiber towel for sealing
Application Steps
- Prior to styling, focus on cleansing the scalp thoroughly and deep conditioning to lock in moisture, as jumbo sections expose more scalp.
- Begin sectioning the hair into large, 2-inch by 2-inch crisp geometric squares, using large hair clips to keep surrounding hair completely out of the way.
- Coat the entire root of the section heavily with braiding jam to prevent the natural hair from puffing up inside the thick extension.
- Loop a generous section of Kanekalon hair around the base of the natural hair, pulling tight at the root, and begin firmly braiding down the length.
- Finish the style by carefully dipping the ends in boiling water to seal them, preventing the thick braids from unraveling.
Pro-Tip: To prevent traction alopecia with heavier jumbo styles, ensure your sections of natural hair are robust enough to support the weight of the extensions. Proper braid weight distribution is critical—never attach a massive amount of extension hair to a tiny sliver of natural hair.

3. Intricate Stitch Feed-In Cornrows

Love this sleek look? Pin these pristine stitch braids to your protective styling board!
Stitch braids elevate classic cornrows into a work of art. This technique uses a precise parting method to create clean, horizontal “stitches” along the length of the braid, resulting in an incredibly sharp and polished look. Achieving this salon-quality aesthetic requires a strong hold gel and a steady hand, but the flat, scalp-hugging result is both beautiful and protective, with a major emphasis on edge protection and sleekness.
Products & Tools Used
- 2-3 packs of pre-stretched braiding hair
- Extreme hold, flake-free braiding gel (essential for the stitch effect)
- Pinky finger or a specialized stitch-parting comb ring
- Edge control brush for detailing
- Silk scarf or wrap strips for setting
Application Steps
- Start by sectioning the hair into perfectly straight vertical rows from the hairline to the nape, securing each row with clips.
- Apply a generous layer of extreme hold braiding gel along both sides of the vertical part to ensure the hair lays completely flat without frizz.
- As you begin cornrowing at the hairline, use your pinky fingernail or a parting ring to slice a small horizontal “stitch” of hair, feeding it into the main braid.
- Continue tucking and feeding in small pinches of extension hair with every horizontal stitch to maintain a flat, natural-looking taper that grows thicker toward the back.
- Once finished, apply styling mousse over the tracks, tie the hair down firmly with a silk wrap strip, and use a blow dryer on low heat to set and seal the style.
Pro-Tip: The secret to flake-free stitch braids is avoiding product mixing. If your leave-in conditioner and your braiding gel don’t share the same edge control chemistry (water-based vs. oil-based), they will curdle and leave a white residue. Always patch-test your products together on your hand first!

4. Gorgeous Fulani Tribal Braids with Beads

Obsessed with hair accessories? Pin these stunning Fulani braids to your hair jewelry board!
Fulani braids, a form of tribal braids, are a culturally rich and highly customizable hair design. The style is famously characterized by a central cornrow braided straight back from the hairline, often accompanied by smaller cornrows braided forward towards the temples. The beauty of this style is amplified with braid jewelry, with the ends often heavily adorned with wooden, metal, or glass braids + beads, making it a true statement of personal style and heritage.
Products & Tools Used
- 4-5 packs of braiding hair
- Assortment of wooden, glass, or metallic hair beads
- Beading threader tool (or a looped piece of fishing line)
- Small clear elastic bands to secure the beads
- Leave-in conditioning spray
Application Steps
- Execute the signature Fulani parting: create one distinct straight line down the center of the head, and section the sides for sweeping, curved cornrows.
- Begin cornrowing the very center part straight back toward the crown of the head.
- Braid the side sections, typically braiding them forward toward the face or in intricate, sweeping curves above the ear.
- Braid the back half of the hair in single, individual knotless or box braids, allowing them to hang down freely.
- Load your threader tool with your chosen bead pattern, pull the ends of the braids through the loop, slide the beads up the hair shaft, and secure tightly by folding the tip of the braid and wrapping it with a mini elastic tie.
Pro-Tip: Beads add mechanical weight to the delicate ends of your hair. To ensure breakage prevention, coat the very ends of your natural hair with a thick butter or oil sealant before installing the extensions. This creates a protective barrier against the friction of wooden or glass beads.

5. Effortless Classic French Braids

Need a quick gym or school look? Save this effortless French braid inspo!
The classic French braids are a timeless, low maintenance style perfect for everyday wear. This is one of the ultimate diy braid styles because it requires no extensions and can be done quickly for a neat, secure look. They are ideal for managing hair during physical activity, providing excellent frizz control while keeping hair off the face. The interwoven technique creates a smooth, elegant plait that lies flat against the head.
Products & Tools Used
- Detangling brush (boar bristle preferred for smoothing)
- Flexible hold hairspray or lightweight styling cream
- Silk or satin scrunchies (to prevent end breakage)
- Bobby pins (to secure stray layers)
Application Steps
- Start by thoroughly detangling the hair from ends to roots. A smooth base is critical for neat French braids.
- Create a clean middle part from the forehead to the nape of the neck, clipping one side away.
- At the front hairline of your working side, gather a small triangular section and divide it into three equal strands.
- Begin the pattern: cross the right strand over the middle, then cross the left strand over the new middle. (This “over” motion is the key difference in french vs dutch braid styling).
- Before crossing the next strand over, gather a small section of loose hair from the side and add it to the strand, continuing this weaving process all the way down to the nape, then finish with a traditional three-strand plait.
Pro-Tip: If you suffer from flyaways, don’t spray hairspray directly on your head. Spray it onto a dense boar-bristle brush and smooth it over the top of the completed braids. This flattens the cuticle without making the braids stiff or crunchy.

6. Goddess Braids with Flowing Curls

Dreaming of a romantic look? Pin these breathtaking Goddess Braids!
Goddess braids offer a beautifully romantic and feminine hair design. These are typically thicker box braids or cornrows that are left unbraided at the ends, which are then curled to create a soft, flowing look. The key difference in knotless braids vs goddess braids is the primary focus on the braids + curly ends, creating a hybrid style that marries the structure of braiding with the soft texture of loose curls. Maintaining moisture retention in the exposed ends is crucial for this style.
Products & Tools Used
- 4 packs of kanekalon hair (for the braid base)
- 2 packs of water wave or deep wave hair (for the goddess ends)
- Foaming wrap lotion or styling mousse
- Perm rods (if curling straight synthetic ends manually)
- Hot water dipping bowl
Application Steps
- After parting the hair into the desired pattern (box or large cornrows), begin braiding the kanekalon hair down the shaft.
- Stop braiding about three-quarters of the way down, leaving a significant portion of the synthetic hair loose.
- If using straight hair, wrap the loose ends securely around perm rods.
- Carefully execute the dipping process by submerging the perm rods in boiling water for 10-15 seconds to set the curl, then towel dry and unravel.
- If using pre-curled water wave hair, simply apply a generous pump of styling mousse to the loose ends and scrunch to define the curls and seal the transition point.
Pro-Tip: The exposed curly ends of Goddess braids are highly susceptible to tangling. To maintain them, institute a strict nighttime routine: pineapple the curls loosely at the top of your head and sleep on a silk pillowcase. Avoid heavy oils on synthetic curls, as it weighs them down and causes severe matting.

7. Sleek Side-Swept Lemonade Braids

Ready for a fierce, side-swept look? Save these iconic Lemonade braids to your style board!
Made iconic by Beyoncé, Lemonade braids are a bold and dramatic style defined by their signature side swept braids. These long, intricate scalp braids are cornrowed from one side of the head to the other, cascading down over the shoulder. The style features intricate hair patterns and relies on a low-manipulation philosophy once installed. Because of the directional tension, special care must be taken to protect the hairline.
Products & Tools Used
- 5-6 packs of long pre-stretched braiding hair
- Heavy-duty edge control
- Fine-tooth rat tail comb
- Scalp soothing oil (peppermint or tea tree based)
- Hair string or cords for accent styling
Application Steps
- Begin by determining the flow direction. Parting should start from one ear (or deep side part) and sweep continuously across the crown to the opposite shoulder.
- Use edge control to meticulously lay down the roots of each curved or straight section to prevent flyaways.
- Start cornrowing using the feed-in method, adding very small pinches of extension hair gradually so the braid starts flat and thin at the root, growing seamlessly thicker.
- Continue the sweeping motion, ensuring your hands are physically pulling the hair in the direction you want the braids to fall to train the hair.
- Once all cornrows are finished and cascading over one shoulder, apply a scalp cooling oil between the parts to relieve any immediate tension from the tight directional pulling.
Pro-Tip: Directional braids like Lemonade styles put asymmetrical tension on your scalp. To ensure edge protection, ask your stylist to leave your absolute front baby hairs completely out of the braids. You can swoop them later with gel, saving your hair follicles from irreversible traction alopecia.

8. Elegant Halo Crown Braids for Special Occasions

Planning a wedding or formal event? Pin this elegant Halo Crown Braid for ultimate inspiration!
For formal events, proms, or weddings, the halo braids (or crown braids) are a stunningly elegant choice. This style transforms the hair into a formal coiffure by weaving a single continuous braid that wraps around the head like a crown. It’s a fantastic option for holiday braid looks or any occasion that calls for a sophisticated updo that keeps hair completely off the neck and shoulders.
Products & Tools Used
- Texturizing spray or dry shampoo (for grip)
- Heavy-duty bobby pins matching the hair color
- Small clear elastic ties
- A tail comb for sectioning
- Smoothing pomade for flyaways
Application Steps
- Prep the hair with texturizing spray; freshly washed, slippery hair will not hold a structural crown braid well.
- Create a deep side part. Begin braiding a Dutch braid (crossing strands under the middle) starting right above the ear on the heavier side of the part.
- Continue weaving the braid closely along the hairline, sweeping across the forehead, down around the opposite ear, and across the nape of the neck.
- When you run out of hair to add, finish with a standard three-strand braid and secure with a clear elastic.
- Wrap the loose tail up alongside the beginning of the braid to complete the circle, firmly tucking the ends underneath the main braid and pinning it securely so the start and finish points are invisible.
Pro-Tip: To make a halo braid look incredibly thick and luxurious, use the “pancaking” technique. Once the braid is secured, gently tug on the outer edges of each braid loop to fan them out. A certified stylist knows to pull only the outer loops, leaving the inner structural weave tight so the crown doesn’t collapse.

9. Fun & Trendy Bubble Braids

Want a style that takes 5 minutes but looks amazing? Pin these easy Bubble Braids!
Bubble braids are a fun, trendy, and incredibly easy ways to style braids for beginners. While not technically a woven braid, this style uses a series of elastic bands to create a similar segmented look that is perfect for anyone who hasn’t mastered weaving techniques. It’s a quick and beginner-friendly way to create a voluminous, playful hair structure for school, festivals, or casual outings.
Products & Tools Used
- Snag-free clear or colored mini elastic bands
- Smoothing brush
- Lightweight hair oil or serum
- Edge control
- Small scissors or an elastic cutter tool (for removal)
Application Steps
- Brush the hair up into a high ponytail (or two pigtails) and secure firmly with a standard hair tie. Smooth the roots with edge control.
- Tie a mini elastic band about 2 to 3 inches down the length of the ponytail.
- Gently pull and tease the hair between the two elastics outward to create a rounded, voluminous “bubble” shape.
- Repeat this banding and fluffing process all the way down the length of the ponytail, keeping the distance between elastics uniform.
- Apply a drop of lightweight hair oil to your palms and smooth over the finished bubbles for a glossy, frizz-free finish.
Pro-Tip: The biggest mistake people make with bubble braids is ripping the elastics out at the end of the day, tearing the hair cuticle. For a gentle take-down, invest in a cheap elastic cutter tool. Snip the bands off instead of sliding them down the hair shaft to guarantee breakage prevention.

10. Ultimate Protective Crochet Braids

Want maximum volume with minimal sitting time? Save these protective Crochet Braids!
Crochet braids are one of the best alternatives to box braids for those seeking a faster installation and superior protection. This fast, full-coverage method involves installing pre-looped braids or twists onto a foundation of cornrows using a latch hook method. This technique completely shields your natural hair from any manipulation, making it an ultimate protective style that saves hours of time compared to crochet vs individual braids.
Products & Tools Used
- 6-8 packs of pre-looped braided or twisted crochet hair
- Crochet latch hook needle
- Hair growth oil with tea tree or peppermint (for scalp care)
- Edge control
- Braiding hair (if adding length to your foundation cornrows)
Application Steps
- Create a foundation by cornrowing your natural hair straight back (or in a specialized crochet pattern with the front braided horizontally for versatile parting).
- Take your crochet latch hook needle, ensure the latch is open, and slide it gently underneath a cornrow.
- Hook the pre-looped end of the crochet braid onto the needle, close the latch, and pull it back under the cornrow.
- Open the loop, thread the tail of the extension braid through the loop, and pull tight to secure the knot against the cornrow.
- Continue installing the braids, spacing them closer together at the crown and hairline for volume, and further apart in the back to prevent excessive bulk.
Pro-Tip: Because your natural hair is completely shielded, crochet styles are the ultimate protective styling method. However, you must maintain scalp microbiome maintenance. Use a nozzle-tipped applicator to apply a witch hazel or tea tree-based scalp cooling serum directly to your foundation cornrows weekly to prevent itchiness and buildup.

11. Textured Butterfly Passion Braids

Obsessed with the distressed look? Pin these gorgeous Butterfly Braids to your beauty board!
Butterfly braids are a stunning, distressed, textured style that embraces a perfectly imperfect aesthetic. Similar in feel to passion twists, this style uses curly water wave hair to achieve its signature look. The technique involves pulling out small loops of hair along the braid shaft, creating a messy, voluminous texture that resembles butterfly wings. This unique style is perfect for anyone who loves a bohemian, textured look.
Products & Tools Used
- 7-8 packs of Water Wave or Passion Twist braiding hair (must be curly/wavy)
- Strong hold braiding gel or edge control
- Rat tail comb for parting
- Nail glue or boiling water (for sealing ends)
- Mousse for finishing
Application Steps
- Prep by sectioning the hair into medium-to-large box parts. Apply braiding gel heavily to the root.
- Begin braiding the natural hair with two strands of the water wave hair using the standard plaiting method.
- To create the signature distressed look, gently pull and tug small loops of the synthetic hair outward from the sides of the braid as you work your way down. Do not pull the natural hair!
- Continue weaving and periodically fluffing/pulling the loops to create asymmetrical “butterfly wings” along the shaft.
- Seal the ends by either tying a small hidden knot, using a tiny drop of nail glue, or dipping very briefly in hot water, then finish by scrunching with mousse.
Pro-Tip: The key to perfect butterfly braids is the tension duality. The first inch at the root must be braided tightly and securely to prevent slippage, while the rest of the braid must be done with very loose tension so the loops can be easily pulled out. This proven result ensures longevity without sacrificing the messy aesthetic.

Key Takeaways: Your Quick Guide to Hairstyle Ideas Braids
- Tension Is The Enemy: Opt for knotless braid ideas over traditional knot-base braids if you have a sensitive scalp, as the tension-less feed-in method drastically reduces the risk of traction alopecia.
- Prep Is Mandatory: Never install braids on dry, unwashed hair. Proper clarifying shampoo use followed by deep conditioning ensures your hair retains moisture while locked away.
- Size Matters For Health: Be mindful of braid weight distribution. Heavier styles like jumbo box braids require thicker sections of natural hair to support the weight of the extensions without snapping.
- Nighttime Protection Is Non-Negotiable: To ensure your style lasts and prevents frizz control issues, always wrap your braids in a satin bonnet or sleep on a silk pillowcase.
- Scalp Care Continues Post-Install: Having braids doesn’t mean ignoring your scalp. Use targeted hair growth oil and astringents to maintain sebaceous gland health and prevent itchiness.
- Match Products Carefully: To avoid white, flaky buildup on your parts, ensure your leave-in conditioners and heavy-duty braiding gels share similar ingredient bases (avoid mixing oils and heavy water-based gels).
- Safe Removal Prevents Damage: Taking down braids requires as much care as installing them. Use a lot of slip (oils or detangling sprays) to soften the buildup at the root before combing, ensuring true breakage prevention.
People Also Ask About Hairstyle Ideas Braids
What are the best braid styles for 2026?
The best braid styles for 2026 prioritize scalp health and natural textures, with boho knotless braids, textured butterfly braids, and intricate stitch feed-in cornrows leading the trends. These styles are heavily favored because they utilize a low-tension application method while offering highly customizable, voluminous aesthetics. Modern trends are shifting away from extremely tight, stiff braids toward flexible, free-flowing styles that incorporate human hair curls and focus heavily on edge protection and comfort.
Are knotless braids better for edges?
Yes, knotless braids are significantly better for your edges than traditional box braids because they start with your natural hair and gradually feed in extensions, eliminating the heavy, tension-inducing knot at the root. This tension-less feed-in method prevents the severe pulling that often leads to traction alopecia around the delicate temporal hairline. If edge protection is your primary goal, knotless variations are the trichologist-approved choice.
How long do box braids last?
With proper maintenance, box braids typically last between 4 to 8 weeks, depending on the size of the braids, your natural hair growth rate, and your nighttime routine. Micro braids tend to last closer to 8 weeks, while jumbo box braids may only look fresh for 3 to 4 weeks. Leaving braids in longer than 8 weeks is not recommended, as the new growth can begin to lock and mat, causing severe breakage during the take-down process.
How to prepare hair for braids?
To prepare your hair for braids, you must thoroughly cleanse with a clarifying shampoo, apply a deep hydration treatment, and gently blow-dry or stretch the hair to ensure a smooth, manageable base. Removing product buildup and balancing your protein-moisture levels beforehand is critical, as your hair will be locked away for weeks. Sealing the hair with a lightweight leave-in conditioner ensures it remains protected from the friction of synthetic extensions.
What is the difference between French and Dutch braids?
The main difference is the weaving direction: French braids cross sections of hair over the middle strand, creating a flat, inward-facing plait, while Dutch braids cross sections under the middle strand, creating a raised, 3D braid that pops off the scalp. Dutch braids are often used as the foundation for halo crown braids and corset braids because their raised structure makes them visually striking and easier to pancake (pull apart for volume).
How to keep braids from frizzing?
To keep braids from frizzing, you must sleep with a silk or satin bonnet nightly, use a lightweight styling mousse weekly to lay down flyaways, and avoid excessive manipulation or friction. When showering, keep your braids completely covered to prevent humidity from reverting your natural hair inside the braid. Applying a specialized anti-frizz braid spray or light oil to the lengths can also help seal the cuticle and maintain a sleek, salon-quality finish.
Why do my braids itch?
Braids usually itch due to an allergic reaction to the alkaline film coating synthetic braiding hair, dry scalp, or excessive tension causing follicular inflammation. To prevent this, always pre-soak synthetic hair extensions in an apple cider vinegar bath before installing to remove the chemical coating. If they are already installed, apply an antimicrobial scalp cooling oil containing peppermint or tea tree oil directly to the parts to soothe irritation.
How to wash hair with braids?
To wash your hair with braids, dilute a clarifying shampoo in an applicator bottle with water, squeeze it directly onto your exposed scalp parts, massage gently with your fingertips, and rinse thoroughly without aggressively scrubbing the braids themselves. Focus entirely on scalp exfoliation and cleansing rather than washing the synthetic extensions, which can cause massive frizz. Always ensure your braids dry completely using a hooded dryer to prevent mildew and sour odors inside the thick plaits.
Which braids are best for the summer?
The best summer braid styles are lightweight, water-friendly options like short bob knotless braids, classic cornrows, and micro braids, as they dry quickly and keep heavy hair off your neck. Heavy styles like jumbo box braids or bohemian braids with lots of loose curly pieces can become matted from pool water, sweat, and sunscreen. Opting for shorter lengths and fully sealed ends minimizes maintenance during active summer months.
Are braids a protective hairstyle?
Yes, braids are a highly effective protective hairstyle because they tuck away the fragile ends of your natural hair, lock in moisture, and enforce a low-manipulation routine that promotes hair growth. However, they are only protective if installed with proper tension reduction and removed safely after 6-8 weeks. If braids are installed too tightly or left in too long, they cease to be protective and can cause severe breakage.
Final Thoughts on Hairstyle Ideas Braids
Finding the perfect hairstyle ideas braids doesn’t have to be a compromise between stunning aesthetics and the health of your natural hair. Whether you are leaning toward the romantic allure of Goddess braids, the quick convenience of Jumbo Box Braids, or the low-tension comfort of Boho Knotless, the latest braid styles for this year prove that protective styling is more versatile and beautiful than ever.
The true secret to a successful hair growth journey while wearing extensions lies entirely in your preparation and maintenance. By focusing on a low-manipulation philosophy, ensuring your stylist utilizes safe installing techniques, and committing to a rigorous nighttime hydration routine, you can enjoy these gorgeous looks for weeks without risking damage to your edges or scalp. Remember, the best braid hairstyles are those that make you feel incredibly confident while silently working to protect your delicate strands underneath.
Are you ready to switch up your look for the new season? We’d love to know which of these 11 styles you’re saving for your next salon appointment, or if you’re feeling bold enough to try a DIY installation at home. Drop your favorite braid inspo in the comments below, and don’t forget to pin your favorite looks to keep your style mood board fresh
Last update on 2026-04-20 / Affiliate links / Images from Amazon Product Advertising API