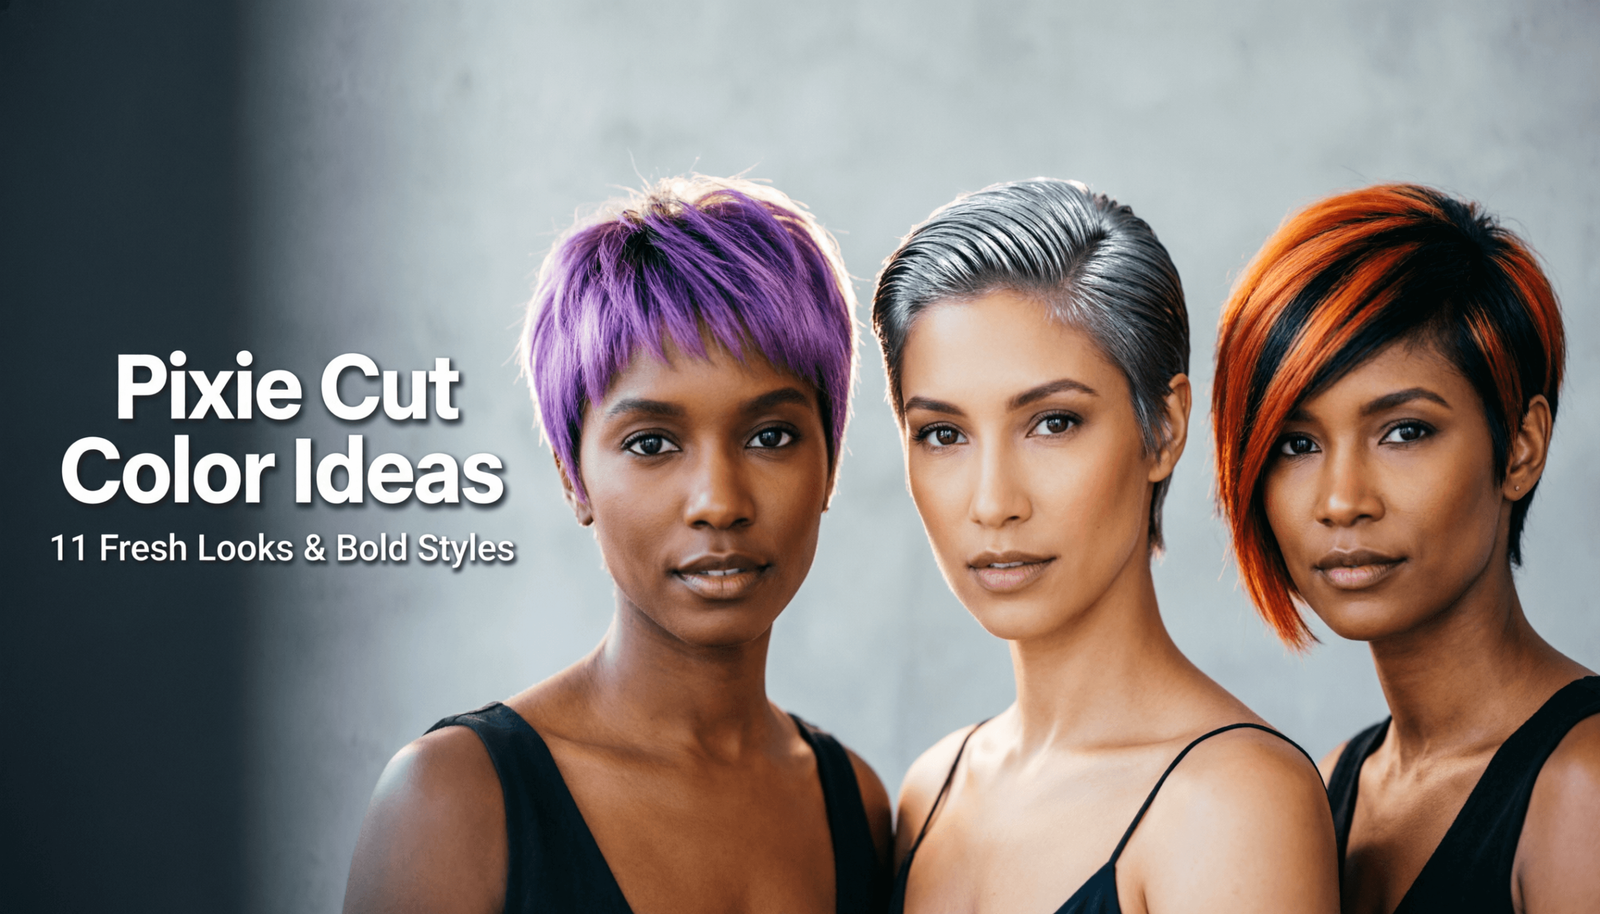
Feeling like your short hair is more simple than statement-making? A pixie cut is the perfect canvas for a bold transformation, and the right color can elevate your style from everyday to unforgettable. You’re ready for a change, but choosing from endless hair color ideas pixie cut can feel overwhelming.
The best hair color ideas for a pixie cut range from bold, high-contrast looks like icy platinum blonde and vibrant copper to subtle, dimensional styles using balayage or peekaboo highlights. These options let you customize your short hair to match your personality and desired maintenance for a truly standout style.
Drawing from professional colorist techniques and trend analysis, this guide is your ultimate inspiration board. We’ll break down the most exciting looks for 2026 into simple, actionable steps. Get ready to find the perfect color that makes your pixie cut pop.
Why Settle for a Boring Pixie? Discover Your Next Bold Hair Color Idea
A pixie haircut is more than just a short style; it’s a declaration of confidence. But the cut itself is only half the story. Color is the secret weapon that unlocks the full potential of your pixie, turning a great haircut into a show-stopping look. Whether you’re craving a dramatic change with bold pixie hairstyles or a subtle enhancement with delicate highlights, the right pixie haircut color can accentuate the texture, define the shape, and reflect your unique personality. By strategically considering factors like your skin tone (warm, cool, or neutral), your lifestyle, and your desired maintenance level, you can choose a color that not only looks incredible but also feels authentically you. This guide is designed to move beyond just pictures and give you the real-world blueprint for achieving the most sought-after edgy pixie cut colors and timeless styles of 2026.
11 Fresh Pixie Cut Color Ideas for a Bold New Look
Ready to find your perfect match? We’ve curated 11 of the most inspiring and achievable hair color ideas for a pixie cut, from icy and bold to warm and subtle. More than just a gallery, each idea below is a mini-guide, complete with the products you’ll need and the steps to get the look, whether you’re a brave DIY-er or gathering intel for your stylist. This is your blueprint for a bold new you.
1. Embrace an Icy Platinum Blonde Pixie for Maximum Impact

Pin this ultra-chic look to your ‘Future Hair’ board!
Nothing makes a statement quite like an icy platinum blonde pixie. This high-impact, high-fashion look is the ultimate head-turner. It requires commitment, as it involves a significant lightening process, but the results are undeniably powerful, creating a bright, edgy look that highlights the sharp lines of a pixie cut perfectly.
Products & Tools Used
- Hair Bleach Powder: A high-quality, dust-free powder for maximum lift.
- 30 or 40 Volume Crème Developer: Choose based on your starting hair color and condition (40 vol is stronger).
- Purple or Silver Hair Toner: Specifically an ashy-toned toner to neutralize all yellow/brassy undertones.
- Bonding Additive or Treatment: Such as Olaplex No.1 or a similar plex treatment to mix into the bleach to protect hair bonds.
- Purple Shampoo & Conditioner: For post-color maintenance to keep brassiness away.
- Application brush, mixing bowl, gloves, and processing cap.
Application Steps
- Prep & Protect: Section dry, unwashed hair. Apply barrier cream around your hairline. Always perform a strand test first to check timing and results.
- Mix & Apply Bleach: In a well-ventilated area, mix the bleach powder and developer according to package directions. Add your bonding treatment. Apply evenly, starting 1/2 inch from the scalp and working towards the ends.
- Process: Cover with a processing cap. Let it process until hair lifts to a pale yellow stage (like the inside of a banana peel). Check frequently. Do not over-process.
- Rinse & Tone: Thoroughly rinse the bleach. Gently towel-dry and apply the mixed toner. Process the toner for the time recommended on the package, usually 10-20 minutes.
- Final Rinse & Condition: Rinse the toner out and apply a deep conditioning treatment or Olaplex No. 2. Regular use of purple shampoo is a must.
Pro-Tip: For platinum, you must lift the hair to a Level 10 (pale yellow). If you see orange, the toner won’t work. You may need a second, more gentle bleaching session (a “bleach bath”) a week later for resistant hair. Always consult a professional for significant color changes.

2. Add Subtle Dimension with Blonde Balayage Highlights

Love this sun-kissed look? Pin it for your stylist!
If all-over color feels too drastic, a pixie cut with highlights is the perfect solution. Balayage, a freehand painting technique, creates a natural, sun-kissed effect that adds beautiful dimension without the harsh regrowth lines of traditional foils. It’s the ideal choice for a brunette pixie with blonde highlights or anyone wanting a lower-maintenance but equally sophisticated look.
Products & Tools Used
- Balayage Lightener: A clay-based hair lightener is ideal as it has a thicker consistency that won’t drip, perfect for freehand painting.
- 20 or 30 Volume Developer: 20 volume for a subtle lift, 30 for a more noticeable contrast.
- Hair Toner: To match your desired highlight shade (e.g., golden, neutral, or cool).
- Color Brush: A standard tint brush, or a specialized balayage brush with feathered bristles.
- Gloves and a mixing bowl.
Application Steps
- Identify Placement: Before mixing, use the end of a comb to plan where you want the highlights. On a pixie, focus on the longer sections on top and around the face for a sun-kissed effect.
- Mix Lightener: Mix the clay lightener and developer to a thick, yogurt-like consistency.
- Paint Highlights: Take a section of hair. Hold it taut and, using your brush, lightly paint the surface of the hair with the lightener. Apply more product to the mid-lengths and ends for a natural gradient. Avoid saturating the section.
- Process Open-Air: Balayage is designed to be processed in the open air (no foils needed). Check every 10-15 minutes until your desired level of lightness is reached.
- Rinse, Tone, and Condition: Rinse the lightener thoroughly. Apply toner to the highlighted sections to refine the color, then follow with a deep conditioner.
Pro-Tip: The key to natural balayage is a light touch. Don’t press the brush hard into the hair. Skim it across the surface. For a pixie, this technique works best on the longer fringe area and the crown to mimic where the sun would naturally hit.

3. Go Fiery and Bold with a Vibrant Copper Red Pixie

Ready for a fiery transformation? Save this copper pixie inspiration!
A copper red hair pixie is one of the hottest trends, offering a perfect blend of warmth, vibrancy, and style. This fiery shade makes a bold statement and beautifully complements a wide range of skin tones. While achieving the perfect ginger pixie cut is one thing, the real challenge lies in how to maintain red hair color, which is notoriously prone to fading.
Products & Tools Used
- Permanent Copper Hair Dye: Look for a shade described as “vibrant copper,” “bright auburn,” or “fiery red.”
- 20 Volume Developer: Sufficient for depositing color and achieving a vibrant result on most hair colors (unless you need to lighten first).
- Color-Depositing Conditioner (Copper/Red): This is non-negotiable for maintenance.
- Pre-color Clarifying Shampoo: To remove any product buildup for even color absorption.
- Standard application kit: bowl, brush, gloves.
Application Steps
- Clarify Hair: The day before coloring, wash your hair with a clarifying shampoo but do not condition. This ensures the hair cuticle is open and ready to absorb the color molecules.
- Mix and Apply: On dry hair, mix the permanent color and developer. Apply thoroughly from roots to ends, ensuring every strand of your short hair is saturated.
- Process: Let the color process according to the manufacturer’s instructions, typically 30-40 minutes.
- Rinse with Cool Water: Rinse the dye out with cool or lukewarm water, never hot. Hot water opens the cuticle and lets the color bleed out.
- Start Maintenance Immediately: Instead of a regular conditioner after your first rinse, use your copper color-depositing conditioner. This will add back any pigment lost during rinsing and seal in the color.
Pro-Tip: Red dye is famous for fading quickly. To prolong your vibrant copper, wash your hair as infrequently as possible, always use cool water, and use a copper color-depositing mask or conditioner every single time you wash.

4. Try a Modern Shadow Root Blonde Pixie

Pin this low-maintenance blonde look for your next salon visit!
The shadow root pixie cut is the epitome of “cool girl” hair. This technique involves keeping the roots darker while the mids and ends are blonde, creating a lived-in, effortless vibe. It’s the perfect low maintenance blonde pixie because the darker root blends your natural regrowth, meaning fewer trips to the salon for touch-ups.
Products & Tools Used
- Dark Root Color: A demi-permanent color one or two shades lighter than your natural color (e.g., a dark ash blonde or light brown).
- Bleach/Lightener & Developer: To lighten the mid-lengths and ends.
- Blonde Toner: To achieve your desired shade of blonde on the lightened ends.
- Two separate tint brushes: One for the roots, one for the blonde.
- Gloves, bowl, clips.
Application Steps
- Section Hair: Part your hair where you normally would. Section off the top portion of your hair that will be blonde.
- Apply Root Color: Mix and apply the darker, demi-permanent color to the root area, typically for the first 1-2 inches. This is your “shadow.”
- Apply Lightener: On the remaining mid-lengths and ends, apply your bleach mixture. Be careful not to overlap with the dark root color. You can use foils to keep the sections separate and clean.
- Process and Rinse: Process until the ends have lifted to the desired lightness. Rinse the hair thoroughly, starting with the blonde ends to remove the bleach before rinsing the root color.
- Tone the Ends: Apply your blonde toner only to the bleached sections of your hair. Process, rinse, and condition everything.
Pro-Tip: To create a softer blend (a “root smudge”), after applying the root color, use a clean, dry brush to gently feather the dark color down into the blonde section just a tiny bit. This avoids a harsh line and creates a more professional, melted look.

5. Add a Surprise with a Peekaboo Color Pop

The perfect way to have secret fun with your hair! Pin this peekaboo idea.
Want to experiment with bold color without the full commitment? A peekaboo highlights pixie cut is your answer. This playful style involves coloring a hidden section of your hair—often the undercut or a panel near the ear—with a vibrant shade. It’s the perfect way to have a pixie cut with pop of color that you can show off or hide whenever you like.
Products & Tools Used
- Hair Bleach Kit: A small kit is sufficient to lighten only the hidden section.
- Vivid Semi-Permanent Hair Dye: In any bold color you choose (blue, purple, green, pink). These typically don’t require a developer.
- Hair Clips: To securely separate the top layer of hair from the section to be colored.
- Foil: To protect the surrounding hair from the bleach and dye.
- Gloves and an application brush.
Application Steps
- Section and Isolate: Determine which part of your pixie will be the “peekaboo” section. This is often the undercut at the nape of the neck or a panel above the ear. Clip the rest of your hair securely up and away.
- Protect: Place a piece of foil underneath the section you’re going to color to act as a barrier.
- Lighten the Section: Mix and apply bleach only to the isolated peekaboo section. Process until it’s a very light blonde (for vivid colors to show up brightly). Rinse carefully, trying not to wet the rest of your hair.
- Dry and Apply Vivid Color: Dry the bleached section completely. Apply the semi-permanent vivid dye, fully saturating the lightened hair.
- Process and Rinse: Semi-permanent dyes often have a longer processing time (check package). Since they are conditioning, you can’t over-process. Rinse with cool water, again being careful to isolate the section.
Pro-Tip: The beauty of using a semi-permanent dye for your peekaboo panel is how easily you can change the color. Once it starts to fade, you can simply apply a different semi-permanent shade right over the top without re-bleaching.

6. Live a Pastel Dream with a Soft Lilac or Pink Pixie

Dreaming of pastel hair? Pin this soft and pretty pixie look!
A pastel pink pixie cut or a soft lilac shade offers a dreamy, whimsical look that’s both soft and edgy. The secret to achieving a true, ethereal pastel is two-fold: an absolutely perfect, platinum-white base, and creating a custom-diluted color. This look is high-maintenance but incredibly rewarding.
Products & Tools Used
- Hair Bleach Kit: To lighten hair to a Level 10 platinum blonde. There can be NO yellow tones left.
- Vivid Semi-Permanent Dye: In pink, purple, or blue. You will be diluting this.
- White Conditioner: A large bowl of cheap, silicone-free white conditioner to use as your mixing base.
- Toner: A violet-based toner to ensure your hair is a pure white canvas before adding the pastel.
- Mixing bowl and brush.
Application Steps
- Achieve a Perfect Base: This is the most critical step. You must bleach and tone your hair to a clean, even, Level 10 platinum blonde (white). If your hair is yellow, your lilac will look muddy or your pink will look peachy.
- Create Your Custom Pastel: In a mixing bowl, place a large amount of white conditioner. Add a VERY small amount of the vivid semi-permanent dye (start with a pea-sized amount). Mix thoroughly. Keep adding tiny amounts of dye until you reach a color that is a shade or two darker than your desired result.
- Strand Test: Test your custom pastel mix on a small, hidden strand of hair (or on a paper towel) to ensure you’re happy with the color.
- Apply to Clean, Dry Hair: Apply your custom pastel conditioner mix all over your pre-lightened hair. Saturate it completely.
- Process and Rinse: Let it sit for at least 30-60 minutes. Because it’s mostly conditioner, it’s very gentle. Rinse with cool water.
Pro-Tip: Always mix your pastel shade slightly darker in the bowl than you want it on your hair. The color in the bowl will always look more intense than the final result. It’s easier to add more dye than to take it away!

7. Look Sophisticated and Chic in Smoky Silver Gray

Gray is the new blonde! Pin this incredibly chic silver pixie style.
A silver hair pixie cut is the height of modern sophistication. Far from being a sign of aging, intentional silver or smoky gray hair is a high-fashion statement. Achieving this sleek, metallic look requires a process similar to platinum blonde, but the toning step is what creates that coveted chic, charcoal hair color.
Products & Tools Used
- Hair Bleach Kit: You must lighten to a pale yellow (Level 9 or 10).
- Silver or Gray Permanent/Demi-Permanent Dye: Look for shades named “smoky silver,” “metallic gray,” or “light silver.”
- Purple or Blue Shampoo: To pre-tone and maintain the cool silver shade.
- Gloves, bowl, brush.
Application Steps
- Lighten to Pale Yellow: Just like for platinum or pastel, a clean base is everything. Bleach your hair until it’s the color of the inside of a banana peel. Any remaining yellow will fight the gray dye and can create a greenish tint.
- Pre-Tone (Optional but Recommended): After rinsing the bleach, wash your hair with a strong purple or blue shampoo and let it sit for 5 minutes. This will neutralize a lot of the yellow and give you a better canvas for the gray dye.
- Apply Gray Dye: On towel-dried, pre-toned hair, apply your chosen silver/gray dye. Ensure complete saturation from root to tip.
- Process and Rinse: Follow the package instructions for timing. Gray dyes can sometimes look very dark (like deep purple or blue) while they are processing – don’t panic! This is normal.
- Maintain with Purple Shampoo: Rinse with cool water and condition. Use a purple shampoo once a week to keep your silver bright and free of any yellow tones that may creep back in.
Pro-Tip: If your silver dye isn’t as “smoky” or deep as you’d like, you can purchase a pure black or graphite semi-permanent color additive. Mix a tiny drop into your silver dye to create a custom, deeper charcoal or smoky silver shade.

8. Rock an Edgy Split Dye Pixie

Can’t decide on one color? You don’t have to! Pin this bold split-dye look.
For the truly fearless, the split dye pixie cut is the ultimate expression of individuality. This half and half hair color look, often seen with a dramatic black and blonde hair contrast, is all about precision. The key to avoiding a blurry mess is meticulous sectioning and a careful rinsing process.
Products & Tools Used
- Two Different Hair Colors: For example, a jet black permanent dye and a bleach kit for the other side.
- Barrier Cream or Thick Conditioner: To apply along the center part line.
- A lot of Hair Clips: For extremely precise sectioning.
- Two separate sets of bowls and brushes: To prevent cross-contamination.
- Gloves.
Application Steps
- Create a Perfect Part: Start with clean, dry hair. Use a pintail comb to create a perfectly straight, clean part exactly where you want the split to be.
- Isolate One Side: Securely clip one entire side of your hair up and away. It must be completely out of the way.
- Apply Barrier Cream: Apply a thick layer of barrier cream or conditioner right on the skin along your scalp part. This creates a wall to prevent the colors from bleeding into each other.
- Color the First Side: Mix and apply your first color (usually the darker one first) to the loose side of your hair. Be extremely neat near the part line. Once applied, cover this side in plastic wrap or a foil.
- Color the Second Side: Unclip the other side. Mix and apply your second color (the bleach/lighter shade). Again, be very precise at the part line.
- Process and Rinse SEPARATELY: This is the most important step. When it’s time to rinse, lean your head to the side so that you are ONLY rinsing the first color, directing the water flow away from the clean side. Secure the wet hair, then switch sides and rinse the second color, again directing the water away from the first.
Pro-Tip: The key to a clean split dye is a clean process. Use different towels, different bowls, and rinse each side as if it’s a completely separate head of hair. Rushing the rinse is what causes the colors to bleed and look muddy.

9. Create a Sunset Effect with Color Melting

Wear a sunset in your hair! Pin this incredible color melt inspiration.
A color melt on short hair is an advanced technique that creates a seamless gradient from one color to another. Unlike ombré with its distinct transition, a color melt blends the lines so smoothly that you can’t tell where one color ends and the next begins. This is a truly artistic choice, perfect for a hair color gradient pixie with shades like magenta, orange, and yellow.
Products & Tools Used
- Hair Bleach Kit: To lighten hair to a pale blonde for the colors to show.
- 3+ Semi-Permanent Colors: Choose colors that blend well together (e.g., pink -> orange -> yellow, or blue -> purple -> pink).
- Multiple bowls and brushes: One set for each color.
- Gloves.
Application Steps
- Lighten to a Clean Base: Bleach your hair to an even, pale blonde base.
- Section and Plan: Mentally divide your hair strands into three horizontal zones: roots, mids, and ends.
- Apply Root Color: Apply your darkest color to the root area (the first zone).
- Apply End Color: Apply your lightest color to the tips of your hair (the third zone).
- Apply Mid Color & Melt: Apply your middle color to the section between the roots and ends. Now, for the “melt”: use your gloved fingers to gently smudge the line where the root color meets the mid color. Then, smudge the line where the mid color meets the end color. You are blurring the lines to create a seamless transition.
- Process and Rinse: Process according to the dye instructions. When rinsing, use very cold water to minimize bleeding.
Pro-Tip: Color melting works best with analogous colors (colors next to each other on the color wheel). The transition from blue to green will be smoother and more forgiving than a transition from, say, green to red.

10. Opt for Natural Warmth with Chocolate Brown & Caramel Highlights

A classic and beautiful choice. Pin this warm brunette pixie for a timeless look.
Not all pixie colors have to be extreme. A brunette pixie cut with highlights in shades of caramel is a timeless, sophisticated, and universally flattering choice. A rich chocolate brown hair color base provides the perfect foundation for warm, subtle caramel highlights on short hair, creating depth and dimension without a major commitment.
Products & Tools Used
- Permanent Base Color: A rich shade like chocolate brown or dark auburn.
- Highlighting Kit or Lightener: Specifically for dark hair.
- 10 or 20 Volume Developer: For a gentle lift to a caramel level, not blonde.
- Foils or a Highlighting Cap: To create fine, precise highlights.
- Bowl, brush, gloves.
Application Steps
- Apply Base Color: If you’re changing your all-over color, apply your chocolate brown permanent dye first according to package directions. Rinse, dry, and wait a day or two before highlighting.
- Isolate Strands for Highlights: Using either a highlighting cap and hook or by weaving out fine strands and placing them on foil, isolate the hair you want to lighten.
- Apply Lightener: Mix your lightener with a low-volume developer (10 or 20 vol). Apply it to the isolated strands. Using a lower developer will give you more control and create a warmer, more caramel-like lift instead of a stark blonde.
- Process Carefully: Watch the highlights closely. You are not aiming for platinum, but a warm, honey or caramel shade. This may only take 15-20 minutes.
- Rinse and Condition: Rinse the lightener out thoroughly and apply a deep conditioner to all of your hair.
Pro-Tip: For the most natural look, concentrate the highlights on the top layer and around your face—the pieces that would naturally be lightened by the sun. Keep the highlights underneath more sparse.
11. Define Your Cut with a Contrasting Undercut Color

Define your style with a sharp, colored undercut. Pin this edgy idea!
One of the most edgy pixie styles is using color to accentuate the haircut itself. A contrasting pixie undercut color is a bold way to highlight the sharp lines and different lengths in your cut. By keeping the top a natural color and dyeing the shaved or buzzed sections a vibrant shade, you create an architectural and eye-catching look.
Products & Tools Used
- Hair Clippers: To create the clean, buzzed undercut.
- Bleach Kit: A small one to pre-lighten the short undercut section.
- Vivid Semi-Permanent Dye: Any bold color to contrast with your top color.
- Painter’s Tape or a steady hand: To create a clean line.
- Clips, gloves, brush.
Application Steps
- Create the Undercut: Section the longer top part of your hair and clip it securely away. Use clippers to create your desired undercut shape.
- Protect the Top Hair: Apply conditioner to the edges of the longer top hair to create a barrier that will repel any stray dye.
- Lighten the Undercut: Apply bleach only to the short, buzzed section. Because the hair is so short, this will process very quickly! Watch it carefully. Rinse it out, keeping the top hair dry and protected.
- Dry and Apply Color: Dry the buzzed section. Apply your vivid semi-permanent color liberally to the entire undercut.
- Process and Rinse: Let the color process. Rinsing is easier here—just lean your head so the water runs over the short section without touching the long hair.
Pro-Tip: Since your undercut will be re-buzzed every few weeks, this is the perfect place to experiment with bold colors you’re not ready to commit to on your whole head. The “canvas” gets refreshed regularly!

Key Takeaways: Your Quick Guide to Pixie Cut Colors
Feeling inspired? Before you start mixing dye, keep these essential rules in mind. They are the foundation for getting a beautiful, professional-looking result and keeping your colored pixie looking its best.
- Your Base Color is Everything: For bold, pastel, or silver colors, you must first bleach your hair to a pale yellow or platinum base. The final color is only as good as the canvas you put it on.
- Toner is Not Optional: For any blonde, silver, or pastel look, a toner is essential to neutralize unwanted yellow or brassy tones after bleaching. It’s the secret to a professional-looking result.
- Maintenance is Key for Vibrancy: Reds and vivid colors fade fast. Plan to use color-depositing conditioners, wash with cool water, and minimize washing frequency to keep your color bright.
- Technique Prevents Mistakes: For techniques like split dye or peekaboo, the most important steps are precise sectioning and rinsing each color separately to prevent bleeding and muddying.
- Low-Maintenance Options Exist: Styles like a shadow root pixie cut or subtle balayage are great for extending time between salon visits, as they blend regrowth more naturally.
- Always Strand Test: Before applying any bleach or dye to your whole head, test it on a small, hidden section of hair to check the final color and processing time.
People Also Ask About Pixie Cut Color Ideas
You’ve got questions, we’ve got answers. Here are some of the most common queries people have when considering a new color for their pixie cut.
What is the best color for a pixie cut?
The best color is one that complements your skin tone and matches your desired maintenance level. For a low-maintenance option, consider subtle balayage or a shadow root that blends with your natural color. For a bold, high-impact look, icy platinum blonde or a vibrant copper can be stunning but will require more frequent upkeep.
Is it hard to maintain a colored pixie cut?
It can be easier to maintain than long hair, but requires consistency. While you’ll use less product, pixie cuts require frequent trims (every 4-6 weeks) to maintain their shape. If you have an all-over bold color, you’ll need to do root touch-ups at the same frequency. Using color-safe shampoo and conditioners is essential.
Can you have highlights on a pixie cut?
Yes, highlights are a fantastic way to add dimension to a pixie cut. Techniques like balayage (hand-painted highlights) can create a natural, sun-kissed look, while traditional foils can add more defined streaks. On short hair, highlights prevent the color from looking flat and one-dimensional.
What is the most low-maintenance color for a pixie?
A shadow root or subtle balayage highlights are the most low-maintenance options. A shadow root blends your natural root color down into a lighter color, so regrowth is not obvious. Similarly, balayage is painted away from the root, meaning you won’t have a harsh line as your hair grows.
How do I keep my blonde pixie from turning yellow?
You must use a purple shampoo and conditioner at least once a week. Purple is opposite yellow on the color wheel, so it neutralizes brassy tones and keeps your blonde looking bright and cool. Rinsing with cool water and minimizing the use of heat styling can also help preserve the tone.
Final Thoughts on Your Pixie Color Journey
Choosing a new hair color for your pixie cut is a powerful way to express your personal style and hit the refresh button on your look. Whether you’re drawn to the timeless elegance of chocolate and caramel highlights or the fearless edge of a split-dye or icy platinum look, the perfect color is waiting for you. A pixie cut provides a unique canvas that makes any color choice feel intentional and chic.
Remember the key takeaways: a clean base is crucial, maintenance is your friend, and toner is non-negotiable for cool shades. While DIY can be a rewarding adventure, for dramatic transformations like going from dark to platinum, seeking professional advice is always the safest bet for your hair’s health. So, which bold new look will you try first?
Last update on 2026-04-13 / Affiliate links / Images from Amazon Product Advertising API