Are you tired of the same old look and struggling to find a style that protects your hair while turning heads? Many of us face the daily frustration of seeking versatile styling options that balance fashion with function, leading us to explore the transformative power of hairstyles with braids.
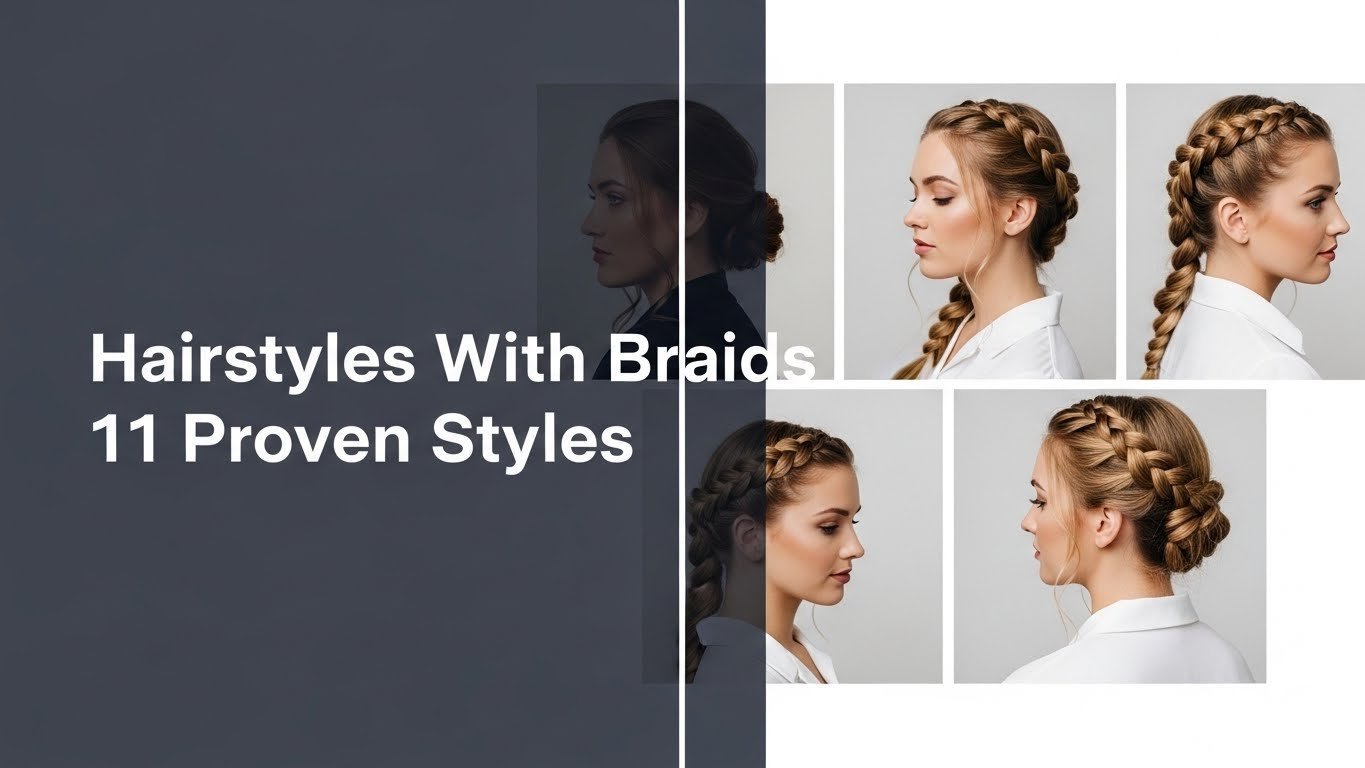
Hairstyles with braids: A definitive collection of styling techniques ranging from protective Box Braids to elegant French Braids, designed to secure hair, promote growth, and offer low-maintenance versatility for all hair types in 2026. These styles provide a proven solution for managing texture while delivering a polished aesthetic suitable for any occasion.
Drawing from comprehensive analysis of current data and expert braiding methodologies, this guide breaks down the most effective techniques for every skill level. You will discover step-by-step tutorials, essential tools, and professional secrets to master these looks at home. Let’s elevate your hair game with styles that are as practical as they are beautiful.
11 Proven Hairstyles With Braids for 2026 to Elevate Your Look
Hairstyles with braids offer a unique intersection of artistry and practicality, serving as both a fashion statement and a method for hair management. Whether you are looking for protective braid styles to shield natural hair from environmental damage or seeking quick hairstyles with braids for a busy morning, understanding the specific mechanics of each style is crucial. In this section, we map out distinct braided hairstyles tailored to various hair lengths, textures, and lifestyle needs, ensuring you find the perfect match for your aesthetic. From the scalp-hugging precision of dutch braid hair to the intricate detail of a fishtail braid, these proven styles bridge the gap between complex salon looks and achievable home styling.
1. Mastering the Classic French Braid for Effortless Elegance

Pin this classic French braid inspiration to your style board!
The French braid is a foundational technique in the world of hair styling, revered for its ability to keep hair securely swept back while maintaining a sophisticated appearance. Ideally suited for medium to long hair, this style works by weaving hair from the crown and gradually incorporating strands from the sides. It creates a smooth, flat look against the head that enhances facial features and serves as a perfect base for more complex updos.
What You Need
- A fine-tooth rat-tail comb for precise parting
- A detangling brush or wide-tooth comb
- Light-hold braiding cream or mousse
- Small clear hair elastics or hair ties
- Hair clips for sectioning
What To Do
- Prepare Hair: Start with clean, detangled hair. Apply a small amount of braiding cream evenly to add grip and reduce frizz.
- Section Crown: Use your rat-tail comb to create a triangular section of hair at the crown of your head, about 1-2 inches from your hairline.
- Divide into Three: Divide this initial section into three equal strands.
- Begin Weaving: Cross the right strand over the middle strand, then the left strand over the new middle strand (just like a regular braid).
- Add Hair: Before crossing the right strand again, gather a small, equal section of hair from the right side of your head and add it to the right strand. Then cross this combined, thicker right strand over the middle.
- Repeat on Left: Gather a small, equal section of hair from the left side and add it to the left strand. Cross this combined, thicker left strand over the new middle.
- Continue Braiding: Continue this process, adding hair from the sides before each cross, working your way down the back of your head. Maintain even tension.
- Finish Braid: Once all loose hair has been incorporated, finish with a regular three-strand braid down to the ends.
- Secure: Fasten the end with a small clear hair elastic. Gently tug at the loops for a fuller, softer look if desired.
Pro-Tip: For a truly neat braid, maintain consistent, firm tension throughout the entire braiding process. This is a key proven method for braid retention and ensures the braid looks polished and lasts longer. Don’t pull too tightly on the scalp, but keep the strands firm.
2. Crafting the Defined Dutch Braid: A Textured Take

Save this textured Dutch braid look for your next workout!
The Dutch braid is frequently confused with the French braid, but it offers a distinct visual difference: it sits on top of the hair rather than blending into it. By crossing strands under rather than over, you create a 3D effect that makes the braid pop. This style is particularly favored for active lifestyles as it holds hair firmly in place and works exceptionally well for creating textured braid styles that look voluminous even on finer hair types.
What You Need
- A rat-tail comb for clean parts
- A wide-tooth comb for detangling
- Strong hold styling gel or pomade
- Hair elastic bands
- Hair clips
What To Do
- Prepare Hair: Start with dry or slightly damp, detangled hair. Apply a small amount of strong hold styling gel along your hairline where the braid will begin.
- Section Hair: Using your rat-tail comb, create a horizontal part from ear to ear across the crown of your head, then divide this into two equal sections for symmetrical braids. Secure one side with a clip.
- Divide First Section: On the unclipped side, take a small, triangular section of hair at the hairline and divide it into three equal strands.
- Begin Reverse Weave: Cross the right strand under the middle strand, then cross the left strand under the new middle strand. This is the key difference from a French braid.
- Add Hair (Right): Before crossing the right strand under again, pick up a small, even section of hair from the right side of your head and add it to the right strand. Then cross this combined strand under the middle.
- Add Hair (Left): Pick up a small, even section of hair from the left side and add it to the left strand. Cross this combined strand under the new middle.
- Continue Down: Keep adding hair from the sides and crossing the strands under the middle as you work your way down towards the nape of your neck.
- Finish and Secure: Once all loose hair is incorporated, finish with a regular three-strand braid, crossing under until you reach the ends. Secure with a hair elastic.
- Repeat: Unclip the other side of your hair and repeat the process to create a matching Dutch braid. Gently pull the edges of the braid for added volume.
Pro-Tip: For maximum definition, ensure each section of hair you add is roughly the same size and that you maintain consistent tension. This proven method for braid retention prevents the braid from unraveling and keeps the distinct raised look.

3. Weaving the Intricate Fishtail Braid: Boho Chic Style

Flaunt your fishtail braid! Pin this boho-chic look.
The fishtail braid is celebrated for its intricate, woven appearance that mimics the texture of a fish’s scales. While it looks complex, the technique simply relies on two strands rather than the traditional three. This style is synonymous with boho chic braids and is incredibly versatile, looking just as good sleek and tight as it does messy and deconstructed. It creates fine braided patterns that add significant visual interest to long or wavy hair.
What You Need
- A detangling brush or comb
- Texturizing spray for grip
- Anti-frizz hair serum
- Hair elastic or clear elastic band
What To Do
- Prepare Hair: Start with dry, detangled hair. Apply a few spritzes of texturizing spray throughout your hair to add grip and volume, making it easier to braid.
- Section Hair: Pull all your hair to one side, or gather it at the nape of your neck, and divide it into two large, equal sections.
- Start Braiding: Take a small, thin strand of hair from the outer edge of the left section.
- Cross Over: Bring this small strand over the left section and join it with the inner side of the right section.
- Repeat on Other Side: Now, take a small, thin strand of hair from the outer edge of the right section.
- Cross Over: Bring this small strand over the right section and join it with the inner side of the left section.
- Continue Weaving: Repeat steps 3-6, consistently taking small strands from the outside of each main section and crossing them over to the inside of the opposite section. The smaller the strands, the more intricate the fishtail pattern will appear.
- Maintain Tension: Keep the tension consistent, but not overly tight, to allow for later loosening.
- Secure: Continue braiding until you reach your desired length, then secure the end with a hair elastic.
- Finish: Gently pull on the interwoven loops of the braid to loosen it and create a softer, fuller, more boho look. Apply anti-frizz hair serum to any flyaways.
Pro-Tip: The secret to a beautiful fishtail braid lies in consistently taking very small sections. This creates the intricate, delicate “fish scale” effect that is the hallmark of this style, a technique often shared by master braider secrets.

4. Styling Classic Box Braids: The Ultimate Protective Style

Discover your next Box Braids look! Pin for protective style inspiration.
Box Braids are a quintessential protective style, characterized by square-shaped hair divisions that give the style its name. This technique uses synthetic hair to extend length and thickness, fully encasing natural hair to shield it from manipulation and the elements. They are famous for being long lasting braids that offer incredible versatility, allowing for buns, ponytails, and half-up styles.
What You Need
- Kanekalon braiding hair (pre-stretched recommended)
- Rat-tail comb for precise parting
- Hair clips or sectioning clips
- Edge control or pomade
- Anti-itch scalp oil
- Shears or sharp scissors
What To Do
- Prepare Hair: Start with clean, deeply conditioned, and stretched natural hair. Ensure it’s fully detangled.
- Section Hair: Using your rat-tail comb, create clean, square-shaped parts across your entire head. The size of the squares will determine the size of your Box Braids. Clip away sections you’re not working on.
- Prepare Braiding Hair: Take a small section of Kanekalon braiding hair and feather the ends by gently pulling strands from one side to create a tapered look.
- Attach Extension: Take a small section of your natural hair from one square part. Place the middle of the prepped extension hair around the base of your natural hair section, close to the scalp.
- Begin Braid: Divide your natural hair and the extension hair into three equal strands. Start with a standard three-strand braid, tightly weaving braids at the root to secure the extension.
- Incorporate Natural Hair: As you braid down, gradually incorporate your natural hair into the three strands. Ensure your natural hair is completely hidden within the extension hair.
- Braid to End: Continue braiding down the length of the extension hair, maintaining even tension until you reach the desired length.
- Seal Ends: Dip the ends of the braids in hot water (not scalding) for a few seconds to seal them, then blot dry with a towel. Alternatively, use a lighter to carefully singe and seal (exercise extreme caution).
- Style Edges: Apply edge control along your hairline and smooth down any flyaways using a small brush or your fingers for a neat finish.
- Moisturize Scalp: Apply anti-itch scalp oil directly to your scalp between the parts to keep it moisturized and prevent discomfort.
Pro-Tip: When installing Box Braids, always prioritize your hair’s health. The licensed cosmetologist advice is to avoid overly tight braiding, especially at the hairline, to prevent traction alopecia from braids. The parts should be neat but the tension should be comfortable.

5. Achieving the Lightweight Knotless Braids Look

Embrace comfort with Knotless Braids! Pin this natural-looking style.
Knotless Braids have revolutionized protective styling by addressing the biggest complaint associated with traditional box braids: tension. By utilizing a “feed-in” technique that starts with your natural hair and gradually adds synthetic hair, this method creates lightweight braids that lie flat against the scalp. The result is a highly flexible, natural looking braids style that allows for immediate styling flexibility without the “tightness” period.
What You Need
- Pre-stretched braiding hair (Kanekalon or similar)
- Rat-tail comb for parting
- Hair clips
- Lightweight braiding mousse
- Scalp soothing spray
- Hair elastic bands (optional, for ends)
What To Do
- Prepare Hair: Begin with clean, stretched, and thoroughly detangled hair. Apply a small amount of lightweight braiding mousse to add moisture and prepare for styling.
- Section Hair: Create neat, precise parts (squares or triangles) similar to Box Braids. Secure surrounding sections with clips.
- Start Base Braid: Take a small section of your natural hair from one part. Begin a three-strand braid with only your natural hair for about 1-2 inches.
- Feed-In Extensions (First Piece): Pick up a very small piece of your pre-stretched braiding hair. Place one end of this extension piece under one of your three natural hair strands, then weave braids it into the next cross of the braid. The goal is a seamless addition.
- Continue Feeding-In: As you continue braiding, gradually add more small pieces of extension hair (one by one, often 3-5 pieces per braid) to the working strands. This “feed-in” technique creates a gradual increase in thickness.
- Maintain Evenness: Ensure you add equal amounts of hair and maintain consistent tension throughout, focusing on a comfortable, tension-free root. This is key to knotless braid method.
- Braid to End: Once all desired extension hair is incorporated, continue braiding down the length until you reach the ends.
- Seal Ends: Seal the ends using the hot water method (dipping in hot water then blotting dry) or by carefully burning and rolling the ends (extreme caution needed).
- Moisturize: Apply scalp soothing spray to the scalp to prevent dryness and itchiness, which are common problem_solution_keywords for new braids.
Pro-Tip: The primary benefit of Knotless Braids is reduced tension at the scalp, minimizing avoiding hair damage from braids. A professional hair stylist insight suggests using pre-stretched hair and adding small pieces gradually to achieve the lightest, most comfortable results.

6. Designing Versatile Cornrows: Scalp-Hugging Styles

Master intricate Cornrows! Pin this scalp-hugging style for inspiration.
Cornrows are an iconic style where hair is braided closely to the scalp in continuous, raised rows. This style serves as the foundation for wigs and weaves but stands powerfully on its own through intricate geometric patterns and designs. As versatile braids, they can be simple straight-backs or complex, artistic creations. They are low maintenance and durable, making them ideal african american braids for active adults and children alike.
What You Need
- Rat-tail comb for precise parting
- Hair clips
- Braiding gel or edge control
- Leave-in conditioner
- Optional: Hair extensions (Kanekalon) for added length or fullness
What To Do
- Prepare Hair: Start with clean, detangled, and moisturized hair. Apply leave-in conditioner to ensure hair is pliable.
- Section Hair: Using your rat-tail comb, create a straight, clean part from your hairline to the nape of your neck, or across the head for a side cornrow. Clip away the rest of your hair.
- Divide First Section: Take a small, triangular section of hair at the beginning of your part and divide it into three equal strands.
- Begin Underhand Braid: Cross the right strand under the middle strand. Then cross the left strand under the new middle strand. This forms the raised pattern characteristic of Cornrows.
- Add Hair & Weave: Before crossing the right strand under again, pick up a small, equal section of loose hair from beneath the part line and add it to the right strand. Then cross this combined strand under the middle.
- Repeat: Repeat on the left side: add a small section of loose hair from beneath the part to the left strand, then cross it under the new middle.
- Continue Braiding: Continue this process, consistently adding small, equal sections of hair from each side as you braid along your chosen part line, keeping the braid flat against the scalp. Maintain firm, even tension.
- Incorporate Extensions (Optional): If adding extensions, begin to feed in small pieces of Kanekalon braiding hair gradually as you braid, similar to the knotless method, once your natural hair has been braided for a few inches.
- Finish & Secure: Once you reach the end of your scalp line, continue with a regular three-strand underhand braid down the length of the hair (or extension hair). Secure with a small elastic.
- Refine Edges: Use braiding gel or edge control to smooth down any flyaways along your part lines and hairline.
Pro-Tip: The trichology of braided hair indicates that proper tension is vital for scalp health with Cornrows. Expert braiding tips emphasize that the parts should be neat, but the braid itself should not feel excessively tight, especially around the sensitive temple and nape areas, to avoiding traction alopecia from braids.
7. Creating the Romantic Waterfall Braid

Capture the charm of a Waterfall Braid! Pin this romantic look.
The waterfall braid is a modified French braid that creates a stunning cascading effect, perfect for weddings, proms, or romantic dates. Instead of gathering all the hair into the braid, you “drop” sections to let them hang loose, creating a delicate, woven crown that sits atop flowing locks. It creates beautiful half up braids that look incredibly intricate but rely on a simple repetitive dropping technique.
What You Need
- Dry shampoo or texturizing spray
- A detangling brush
- Hair clips
- Mini clear hair elastic
- Light hold hairspray
What To Do
- Prepare Hair: Start with dry, detangled hair. For better grip, spray a little dry shampoo at the roots where you’ll be braiding.
- Section Hair: Create a side part. Take a section of hair about 1-2 inches from your hairline on the side with more hair. Divide this section into three equal strands.
- Begin French Braid (Modified): Start a standard French braid: cross the top strand over the middle, then the bottom strand over the new middle.
- Drop a Strand: For the next step, when you would normally bring the top strand over, drop that top strand (let it fall down). This creates the “waterfall” effect.
- Pick Up New Strand: Immediately pick up a new section of hair from above the dropped strand (from the top of your head) to replace the dropped strand. This new section becomes your new top strand.
- Continue Braiding: Cross this new top strand over the middle, then take the existing bottom strand and cross it over the new middle.
- Repeat: Continue this process: drop the top strand, pick up a new top strand, cross over the middle, then cross the bottom strand over the new middle. Work horizontally across your head.
- Secure: Once you reach the back of your head or the opposite side, secure the end of the braid with a mini clear hair elastic or pin it discreetly with bobby pins.
- Finish: Gently tug at the loops of the braid for added fullness. Finish with a light mist of hairspray to secure any loose flyaways.
Pro-Tip: Consistency in the size of the strands you drop and pick up is paramount for a uniform Waterfall Braid. Proven methods for braid retention for this style include securing the end firmly and using a light hairspray to prevent the delicate drops from unraveling.

8. Voluminous Pull-Through Braid: No Weaving Required

Get major volume with a Pull-Through Braid! Pin for effortless style.
For those who struggle with traditional weaving techniques, the pull through braid is a game-changer. It essentially creates a faux braid using a series of ponytails looped through one another. This technique allows for massive expansion, creating voluminous braids that look incredibly thick and textured, even on finer hair. It acts as a fantastic braid alternative that stays secure all day thanks to the multiple elastic bands.
What You Need
- Small clear hair elastics (at least 5-7, depending on hair length)
- Volumizing hair powder or texturizing spray
- A fine-tooth comb for teasing
- Hair clips
What To Do
- Prepare Hair: Start with dry, detangled hair. If your hair is fine, apply volumizing hair powder at the roots and mid-lengths.
- Create First Ponytail: Gather the top section of your hair (from your temples to the crown) into a half-up ponytail. Secure it with a small clear hair elastic.
- Create Second Ponytail: Gather another section of hair from just above your ears, bringing it to meet the ends of your first ponytail. Secure this second ponytail with another small clear hair elastic, making sure it’s below the first one.
- Split & Pull Through: Split the first ponytail (the top one) into two equal halves. Take the second ponytail and pull it up through the split, so it now sits above the first ponytail. Secure the second ponytail with a clip for a moment.
- Create Third Ponytail: Gather a new section of loose hair from below the second ponytail, bring it to meet the ends of the original first ponytail (which is now at the bottom). Secure with a new small clear hair elastic.
- Repeat Split & Pull: Unclip the “new” second ponytail (which was the original first). Split it into two halves. Take the new third ponytail and pull it up through the split, so it sits above.
- Continue Down: Repeat this process all the way down your hair: create a new ponytail with remaining loose hair and the bottom section of the previous ‘pull-through’, split the top section of the previous ‘pull-through’, and pull the new ponytail through.
- Secure End: Once all hair is incorporated, secure the very end with a final small clear hair elastic.
- Volumize: Gently tug and pull at each loop of the braid, starting from the top, to loosen and expand it, creating significant volume and a fuller Pull-Through Braid look.
Pro-Tip: For the most voluminous braids, a proven method for braid retention is to use small, strong elastics and to tease each ponytail section slightly before pulling it through. This creates a denser foundation for the voluminous loops, a trick used by master braider secrets.

9. Crafting Darling Microbraids: Tiny, Intricate, and Long-Wearing

Admire the artistry of Microbraids! Pin this intricate protective style.
Microbraids are tiny, delicate individual braids that often resemble thick strands of hair rather than obvious braids. Because they are so small and plentiful, they offer maximum movement and versatility, allowing you to style them almost exactly like loose hair. They are long-wearing braids that require a significant time investment to install but pay off with months of low-maintenance style, often serving as intricate braid designs that stand the test of time.
What You Need
- Fine-tooth rat-tail comb for ultra-precise parting
- Small, lightweight human hair braiding extensions (optional, but common)
- Hair clips
- Lightweight scalp moisturizer or oil
- Shears
- Small hair elastics or sealing tools (for extension ends)
What To Do
- Prepare Hair: Start with meticulously clean, deeply conditioned, detangled, and stretched hair. Microbraids work best on hair that is as straight and smooth as possible.
- Section Hair: This is the most critical step. Using your fine-tooth rat-tail comb, create extremely small, precise square or brick-lay parts across your entire head. The smaller the sections, the finer the braids.
- Prepare Extension (Optional): If using extensions, feather small pieces of human hair braiding extensions to match the desired length and density of your natural hair section.
- Begin Braid: Take one tiny section of your natural hair. If using extensions, attach a small feathered piece to the base of your natural hair section using a small knot or feed-in method.
- Three-Strand Weave: Divide the combined hair (natural + extension) into three very thin, equal strands. Begin a standard three-strand braid.
- Maintain Precision: Weaving braids this small requires immense patience and precision. Maintain incredibly consistent, light tension to avoid pulling at the scalp, but ensure the braid is secure.
- Braid to End: Continue braiding down the length of the hair (or extension hair) until you reach the ends.
- Secure Ends: For extension hair, seal the ends by dipping them in hot water or using a small amount of glue/sealant. For natural hair, secure with tiny elastics if needed.
- Moisturize Scalp: Apply a lightweight scalp moisturizer between the braids to keep the scalp healthy and prevent dryness or itchiness, addressing a common problem_solution_keywords.
Pro-Tip: The biomechanics of hair braiding for Microbraids demands minimal tension at the root. A licensed cosmetologist advice is to take frequent breaks during installation and avoid adding too much extension hair per braid to prevent avoiding hair damage from braids and scalp irritation.

10. Glamorous Goddess Braids: Thick and Ornate Styles

Channel your inner goddess with these majestic Goddess Braids! Pin for regal inspiration.
Goddess Braids are a larger, thicker, and more ornate variation of cornrows that sit high on the scalp, offering a truly regal appearance. Often braided in intricate geometric or swirling patterns, they are designed to be glamorous braided hair suitable for special events or everyday sophistication. They frequently incorporate african hair braiding techniques mixed with loose, curly extensions to add softness and a bohemian flair to the structured look.
What You Need
- Human hair braiding extensions (curly texture optional)
- Rat-tail comb for precise parting
- Hair clips
- Strong hold braiding gel or edge control
- Lightweight sheen spray
What To Do
- Prepare Hair: Start with clean, stretched, and deeply moisturized hair. Ensure hair is fully detangled.
- Section Hair: Using your rat-tail comb, create the desired large, sweeping parts for your Goddess Braids. These can be straight, curved, or follow a specific pattern. Clip away other sections.
- Prepare Extensions: Take substantial sections of your human hair braiding extensions. If you want loose curly pieces, prepare separate, smaller curly strands.
- Begin Braid: Take a section of your natural hair from the beginning of a part. Apply strong hold braiding gel at the root. Begin an underhand (Dutch) braid, adding small pieces of extension hair gradually using the feed-in method to create thickness.
- Incorporate Loose Hair (Optional): If desiring a goddess braid look with loose strands, occasionally leave out a small section of the extension hair (or natural hair) as you braid, allowing it to fall freely or be styled into curls later.
- Maintain Thickness: Continue braiding along your part line, constantly feeding in extension hair to maintain the thick, uniform appearance characteristic of Goddess Braids. The braid should lie flat against the scalp.
- Braid to End: Once you reach the end of the scalp line, continue the braid down the length of the hair, ensuring all extension hair is securely incorporated.
- Secure & Style: Secure the ends with a small elastic, or if the braid is meant to be swept into an updo, use bobby pins. Style any loose strands as desired (e.g., finger curls).
- Finish: Lightly mist with sheen spray for a glossy finish and to minimize flyaways.
Pro-Tip: The cultural semiotics of braided hairstyles highlight Goddess Braids as a symbol of beauty and status. Expert braiding tips suggest that to truly achieve that regal look, ensuring the parts are immaculate and the added hair blends seamlessly, often using high-quality human hair extensions, is key. This is a proven method for braid retention for long-lasting styles.

11. Crafting the Iconic Lemonade Braids: Side-Swept Perfection

Sweep your style to the side with Lemonade Braids! Pin this iconic look.
Inspired by pop culture icons, Lemonade Braids are defined by their unique, side-swept architecture. They are essentially side-swept cornrows that travel from one side of the ear across the head to the other, cascading over the opposite shoulder. This iconic braid styles creates a dramatic, asymmetrical silhouette that is both elegant and edgy, serving as powerful braided hair art that frames the face beautifully.
What You Need
- Extra hold braiding gel or edge control
- Rat-tail comb for precise, curved parts
- Hair clips
- Pre-stretched braiding hair (Kanekalon) for length
- Hair shine serum
What To Do
- Prepare Hair: Start with meticulously clean, deeply conditioned, detangled, and stretched hair. Apply leave-in conditioner.
- Section Hair: Using your rat-tail comb, create an off-center part. Then, from that part, begin creating curved or diagonal partings that sweep towards one side of your head. Clip away other sections not being worked on.
- Prepare Extensions: Take sections of your pre-stretched braiding hair and feather the ends for a seamless blend.
- Begin Cornrow: Take a small section of natural hair at the beginning of a curved part. Apply extra hold braiding gel at the root. Begin an underhand (Dutch) cornrow, braiding towards the side where you want the braids to lay.
- Feed-In Extensions: As you braid, gradually feed in small pieces of extension hair using the knotless method to add length and fullness. Ensure the braids lie flat against the scalp and follow the curve of your parting.
- Maintain Consistency: Keep the size of your sections and the tension consistent to create uniform, sleek Lemonade Braids. All braids should ultimately flow in the same direction towards your chosen side.
- Braid to End: Once all your hair is incorporated into cornrows flowing to one side, continue braiding the ends of the extensions down to your desired length.
- Seal Ends: Seal the ends using the hot water method (dipping in hot water then blotting dry) or by carefully singeing (extreme caution).
- Finish: Apply hair shine serum to the braids for a glossy finish and use a small amount of gel to smooth down any remaining flyaways, ensuring a polished look.
Pro-Tip: The advanced knotless braiding techniques are especially beneficial for Lemonade Braids as they allow for a smoother transition from the scalp, minimizing tension while creating braided styles that maintain their sleek, side-swept appearance. Consistent curving of the parts is a proven method for braid retention.
Key Takeaways: Your Quick Guide to Hairstyles With Braids
To truly master hairstyles with braids, it’s helpful to recap the essential principles that apply across all styles. Whether you are attempting a simple plait or complex architectural cornrows, these core tenets ensure success and style longevity.
- Variety is Key: Our guide explored 11 distinct hairstyles with braids, from the classic French to the intricate Lemonade, proving versatility for every occasion and hair type.
- Preparation is Paramount: Always start with properly prepared hair—clean, detangled, and often moisturized or stretched—to ensure neat and long-lasting braided styles.
- Tension Management is Critical: Whether installing braids or creating braided styles, consistent but gentle tension at the scalp is vital to prevent avoiding hair damage from braids and promote scalp health braids.
- Product Selection Matters: Using the right braiding hair products like gels, mousses, and scalp oils can significantly impact the ease of braiding hair, the neatness of the final look, and maintaining braids.
- Master Specific Techniques: Each braid type, from the underhand weave of Dutch braids to the pull-through method, requires mastery of specific braiding techniques for optimal results and proven methods for braid retention.
- Embrace Protective Styling: Many hairstyles with braids, especially Box Braids and Knotless Braids, are fantastic protective braid styles that can aid hair growth and minimize daily manipulation.
- Long-Term Care: Proper braid maintenance tips including moisturizing the scalp, covering at night, and gentle washing, are essential for extending braid life and keeping your braided hairstyles looking fresh.
People Also Ask About Hairstyles With Braids
Navigating the world of braided hairstyles often leads to specific questions about technique, maintenance, and hair health. Below, we address the most common inquiries to ensure you have complete confidence in your styling choices.
What are the most popular braided hairstyles for 2026?
For 2026, the most popular hairstyles with braids include Knotless Box Braids, classic French Braids, versatile Cornrows, and elegant Goddess Braids, reflecting a trend towards comfortable, stylish, and protective styling. These styles are favored for their ability to protect natural hair, offer long-lasting wear, and provide a foundation for diverse looks, from casual to formal, often seen with added hair extensions for length and volume.
How to maintain braided hairstyles for longevity?
To maintain braided hairstyles effectively, prioritize scalp health by regularly applying lightweight oils or sprays to prevent dryness and itchiness. Cover your braids with a silk scarf or bonnet at night to reduce frizz and friction, and gently cleanse your scalp with diluted shampoo as needed. Avoid excessive pulling or tension and consider using a satin pillowcase to extend braid life and neatness.
Are braids damaging to hair, and how can I prevent it?
Braids are not inherently damaging, but improper installation and maintenance can lead to issues like hair breakage from braids or traction alopecia. Prevent damage by ensuring your braids are not too tight, especially at the hairline, and avoid leaving them in for excessively long periods. Always choose protective braid styles that prioritize scalp comfort, and ensure preparing hair for braids includes thorough detangling and moisturizing.
What hair products are best for braided hairstyles?
The best hair products for braided hairstyles include lightweight braiding gels or edge control for neat parts, moisturizing foams or mousses for body, and anti-itch scalp oils for comfort. Look for products specifically formulated for braid maintenance that nourish your scalp and hair without causing buildup, addressing common problem_solution_keywords like dry scalp or frizz.
What is the difference between a French braid and a Dutch braid?
The primary difference lies in the weaving technique: a French braid involves crossing hair sections over the middle strand, creating a seamless, woven-in look. In contrast, a Dutch braid involves crossing hair sections under the middle strand, resulting in a raised, more prominent braid that sits on top of the hair. This key distinction changes the visual texture and definition of the braided hairstyles.
Can you braid short hair, and what styles work best?
Yes, you can absolutely braid short hair, opening up many stylish possibilities for hairstyles with braids. Styles like micro-braids, small cornrows, French braids that start very close to the hairline, or half-up Dutch braids work exceptionally well. Easy braided hairstyles for beginners with short hair often involve adding minimal extensions for length or experimenting with small, intricate braid patterns for a chic, textured look.
How to do quick braided updos for special occasions?
For quick braided updos, consider starting with two simple French or Dutch braids at the temples and joining them at the back, or create a loose side braid and pin it up. Alternatively, a messy bun with braids can be effortlessly elegant. Adding hair accessories for braids can instantly elevate a simple braid into a sophisticated formal braided style, proving braids offer immense versatility.
How long do braids typically last?
The longevity of braided hairstyles varies significantly depending on the type of braid, hair texture, and maintenance routine, but generally ranges from 4 to 8 weeks. Smaller, tighter protective braid styles like Box Braids or Microbraids can last longer, while looser styles like a French or Dutch braid are typically temporary. Proven methods for braid retention include proper care and avoiding excessive manipulation to extend braid life.
What tools do I need for braiding hair at home?
For braiding hair at home, essential tools include a fine-tooth rat-tail comb for precise parting, hair clips for sectioning, and good quality hair elastics. Depending on the style, you might also need hair extensions, braiding gel or edge control, and a detangling brush. These braiding tools are crucial for creating braided styles with neatness and a professional finish.
What are some common solutions for an itchy scalp with braids?
An itchy scalp with braids is a common problem_solution_keywords that can be alleviated by applying lightweight, anti-itch scalp oil for protective styles or a witch hazel spray directly to the scalp. Ensure your braids aren’t too tight, avoid excessive scratching, and gently cleanse your scalp with a diluted astringent or specialized braid shampoo to remove buildup without disturbing your braided hairstyles.
Final Thoughts on Hairstyles With Braids
Choosing to wear hairstyles with braids is more than just a styling choice; it’s a statement of versatility, protection, and often, cultural pride. From the timeless elegance of a French Braid to the intricate braid patterns of Knotless and Lemonade Braids, each of the 11 proven methods for braid retention we’ve explored offers a unique way to express yourself and protect hair. We’ve delved into the essential braiding techniques, the braiding tools and products needed, and expert braiding tips to help you master your braids with confidence.
Remember, the key to successful braided hairstyles lies in meticulous preparation, consistent tension, and diligent braid maintenance tips. By applying the insights from this definitive guide, you’re not just creating a look; you’re investing in the health and beauty of your hair. Don’t be afraid to experiment, adapt these styles to your unique hair type and preference, and truly make them your own.
Which of these 11 proven braid styles are you excited to try first? Share your favorite braided hair looks in the comments below
Last update on 2026-04-27 / Affiliate links / Images from Amazon Product Advertising API