Ever scroll through endless, complex nail art, wishing for something festive you can actually do? You want to celebrate the season with a cute manicure but lack the time, tools, or pro-level skills for intricate designs. Finding genuinely simple christmas nails that look chic and polished feels like an impossible task.
You can create beautiful, simple Christmas nails at home using basic tools and easy-to-follow techniques. Start with classic holiday colors like red, green, white, and gold, focusing on minimalist designs like a single accent nail, a subtle glitter gradient, or easy-to-paint motifs for a festive look without the complexity. It’s all about choosing the right design that delivers maximum holiday cheer with minimum effort.
Drawing from proven simple techniques and tested methods, this guide is designed for beginners. We’ll walk you through 7 essential, totally achievable DIY holiday designs that look amazing on any nail length. Get ready to discover how to create a festive, salon-quality manicure right from your own home.
How to Do Simple Christmas Nails at Home? A Beginner’s Guide
Getting into the holiday spirit with a festive manicure shouldn’t be stressful. The secret to beautiful DIY christmas nails isn’t about having an artist’s steady hand; it’s about using smart, simple techniques and the right basic tools. This guide is built for beginners and anyone looking for a quick and easy way to add a touch of Christmas cheer to their look. We’ll focus on methods that are forgiving, fast, and deliver a professional-looking result without the fuss. Forget complicated tutorials and get ready for genuinely easy christmas nails that you’ll be proud to show off at every holiday gathering.
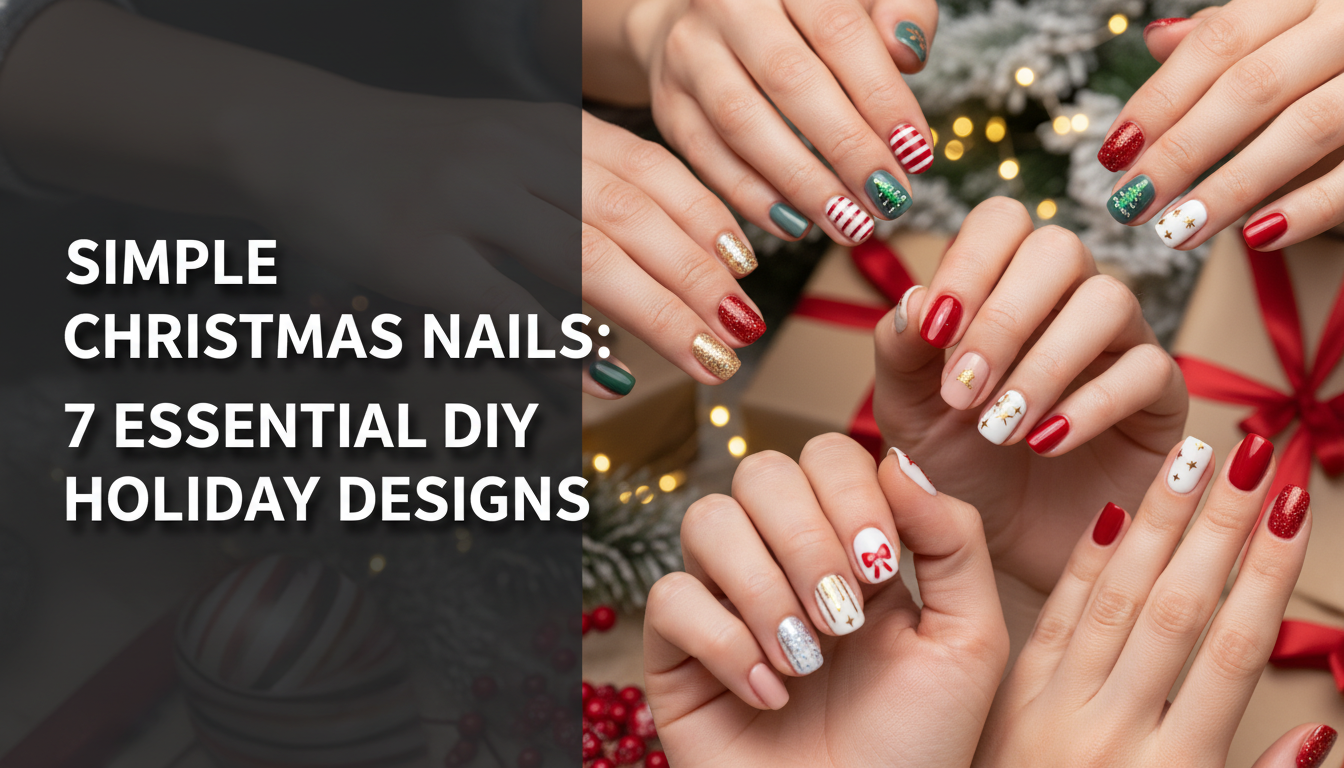
7 Essential DIY Holiday Designs for simple christmas nails in 2026
Ready for some festive fun? We’ve curated 7 of the most essential and achievable designs for simple christmas nail designs. Each tutorial is broken down into two parts: the exact products you’ll need and the step-by-step process to get the look. These designs prove that you don’t need to be a nail artist to have stunning holiday nails. From a classic candy cane to an elegant gold foil look, there’s an idea here for every style and skill level.
1. Create a Classic Candy Cane Accent Nail

Pin this classic holiday look to your ‘Festive Nails’ board!
Products & Tools Used
- Opaque white nail polish (e.g., a “creme finish” for full coverage)
- Red glitter nail polish or a fine-tipped red nail art pen
- Thin nail art striping tape (optional, for super straight lines)
- A high-gloss quick-dry top coat
Application Steps
- Prep and Paint: Start with a clean, prepped nail. Apply two coats of the opaque white polish to your chosen accent nail (usually the ring finger), allowing it to dry completely.
- Create Stripes: If using tape, place thin strips diagonally across the nail. Carefully paint the red glitter polish in the spaces between the tape. If free-handing, use a thin brush or nail art pen to draw 3-4 delicate diagonal lines.
- Reveal & Refine: If you used tape, gently peel it off while the red polish is still slightly wet to ensure a crisp line.
- Seal the Deal: Wait 2-3 minutes for the stripes to set, then apply a generous layer of your high-gloss top coat to smooth everything out and add shine.
Pro-Tip: For a truly professional finish at home, cut your striping tape pieces before you start painting. This prevents smudging your base coat while fumbling with the tape roll.

2. Style a Subtle Glitter Gradient

So elegant! Pin this sparkly idea for your holiday parties.
Products & Tools Used
- A neutral or sheer pink base coat
- A chunky or fine glitter polish (gold, silver, or green are great for Christmas)
- A small piece of a disposable makeup sponge
- A quick-dry top coat
Application Steps
- Apply Base: Paint one to two coats of your neutral base color on all nails and let them dry completely.
- Load the Sponge: Paint a small amount of the glitter polish directly onto the corner of the makeup sponge. The sponge will absorb most of the clear polish, leaving just the concentrated glitter.
- Dab and Fade: Gently dab the glitter-loaded sponge onto the nail, starting at the tip and fading it down towards the cuticle. For a reverse gradient, start at the cuticle and fade out. Apply more pressure where you want the glitter to be most dense.
- Seal and Smooth: The glitter will have a slightly rough texture. Apply two coats of a good top coat to make it perfectly smooth and shiny.
Pro-Tip: A common mistake is applying the glitter polish directly from the brush, which results in a sparse, uneven look. Using a makeup sponge is a proven simple technique that gives you total control over glitter placement.

3. Paint a Simple Holly Leaf Accent

So cute and easy! Pin this holly design for a touch of Christmas.
Products & Tools Used
- A nude, white, or light grey base polish
- A dark green nail polish
- A bright red nail polish
- A dotting tool (or the tip of a bobby pin/toothpick)
- A quick-dry top coat
Application Steps
- Set the Stage: Apply two coats of your chosen base color and let it dry.
- Create the “Leaves”: Dip your dotting tool into the dark green polish. Place two dots side-by-side. Then, using the same tool, gently drag the polish outward from each dot to create a simple, pointed leaf shape.
- Add the Berries: Clean your dotting tool. Dip the tip into the red polish and place three small dots in a cluster at the base of your two leaves.
- Protect Your Art: Wait at least 5 minutes for the design to dry, then float a thick layer of top coat over the nail to avoid smearing your work.
Pro-Tip: When choosing colors, think about color theory for festive nail designs. A deep, forest green and a true berry red will look more sophisticated and modern than primary shades of green and red.

4. Design an Easy Snowflake Dot Pattern

Pin this simple winter look for chic holiday nails!
Products & Tools Used
- A dark base color (navy blue, deep red, or forest green work well)
- A highly-pigmented, opaque white polish
- A dotting tool with at least two different sized ends (or a toothpick and a bobby pin)
- A matte or glossy top coat
Application Steps
- Create Your Canvas: Apply two coats of your dark base color. If you’re using a matte top coat, apply it now and let it dry completely.
- Dot the Center: Using the larger end of your dotting tool, place a single white dot where you want the center of your snowflake to be.
- Add Main Spokes: Clean the tool. Use the same large end to place four dots around the center dot in a ‘plus sign’ (+) shape.
- Add Smaller Details: Use the smaller end of your dotting tool to place smaller dots in between the main spokes, creating a starburst or asterisk (*) shape. Scatter a few extra tiny dots around the nail for a “falling snow” effect. Let dry, then seal with a glossy top coat (if you didn’t use a matte one earlier).
Pro-Tip: For the cleanest dots, use a white polish with high pigment density. Sheer or streaky polishes will result in transparent-looking dots. A good “stamping” polish often works best for art like this.

5. Apply a Festive French Tip Sparkle

A festive twist on a classic! Pin this sparkly French tip idea.
Products & Tools Used
- A sheer pink or nude base polish
- A glitter polish in a festive color (green, red, silver, or gold)
- A quick-dry top coat
Application Steps
- Apply Base: Start with two coats of your sheer base polish and allow it to dry completely.
- Paint the Tip (The Hack): Instead of trying to paint a perfect line, hold your finger still and bring the polish brush toward it. Place the brush down just past the center of your nail tip. Roll your finger away from the brush, letting the natural curve of your finger create a perfect curved line.
- Perfect the Line: Use the brush to fill in the rest of the tip on both sides. If you made any mistakes, clean them up with a small brush dipped in acetone before the polish dries.
- Add Shine: Let the tips dry for a few minutes, then apply a top coat to all nails for a cohesive, glossy finish.
Pro-Tip: This is a nail technician recommended method: To prevent a thick, bulky tip, wipe most of the polish off the brush before application. It’s better to apply two thin coats on the tip than one thick, goopy one.

6. Create a Minimalist Dot Wreath

Pin this chic and modern holiday nail idea for a minimalist look!
Products & Tools Used
- A base color (white, nude, or light blue work well)
- A green nail polish
- A red glitter polish
- A fine-tipped dotting tool or a toothpick
- A quick-dry top coat
Application Steps
- Apply Base Coat: Paint two coats of your chosen base color and let it dry completely.
- Dot the Wreath: Dip your fine-tipped dotting tool in the green polish. Carefully place small dots in a circle shape, leaving a small gap at the bottom. Don’t worry if it’s not a perfect circle!
- Add the “Bow”: Clean the tool. Dip it into the red glitter polish and place a single dot in the gap at the bottom of your wreath to represent a bow.
- Seal It: Wait for the dots to dry fully (about 5-10 minutes), then apply your top coat to protect the design.
Pro-Tip: The ergonomics of nail art tools matters. Hold your dotting tool like a pencil, perpendicular to the nail, and use a light, quick “up-and-down” motion. Don’t press and drag, as this will create ovals instead of round dots.

7. Get an Elegant Red and Gold Foil Look

Pin this luxurious-yet-easy design for an instantly chic holiday manicure!
Products & Tools Used
- A classic red nail polish
- Gold foil flakes for nail art
- A pair of tweezers
- A “sticky” base coat or specialized foil glue (optional)
- A thick, gel-like top coat
Application Steps
- Paint Your Base: Apply two coats of your classic red polish. Let the second coat dry for about a minute until it’s tacky, but not fully wet.
- Apply the Foil: Using tweezers, pick up small flakes of the gold foil and gently press them onto the tacky polish. Place them randomly for an abstract, modern look.
- Press and Secure: Gently pat the foil flakes down with your fingertip or a silicone tool to ensure they are flat against the nail.
- Encapsulate: This is the most important step. Apply two thick coats of a gel-like top coat to completely cover the foil flakes and create a smooth, glossy surface.
Pro-Tip: For the best results, use a “sticky” base coat or a dedicated foil glue. These products act as adhesion promoters, creating the perfect tacky surface for the foil to grab onto, ensuring it lasts longer without peeling.

Key Takeaways
Achieving a beautiful holiday manicure is easier than you think. By focusing on simple techniques and embracing minimalist designs, you can create a festive look that is both elegant and stress-free.
- Tools Are Your Friend: You don’t need artistic skill. A dotting tool, a makeup sponge, and gold foil flakes can create impressive designs with almost no effort.
- Accent Nails Are a Great Start: If you’re nervous, start by trying a design on just one nail per hand (the “accent nail”). It provides a festive touch without the commitment of a full set of art.
- Preparation is Key: Always start with clean, dry nails and a good base coat. This is the single most important factor for making your simple christmas manicure last longer.
- The “Tacky” Stage is Your Friend: For applying things like foil or decals, applying them when the base polish is tacky (not wet, not fully dry) provides the best adhesion.
- Top Coat is Not Optional: A good, quick-dry top coat is essential. It smooths out textures from glitter or foil, adds professional-level shine, and protects your DIY christmas nails from chipping.
- Embrace Simplicity: A few well-placed dots or a touch of glitter often looks more elegant and sophisticated than a busy, complicated design. Less is more!
FAQs About simple christmas nails
What supplies do I need for simple Christmas nail art?
For most beginner designs, you only need a few basics. Essential supplies include your chosen nail polish colors (red, green, white, glitter), a good base and top coat, and a simple dotting tool. A toothpick or a bobby pin can work as a dotting tool in a pinch. For cleaner lines, thin nail art tape is also a great, inexpensive tool to have.
How do I make my simple Christmas nails last longer?
Proper preparation and sealing are the keys to longevity. Always start by wiping your nails with alcohol to remove oils. Use a quality base coat. After painting your design, “wrap the tip” by running the top coat brush along the free edge of your nail. This chip-resistant seal is a professional technique that dramatically extends the life of your manicure.
What are good simple Christmas nail ideas for short nails?
Minimalist designs and vertical patterns work best for short nails. Ideas like a subtle glitter gradient, a single accent nail with a small holly or snowflake design, or a festive French tip (which creates the illusion of length) are perfect. Avoid large, horizontal patterns that can make short christmas nails look wider.
Can I do these designs with gel polish?
Yes, all of these designs can be adapted for gel polish. The process is the same, but you must cure each layer (base, color, art, top coat) under an LED or UV lamp as directed. The main benefit is that your simple gel christmas nails will last for two weeks or more without chipping. Just remember to use “no-wipe” top coats for applying foils or chrome powders.
What’s the easiest Christmas nail design for a total beginner?
The easiest high-impact design is the gold foil method (Idea #7). Since it’s abstract, there’s no way to make a mistake. You simply press foil onto tacky polish. The second easiest is the glitter gradient using a sponge (Idea #2), as it requires no precision and is very forgiving for someone with no artistic skill.
How to make Christmas nails look professional but simple?
Focus on clean execution and a high-gloss finish. Make sure your cuticles are pushed back and your application is neat. A high-quality, plump “gel-like” top coat is the most important product. It smooths over minor imperfections and provides that ultra-shiny, durable finish that makes any simple design look professional.
What are the best simple Christmas nail colors?
You can’t go wrong with the classic trio: red, green, and white. For a more modern or elegant simple look, consider jewel tones like emerald green and deep burgundy. Metallic shades like gold, silver, and champagne are also essential for adding a festive, light-catching sparkle to any design.
How do you paint Christmas nails on kids?
Use non-toxic, peel-off or water-based polish and choose extremely simple designs. The dot wreath (Idea #6) or a simple glitter top coat are perfect simple christmas nails for kids. The key is speed, so use a quick-dry polish and focus on one or two accent nails rather than trying to do art on all ten fingers.
How do you do a simple Christmas French tip?
Use a festive glitter polish instead of the classic white. After your sheer base coat is dry, use the “roll away” method: hold your finger still and roll your nail against the brush to create a natural curve. This is much easier than using guide stickers. A thin line of silver or red glitter on the tip is a classy, simple, and festive look.
Are press-on nails a good option for simple Christmas nails?
Absolutely, press-on nails are a fantastic solution. Many brands offer beautiful, simple christmas press on nails with pre-made designs. They offer a perfect, professional look in minutes with no drying time or artistic skill needed. They are a great quick fix for holiday nails if you are short on time.
Final Thoughts on Your Festive DIY Manicure
Creating your own festive manicure is a small but wonderful way to celebrate the holiday season. As we’ve explored, you don’t need an arsenal of complex tools or years of practice to achieve beautiful simple christmas nails. By embracing minimalist designs, using clever hacks like the sponge gradient or dotting tool patterns, and focusing on clean execution, you can create a look that is both personal and polished. Remember that the goal is to have fun and express your holiday spirit. These proven simple techniques are just a starting point, so feel empowered to mix colors, try different accent nails, and make these designs your own.
Last update on 2026-04-13 / Affiliate links / Images from Amazon Product Advertising API