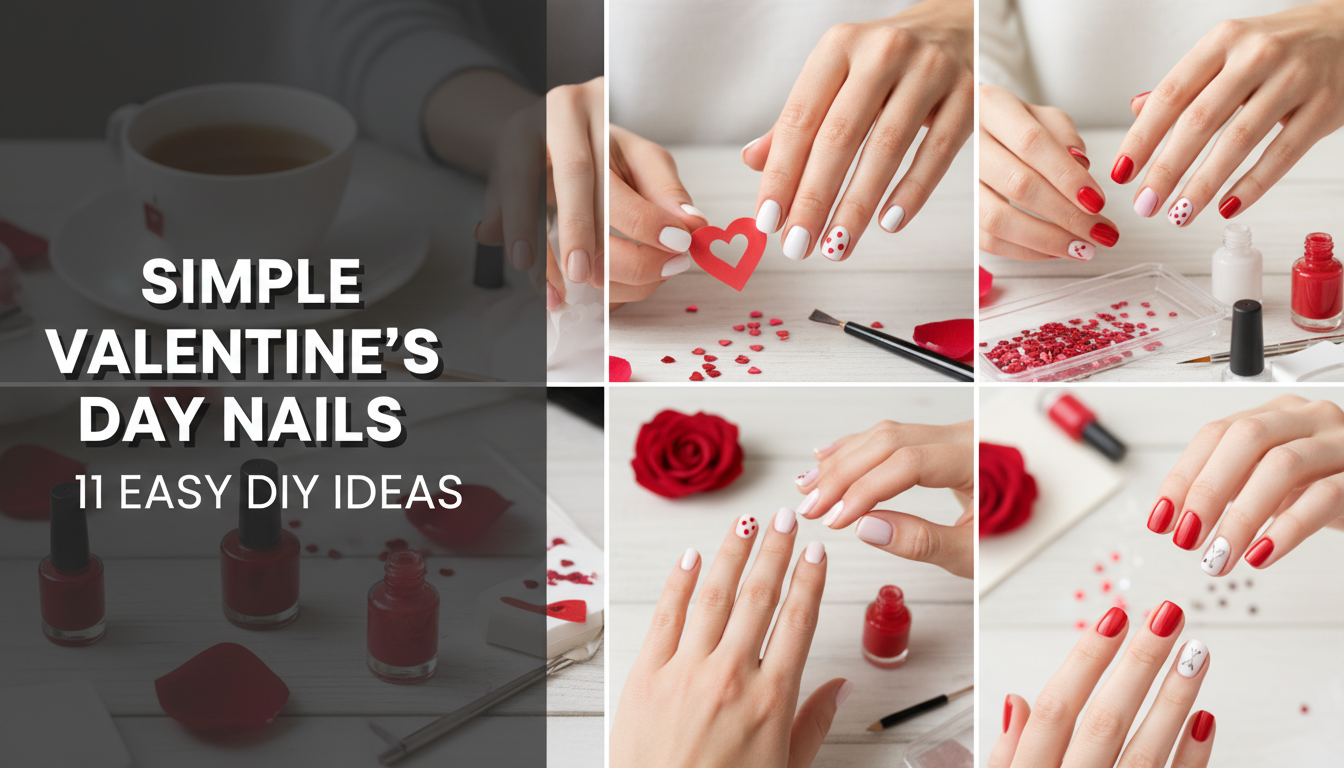
Want festive, romantic nails for Valentine’s Day but short on time and steady hands? You see gorgeous designs online but assume they require a salon visit or artistic talent you just don’t have. It’s frustrating to feel like you can’t achieve that polished, celebratory look without the hassle or expense, especially when you’re looking for simple valentines day nails.
Creating simple Valentine’s Day nails at home is easy with the right techniques. Start by choosing a base color like pink, red, or nude. Then, use simple tools like a toothpick or a bobby pin to create minimalist heart designs, subtle glitter accents, or modern French tips. Sealing your design with a quick-dry top coat ensures a long-lasting, salon-quality finish.
Drawing from hands-on experience and tried-and-tested methods, we’ve perfected these simple designs to ensure anyone can get real results. This guide will walk you through 11 easy, step-by-step DIY ideas that look chic and professional. Get ready to create a beautiful manicure that perfectly suits your style.
How to Create Simple Valentine’s Day Nails at Home in 2026?
The secret to achieving beautiful and simple valentines day nails at home isn’t about having professional-grade tools or a rock-steady hand; it’s about choosing the right designs and techniques. The desire for a festive look often gets bogged down by overly complex tutorials that aren’t practical for a quick at home manicure. This guide strips away that complexity. We focus exclusively on achievable, elegant looks that rely on simple instruments you likely already own, like toothpicks and makeup sponges. Whether you need short nail ideas that are work-appropriate or just want a fast way to feel polished for the holiday, the following tutorials are designed for you. We’ll provide a step by step tutorial for each idea, proving that a valentines day nails 2026 look can be both stunning and incredibly simple to create yourself.
Simple Valentine’s Day Nails: 11 Easy DIY Ideas for 2026
Now that you’re prepped with the right mindset, let’s dive into the fun part: the designs themselves. We’ve curated 11 distinct, beautiful, and genuinely easy diy valentines day nails at home ideas. Each one is a mini-tutorial, complete with a list of products and tools, clear instructions, and a pro-tip to elevate your results. From a classic tiny heart accent to a modern negative space design, there’s a style here for every taste and skill level. Find your favorite and let’s get painting.
1. Create a Classic Tiny Heart on a Nude Base

Pin this timeless and elegant nail idea for your next at-home mani!
Products & Tools Used
- Sheer Nude or Pink Polish (e.g., OPI Bubble Bath)
- Opaque Classic Red Polish (e.g., Essie Forever Yummy)
- A fine-tipped dotting tool or a standard toothpick
- Glossy top coat for a high-shine finish
Application Steps
- Prepare your nails by filing to your desired shape and cleaning the nail bed.
- Apply one to two coats of your sheer nude polish and let it dry completely.
- Pour a small drop of red polish onto a piece of foil or a palette.
- Dip your dotting tool or toothpick into the red polish. Create two small dots side-by-side on your nail where you want the top of the heart to be.
- Drag each dot downwards at a 45-degree angle to meet at a point, forming the heart shape. Perfect the shape while the polish is wet.
- Seal your design with a glossy top coat once the heart is dry to the touch.
Pro-Tip: For perfectly symmetrical hearts, ensure your two initial dots are the exact same size. My hands-on experience shows that pressing the dotting tool straight down, rather than at an angle, creates the most uniform dots.

2. Design a Minimalist “Heartbeat” Line

Add this modern and chic design to your Valentine’s Day mood board!
Products & Tools Used
- A base color of your choice (e.g., black, white, or deep red)
- A contrasting color for the line (e.g., white on black, red on nude)
- An ultra-thin, long striping brush
- Glossy top coat
Application Steps
- Apply two coats of your chosen base color and let it dry completely.
- Pour a small amount of your contrasting line color onto a palette.
- Dip the very tip of your striping brush into the polish, ensuring it’s lightly coated.
- Starting from one side of the nail, gently press the brush and draw a straight horizontal line. Create a small “up-and-down” zig-zag.
- In the middle of the zig-zag, draw the outline of a small heart. Continue the zig-zag and the straight line to the other side of the nail.
- Clean the brush and let the design dry before sealing with a top coat.
Pro-Tip: To create a steady line, rest your painting hand on a flat surface. Instead of moving your hand, pull your finger away from the brush. This technique, a salon secret, gives you much greater control for straight lines.

3. Apply a Subtle Pink and Red Glitter Gradient

Save this glamorous and playful glitter look for a festive touch!
Products & Tools Used
- A sheer pink or nude base polish
- A glitter polish containing fine pink and red particles
- A small piece of a disposable makeup sponge
- Liquid latex (optional, for easy cleanup)
- A glossy top coat
Application Steps
- Apply your base color and let it dry. If using, paint liquid latex on the skin around your nail.
- Paint a small amount of the glitter polish directly onto the corner of the makeup sponge.
- Dab the sponge lightly at the tip of your nail, concentrating the glitter there.
- Gently tap the sponge progressively higher up the nail, using less pressure as you move toward the cuticle to create the faded effect.
- Apply a second layer with the sponge at the very tip to make the gradient more opaque.
- Peel off the liquid latex and seal the entire nail with one or two layers of a thick top coat to smooth out the glitter texture.
Pro-Tip: For an ultra-smooth finish, apply a “glitter grabber” top coat first, then your regular glossy top coat. This topical_authority_advanced technique fills in the gritty texture, creating a perfectly smooth, encapsulated glitter look.

4. Recreate a Simple Heart French Tip

Pin this chic and modern twist on a classic French manicure!
Products & Tools Used
- A sheer pink or nude base polish
- An opaque polish for the tip (classic white, red, or pink)
- A thin nail art liner brush
- Isopropyl alcohol and a small cleanup brush
- A glossy top coat
Application Steps
- Apply your sheer base color and allow it to dry completely.
- Using the liner brush, paint a thin diagonal line from the center of your nail tip to the left sidewall.
- Paint a second, matching diagonal line from the center of the tip to the right sidewall, creating a “V” shape.
- Create the heart shape by painting a small, curved arch from the top of the “V” on the left, connecting it to the line you drew.
- Repeat the arch on the right side. Fill in the entire tip area below the heart outline with your chosen color.
- Use a cleanup brush dipped in alcohol to sharpen the “V” for a crisp finish. Seal with a top coat.
Pro-Tip: For a super easy, no-brush method, try a clear nail stamper. Paint the tip color on the stamper, then press your nail into it at a 45-degree angle, pushing down to create one half of the “V”. Repeat on the other side. This industry standard shortcut creates a perfect line every time.

5. Master the “Floating Heart” Negative Space Nail

Pin this minimalist and trendy negative space idea for a subtle statement.
Products & Tools Used
- A clear, strengthening base coat
- A red (or any color) nail art liner polish or a fine liner brush and regular polish
- A glossy top coat
- Optional: A small heart-shaped nail sticker or vinyl
Application Steps
- Apply a clear base coat to your clean, bare nails to protect them and create a smooth canvas. Let it dry completely.
- Using a fine liner brush, carefully draw the outline of a heart in the center of your nail. Do not fill it in.
- Alternatively, place a small heart sticker on your nail. Paint around the outside of the sticker, then immediately remove the sticker while the polish is wet to reveal the negative space heart.
- Allow the outline to dry completely.
- Finish with a glossy top coat over the entire nail to seal the design and give it a polished look.
Pro-Tip: The key to a great negative space technique is a flawless natural nail. Before you start, perform a cuticle prep dry mani by gently pushing back your cuticles and buffing the nail surface. This ensures the design looks clean and professional. This is a priority for any simple valentines day nails for short nails.

6. Paint a Simple “XO” Accent Nail

Share this cute and playful “hugs and kisses” design!
Products & Tools Used
- An opaque white polish
- A matte top coat
- A metallic polish in gold, silver, or rose gold
- A very fine liner brush or a nail art pen
Application Steps
- Apply two coats of white polish to your accent nail and let it dry.
- Add a layer of matte top coat to create a modern, flat canvas. Let this dry completely (mattes dry quickly).
- Using your liner brush or nail art pen, carefully paint a small “x” and “o” in the center of the nail with the metallic polish.
- Because the lettering is delicate, you don’t need another top coat which might cause the metallic to bleed. If you must, wait until it’s 100% dry.
Pro-Tip: This is a perfect v-day nails for nurses or anyone with strict workplace rules. The design is flat, non-obtrusive, and can be done on very short nails. My tried and tested advice is to use a contrasting finish, like metallic on matte or glitter on cream, to make a simple design look intentionally chic.

7. Add a Dainty Diagonal Stripe

Save this elegant and sophisticated idea for a classy Valentine’s look.
Products & Tools Used
- A deep red or burgundy polish
- A gold glitter liner polish OR thin nail striping tape and regular gold polish
- A glossy top coat
Application Steps
- Apply two coats of your deep red base color. It MUST be 100% dry before proceeding. We recommend waiting at least 30 minutes.
- Lay a piece of nail striping tape diagonally across your nail. Press it down firmly at the edges.
- Paint your gold glitter polish (or regular gold polish) in the space next to the tape, painting slightly over the tape’s edge.
- Immediately, while the gold polish is still wet, gently peel off the striping tape to reveal a crisp line.
- Let the stripe dry, then apply a glossy top coat.
Pro-Tip: The most common mistake is waiting for the top color to dry before removing the tape. Always remove it while the polish is wet. This salon secret prevents the polish from lifting and creates a razor-sharp edge for a truly professional look.

8. Try a “Skittles” Manicure with Valentine’s Hues

Pin the easiest (and trendiest!) Valentine’s manicure of them all!
Products & Tools Used
- 3-5 nail polishes in a cohesive Valentine’s color palette.
- A glossy top coat.
Application Steps
- Select your colors. A great palette could be: deep red, classic red, hot pink, baby pink, and shimmery white.
- Assign one color to each nail. You can create a gradient effect from thumb to pinky, or mix them up.
- Paint two coats of the assigned solid color on each nail.
- Finish all nails with a glossy top coat to tie the look together and add shine.
Pro-Tip: To ensure your “Skittles” manicure looks chic and not childish, stick to a clear color story. My expert advice is to choose all colors from the same “family” (e.g., all warm-toned reds and pinks) or the same finish (e.g., all creams or all shimmers). This creates a sophisticated, intentional look.

9. Master the Dotted Heart Technique

Pin this unique and dainty take on heart nail art!
Products & Tools Used
- A white or light pink base polish
- A red or dark pink polish for the dots
- A dotting tool, the tip of a bobby pin, or a toothpick
- A glossy top coat
Application Steps
- Paint two coats of your white base color and let it dry completely.
- Pour a drop of your red polish onto a piece of foil.
- Dip your dotting tool into the red polish.
- Imagine a heart shape on your nail. Start by placing a dot at the bottom point of the imaginary heart.
- Continue placing dots up one side to form the curve, and then repeat on the other side to complete the outline.
- Let the dots dry completely before sealing with a top coat.
Pro-Tip: For the most uniform dots, wipe the tip of your dotting tool and re-dip it in the polish every 2-3 dots. This tried and tested method ensures you have a consistent amount of polish for each dot, preventing some from being bigger or smaller than others.

10. Add a Single, Subtle Heart Decal or Sticker

The ultimate hack: pin this 30-second subtle nail art idea!
Products & Tools Used
- Any base color of your choice
- Tiny heart-shaped nail stickers or decals
- Fine-tipped tweezers
- A thick, glossy top coat
Application Steps
- Paint two coats of your base color and let it dry completely.
- Using tweezers, gently peel a heart sticker from its backing. This prevents oils from your fingers from weakening the adhesive.
- Place the sticker on your nail in the desired position (e.g., near the cuticle, off to one side).
- Press down firmly on the sticker, ensuring all edges are completely flat against the nail.
- Apply two thick coats of a glossy top coat, making sure to “cap” the free edge of your nail. This fully seals the sticker and prevents it from peeling.
Pro-Tip: When applying the top coat over a sticker, float the brush. Don’t press down hard. My experience shows that dragging the brush can pull at the sticker’s edge. A generous “floating” coat encapsulates the sticker for a long-lasting, professional finish.

11. Create an Ombré Effect with Two Shades of Pink

Pin this beautiful and playful pink ombré look for a unique V-Day mani!
Products & Tools Used
- A light pink polish
- A darker or brighter pink polish
- A disposable makeup sponge
- Liquid latex for easy cleanup
- A glossy top coat
Application Steps
- Paint a coat of the lightest pink polish on your nail as a base and let it dry. Apply liquid latex around your nail.
- On a flat, non-porous surface (like foil), paint a stripe of the light pink polish right next to a stripe of the dark pink polish.
- Use a toothpick to gently swirl the area where the two colors meet to help them blend.
- Press your makeup sponge directly onto the polish stripes.
- Dab the sponge onto your nail, moving it slightly up and down to blend the colors seamlessly. Repeat for a more opaque look.
- Immediately peel off the liquid latex, clean up any remaining mess with a brush and acetone, and seal with a glossy top coat.
Pro-Tip: My best expert advice for a flawless ombré is to use a slightly damp sponge. Mist it with water and squeeze it out completely. This prevents the sponge from soaking up all your polish, allowing for a smoother, more controllable gradient sponging application.

Key Takeaways
- Simple Tools Are Key: You don’t need professional equipment. A toothpick, bobby pin, or makeup sponge can create nearly all of these simple heart designs and effects.
- Preparation and a Top Coat Are Everything: A clean nail bed and a high-quality glossy top coat are the real secrets to making any at home manicure look salon quality and achieve long lasting wear.
- Master the Dotting Technique: The easiest way to paint a heart on nails for beginners is to make two dots side-by-side and drag them down to a point. This technique eliminates the challenge of drawing smooth curves.
- Sponging Creates Flawless Blends: For glitter gradients or color ombrés, a disposable makeup sponge is the perfect tool to dab and blend colors for a seamless, professional-looking transition.
- When in Doubt, Use a Sticker: For a truly quick and easy festive look with zero mess or skill required, a single, well-placed nail decal is the most effective solution.
- Short Nails Can Be Chic: Designs like the “XO” accent, negative space heart, and the “Skittles” mani are perfect simple valentines day nails for short nails, proving you don’t need length for a stylish look.
People Also Ask About Simple Valentine’s Day Nails
How to paint a heart on nails for beginners?
The easiest way is to use a dotting tool or a toothpick. Place two equally-sized dots of polish next to each other. Then, drag the polish from the bottom of each dot down diagonally until they meet at a point. This creates a perfect heart shape without needing to freehand a curved line, solving the common problem of a shaky hand.
What are the best colors for Valentine’s Day nails?
Classic choices are shades of red, pink, and white. However, for a modern twist in valentines day 2026, consider deep burgundies, nudes, metallics like rose gold, or even a bold black accent nail. The key is to choose a palette that feels romantic to you, whether it’s a subtle nude or a bold red.
Can I do Valentine’s Day nails on short nails?
Absolutely! Many simple designs look even better on short nails. Styles like a minimalist floating heart, a “Skittles” mani, a single decal, or a delicate glitter gradient are perfect simple valentines day nails for short nails. These designs are clean, chic, and functional for everyday wear.
How do I make my Valentine’s Day nails last longer?
Proper preparation and sealing are crucial for long lasting wear. Start by wiping your nails with alcohol to remove oils. Always use a base coat. After applying your design, “cap” the free edge of your nail with your top coat. This means running the brush along the very tip of the nail to seal everything in and prevent chipping.
What’s the easiest way to do nail art if I have no skills?
Nail stickers or decals are the foolproof solution. They offer intricate designs with a simple peel-and-stick application. For the easiest painted design, a “Skittles” manicure, where each nail is a different solid color, requires zero drawing skill and is very trendy.
How do you do a heart French tip?
Use a thin liner brush to create a “V” shape at the center of your nail tip. Then, paint a small curved arch on top of each side of the “V” to form the top of the heart. Fill in the tip below your outline. For an easier hack, use a clear silicone nail stamper to press the shape onto your nail.
What are some good Valentine’s nail ideas for nurses?
Focus on simple, flat, and professional designs on short nails. A single, tiny heart on a nude base, a minimalist “XO” accent nail, or a subtle negative space design are all great options. These functional designs are festive yet appropriate for a healthcare setting, addressing the short nail bed concern.
How do I prevent smudging my nail art?
Patience and a quick-dry top coat are essential. Wait for each layer of polish to be at least 80% dry before adding the next. When you’re finished, apply a good quality quick-dry top coat. This not only adds shine but also helps harden the layers underneath more quickly to prevent smudging.
Is matte or glossy better for Valentine’s Day?
This is a personal style choice, as both can look stunning. A glossy top coat gives a classic, high-shine polished look that makes colors pop. A matte finish provides a modern, sophisticated, and velvety texture that can make simple designs look more intentional and elegant. A popular trend is to mix finishes, like a metallic design on a matte base.
How do you get clean lines with a striping brush?
Rest your painting hand on a stable surface to minimize shakiness. Load the brush with only a small amount of polish. Instead of moving the brush across the nail, try to hold the brush steady and pull your finger away from it. This professional tip uses a larger motion to create a straighter, cleaner line.
Final Thoughts on Your Simple Valentine’s Day Manicure
Creating simple Valentine’s Day nails at home should be a fun act of self-care rituals, not a stressful one. As we’ve shown in these 11 easy ideas, you don’t need to be a professional manicurist or have a drawer full of complicated tools to achieve a beautiful and festive look. From a single, elegant heart to a playful glitter gradient, the key is to embrace simplicity and have fun with it.
By using basic tools like toothpicks and sponges, and mastering a few simple techniques, you can create a valentines manicure that is uniquely yours. Whether you’re working with short natural nails or just have limited time, these designs prove that a little creativity goes a long way. Remember to focus on a good base and a quality top coat, and your at-home manicure will look polished and professional. For more tips on keeping your nails healthy, be sure to check out our complete guide to a perfect nail care routine.
Now you have the inspiration and the know-how. Which one of these simple Valentine’s Day nail ideas will you try first? Let us know in the comments below
Last update on 2026-04-13 / Affiliate links / Images from Amazon Product Advertising API